Table of Contents
Intro
For a while now i wanted to use my Android phone as a mobile (wireless) pentesting device. Unfortunately most tutorials online we’re either incomplete, outdated or just didn’t work. So I’ve decided to write my own tutorial which should work on any unlocked and rooted Android phone.
Update
If you prefer not to build the entire ROM yourself but only the kernel, have a look at this post. It guides you through with easy to follow steps.
Requirements
In order to get this up and running you need two things. A ROM (or kernel) with the correct modules (drivers) installed, and a wireless chip that supports monitor mode. A few chips that support monitor mode are:
- Atheros AR9271
- MediaTek MT7601u
- Ralink RT3070
- Ralink RT3572
- Ralink RT5370
- Ralink RT5572
- Realtek RTL8812AU
- Realtek RTL8189FTV
- Many others
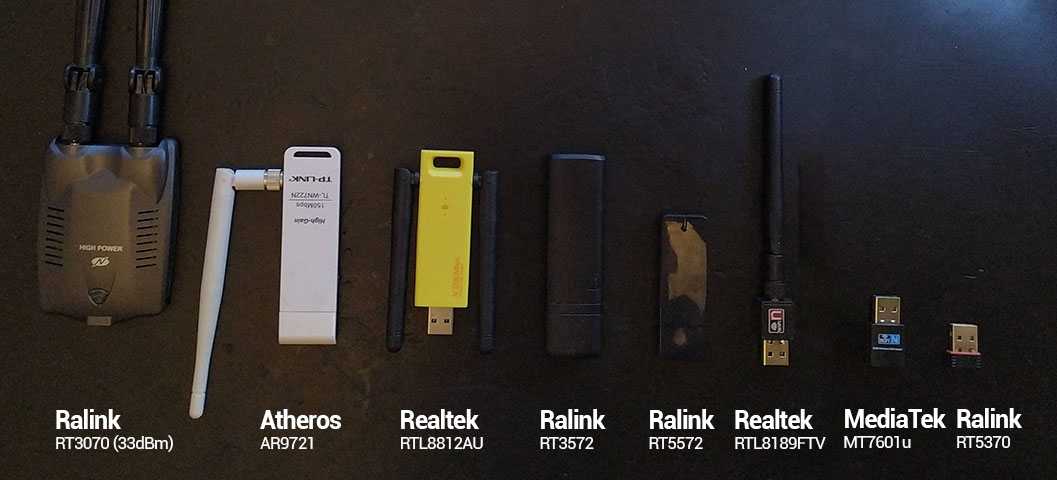
In this tutorial i’m going the use the MediaTek MT7601u from AliExpress.
If you have the same phone as me (Xiaomi Redmi Note 7 / Lavender) you can download my ROM @ AndroidFileHost here.
The ROM built process
Dependencies
I’m using Ubuntu 18.04 in this tutorial. Either you have it running bare metal or you’ve installed it in a VM.
sudo apt update && apt upgrade -yThen we need to install some dependencies for building an Android repo
sudo apt install bc bison build-essential ccache curl flex g++-multilib \
gcc-multilib git gnupg gperf imagemagick lib32ncurses5-dev \
lib32readline-dev lib32z1-dev liblz4-tool libncurses5-dev libsdl1.2-dev \
libssl-dev libwxgtk3.0-dev libxml2 libxml2-utils lzop pngcrush rsync \
schedtool squashfs-tools xsltproc zip zlib1g-dev python
Repo download
Now download and install the repo binary
mkdir ~/bin
curl https://storage.googleapis.com/git-repo-downloads/repo > ~/bin/repo
chmod a+x ~/bin/repo
Add ~/bin to PATH. Edit ~/.profile. Add the following
# set PATH so it includes user's private bin if it exists
if [ -d "$HOME/bin" ] ; then
    PATH="$HOME/bin:$PATH"
fi
Followed by a:
source ~/.profileDownload the Pixel-Experience repo . This is going to take a while depending on your internet connection
mkdir pixel-experience && cd pixel-experience
repo init -u https://github.com/PixelExperience/manifest -b ten
repo sync -c -j$(nproc --all) --force-sync --no-clone-bundle --no-tags
Device and vendor tree
After it finishes. Download the device/vendor tree and kernel for your device. (mine is xiaomi redmi note 7- lavender)
export USE_CACHE=1
ccache -M 50G
. build/envsetup.sh
lunch aosp_lavender-userdebug
Kernel modification
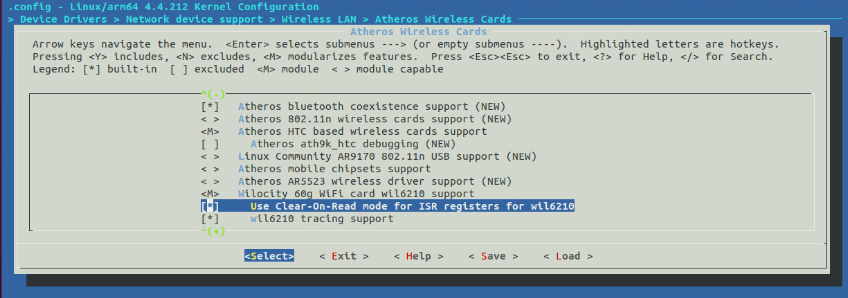
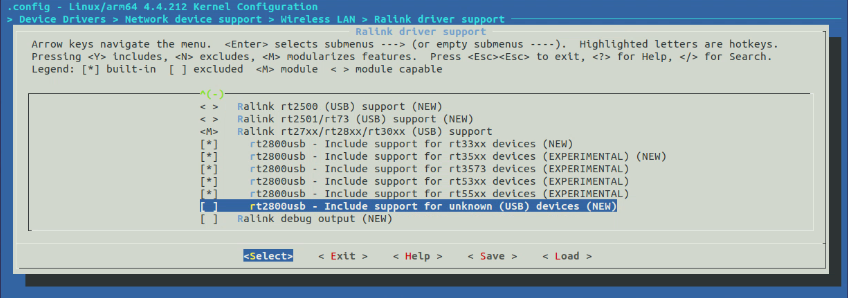
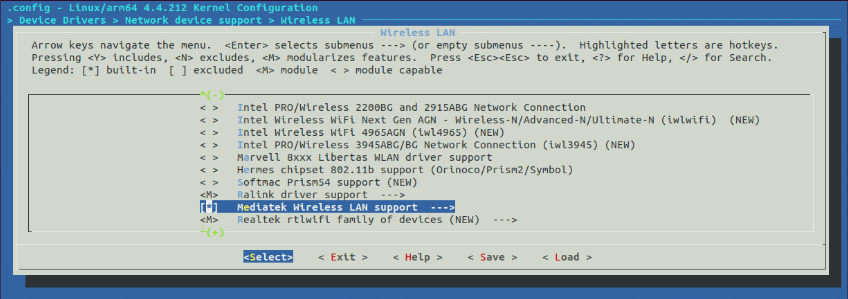
Now we have to modify the kernel config in order to add support for additional wireless cards.
cd kernel/xiaomi/lavender
export ARCH=arm64
make lavender-perf_defconfig
make menuconfig
In menuconfig add/modify the following items:
Enable loadable module support
- Enable loadable module support
- Module versioning support (deselect)
- Source checksum for all modules (deselect)
- Module signature verification (deselect)
This is done because if we need to add another module later (kernel only build / make modules) it won’t complain about module signing.

Enable mac80211 and cfg80211 support.
- Networking support
- Wireless
- cfg80211 – wireless configuration API (buit-in select)
- Generic IEEE 802.11 Networking Stack (mac80211) (module select)
- Wireless

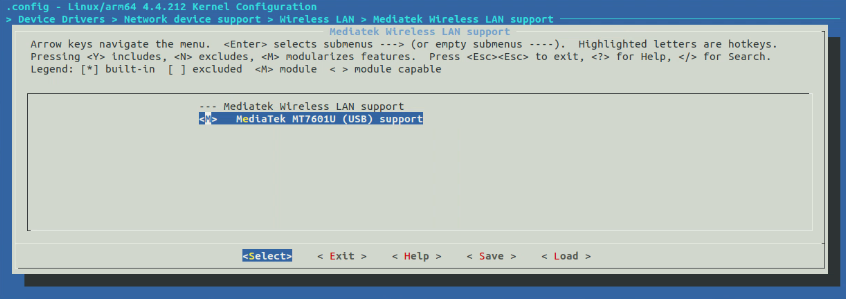
Enable Wireless Lan device support
- Device Drivers
- Network device support
- Wireless LAN
- Select wireless lan drivers you need (module select)
- Wireless LAN
- Network device support
I’ve added Atheros HTC (ath9k-htc) support

Ralink (rt30xx) support

And Mediatek (mt7601u) support
Now exit and save config and copy the .config to the kernel config location of Pixel-Experience. Again mine is lavender.
cp .config arch/arm64/configs/lavender-perf_defconfigWe need to run a make mrproper for cleaning up the kernel source
make clean && make mrproperModule edit
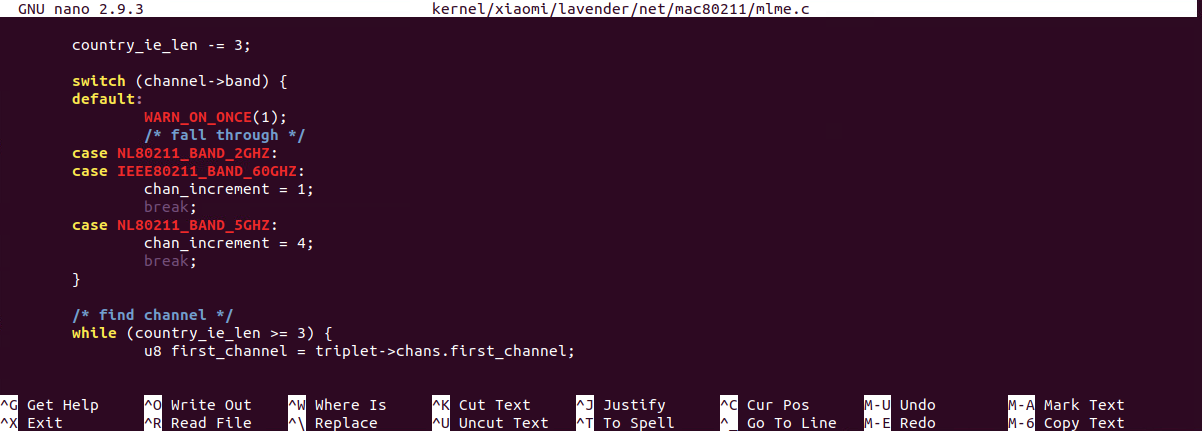
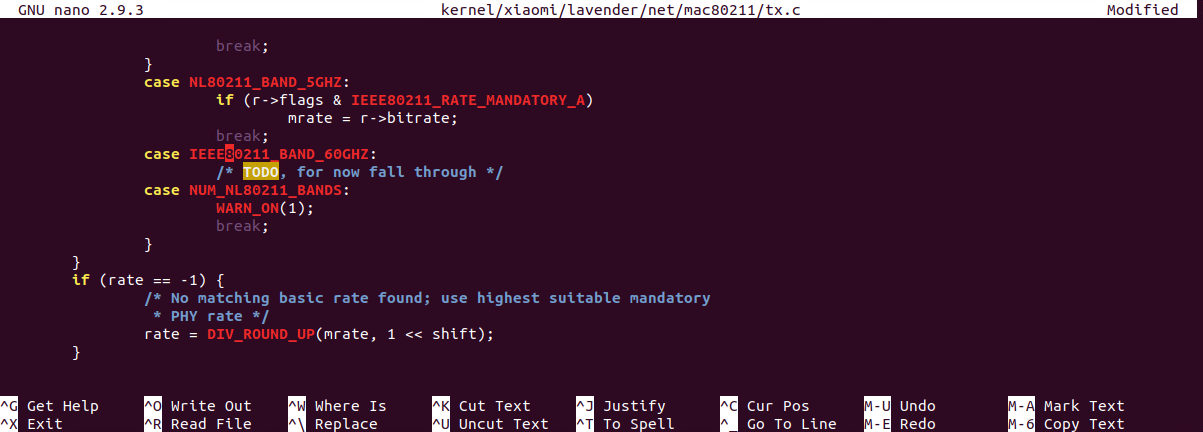
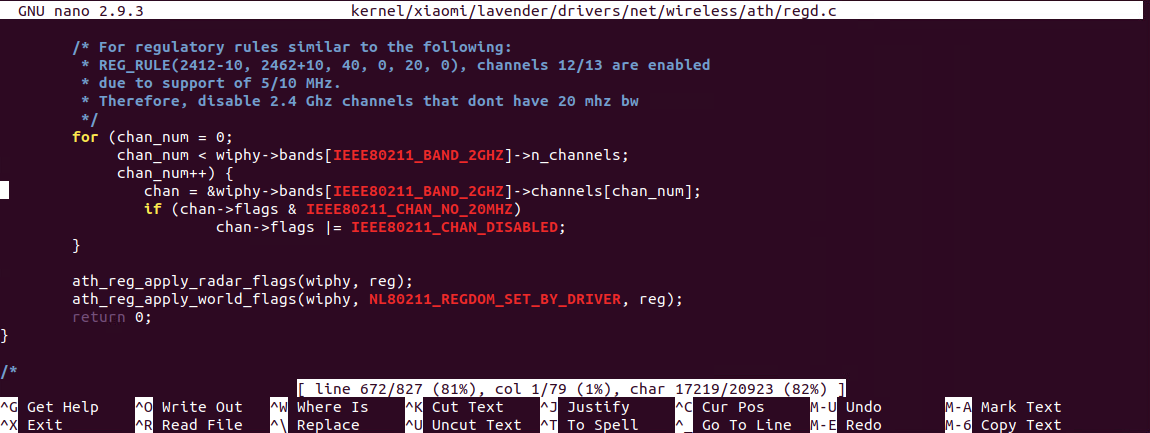
Next we need to modify three files, otherwise the mac80211 and atheros modules will fail to build. Which are:
- kernel/xiaomi/lavender/net/mac80211/mlme.c
- kernel/xiaomi/lavender/net/mac80211/tx.c
- kernel/xiaomi/lavender/drivers/net/wireless/ath/regd.c
MAC80211
kernel/xiaomi/lavender/net/mac80211/mlme.c
On line 1343 replace IEEE80211_BAND_60GHZ with NL80211_BAND_60GHZ

kernel/xiaomi/lavender/net/mac80211/tx.c
On line 167 replace IEEE80211_BAND_60GHZ with NL80211_BAND_60GHZ

Atheros
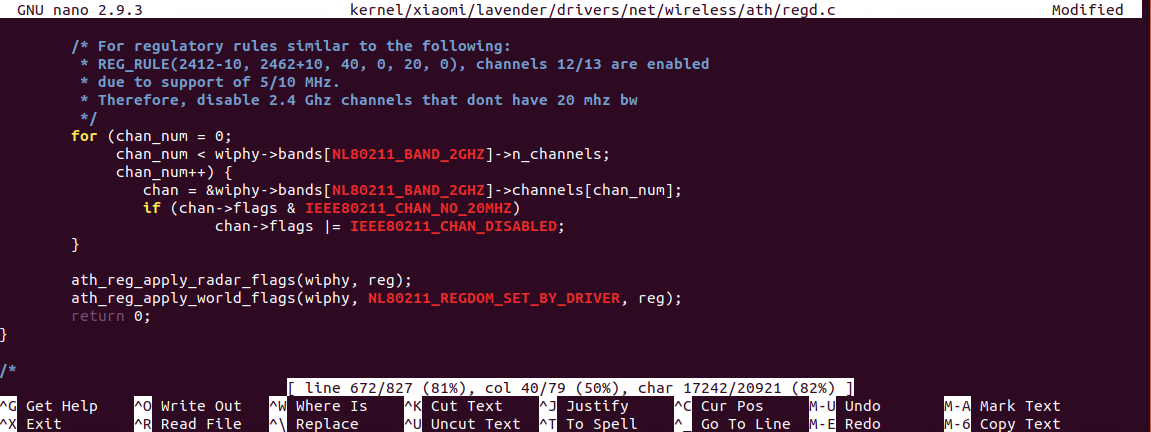
kernel/xiaomi/lavender/drivers/net/wireless/ath/regd.c
On line 670 and 672 replace IEEE80211_BAND_2GHZ with NL80211_BAND_2GHZ
Built the ROM
Now we can build the ROM for flashing onto the phone. This can take a long time depending on your processor. On my AMD 3700x it took 45 minutes.
Start the build in the root of the Pixel-Experience directory with:
mka bacon -j$(nproc --all)After the build finishes successfully you should have a ROM zip in your output directory.
ls out/target/product/lavender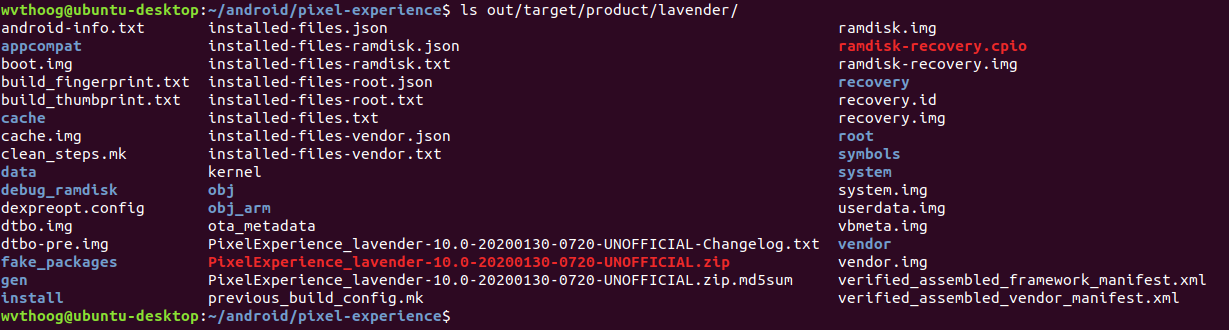
Flash the ROM
Now we can flash this ROM and Magisk (root app) onto the phone. Assuming the phone has an unlocked bootloader and TWRP recovery installed.
- Power off the phone
- Hold volume-up + power
- TWRP boots
- Go to: Wipe
- Swipe to Factory Reset
- Format Data -> Yes
- Go to: Advanced
- ADB Sideload
- Select wipe cache & dalvik
- Slide to start ADB Sideload
- ADB Sideload
- On the PC side go to the directory of the newly created ROM
- Type: adb sideload PixelExperience_lavender_10.0-20200130-0720-UNOFFICIAL.zip
- When ROM installation finishes go back and sideload Magisk
- Type: adb sideload Magisk.zip
- Now reboot the phone
- First boot could take some time. Be patient
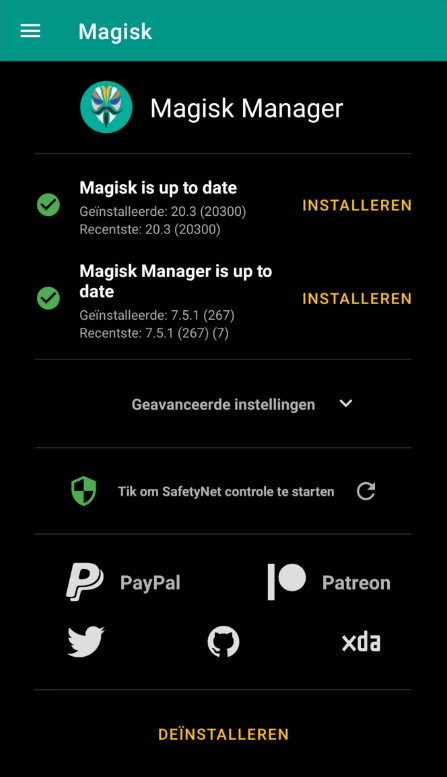
Magisk
After the phone boots go through the usual setup (wifi, google account etc) then go to magiskmanager.com to download and install Magisk Manager.
Termux
So what we’ve achieved so far is that we have a rooted Android phone with the proper modules installed. Next we need to install Termux and the Kali Nethunter chroot to take advantage of the huge pentesting software collection Kali offers. Although i’m only going to use Wifite and Bettercap in this example.
Install Termux through the Google Playstore and start it up
In Termux first update
pkg updateThen install the root-repo
pkg install root-repoLoad the modules
Now we can load the wireless modules
tsudo /system/bin/modprobe -d /vendor/lib/modules/ ath9k-htc
tsudo /system/bin/modprobe -d /vendor/lib/modules/ mt7601u
To load the modules at Termux startup create a script called m.sh
pkg install nano
nano m.sh
Insert the following code into m.sh
#!/bin/bash

export PATH=&PATH:/system/bin/

modules="/vendor/lib/modules/"

tsudo modprobe -d $modules ath9k-htc
tsudo modprobe -d $modules rt2800usb
tsudo modprobe -d $modules mt7601u
Make m.sh executable and edit bashrc
chmod +x m.sh
nano ~/.bashrc
Add this line to bashrc
bash m.shKali
Now that module loading is setup correctly we can proceed to download Kali Nethunter installer script
curl -LO https://raw.githubusercontent.com/Hax4us/Nethunter-In-Termux/master/kalinethunterInstall Kali Nethunter
chmod +x kalinethunter
./kalinethunter
Start Kali Nethunter
tsudo startkaliApt update & upgrade
apt update && apt upgrade -yWifite
After upgrading Kali we’re ready to proceed to install Wifite. If you’re not familiar with Wifite it’s a handy tool to probe surrounding wireless networks with different kinds of attack.
- PMKID – Clientless WPA PSK capture
- WPA – Standard deauth PSK capture
- WPS – Pixiedust/Bully WPS attack
- WEP – Weak IV’s
- etc
apt install wifite bully pyrit macchanger hcxtools hcxdumptoolRun Wifite.
wifite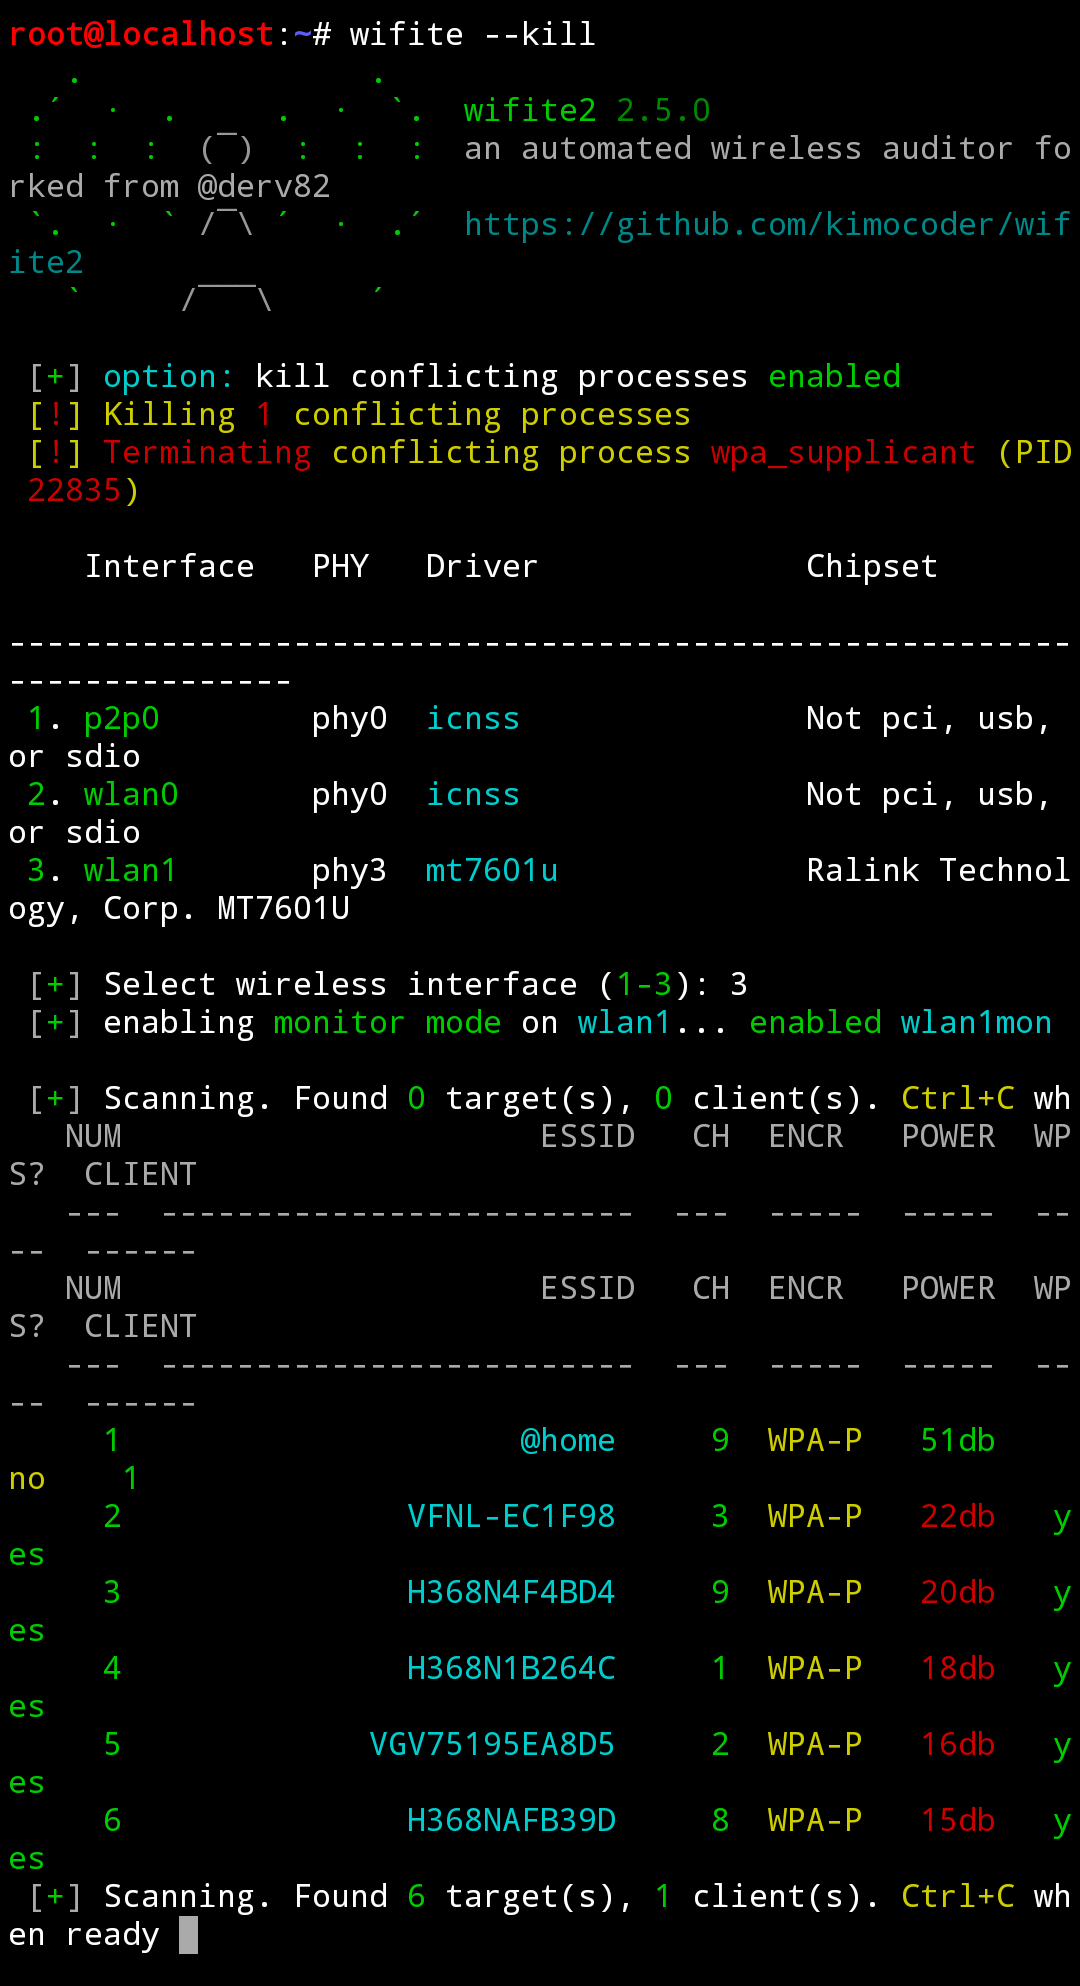
Bettercap
Optionally you can install Bettercap. Bettercap is the swiss army knife when is comes to (wireless) networks and has a neat mass deauth script. (which captures handshakes)
apt install bettercap bettercap-ui bettercap-capletsRun Bettercap
bettercap -iface wlan1 -caplet http-uiOn your phone point your browser to: http://127.0.0.1
In the caplets tab on top of your screen there is a caplet called “mass-deauth”. Select it and click on the “play button”
Bettercap will start to search for wireless networks and it’s clients and capturing handshakes by deauthing all of them.
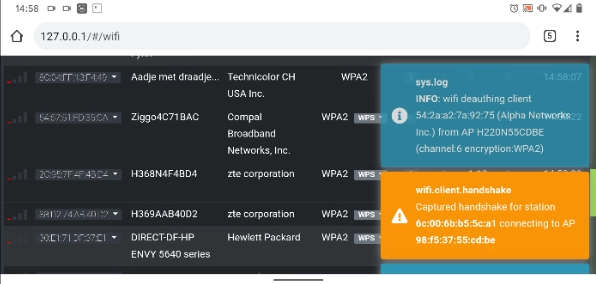
Captured handshakes will be stored in the hs directory. Convert these cap files to hccapx with cap2hccapx for use with Hashcat.
So that’s it. A fully functioning mobile pentesting device built with your own ROM.
PayPal
If you like my work, please support me
[wpedon id=3869]