
Intro
It was time to upgrade my old Redmi Note 7 with a new Redmi Note 10 Pro. Like the old phone, installed my favorite ROM Pixel Experience on it because i love the clean and intuitive appearance without the bloatware from Xiaomi. Plus Kali Nethunter installed on top for mobile pentesting purposes.
Table of Contents
Pixel Experience
Download my ROM
You can build it yourself using the guide below or just download my pre-built ROM. This ROM has all the features enabled Kali Nethunter suggests and has module support for a lot of WiFi, Bluetooth and SDR devices.
A PixelOS 13 ROM is now also available
Included:
▪ VantomKernel
▪ AOSP-Playground device and vendor tree
▪ MIUI Camera
▪ Google Photo backup in original quality
▪ Many wireless, sdr, bluetooth and usb (gagdet) modules
Skip to chapter Install the ROM if you just want to install the Kali Nethunter ROM without building it yourself.
Please keep in mind that i’m NOT responsible for bricking your phone. This procedure is done entirely at your own risk.
Build the ROM yourself
Platform Tools
Download adb and fastboot from Google and unzip
wget https://dl.google.com/android/repository/platform-tools-latest-linux.zip
unzip platform-tools-latest-linux.zip -d ~
Add the following to ~/.profile
# add Android SDK platform tools to path
if [ -d "$HOME/platform-tools" ] ; then
    PATH="$HOME/platform-tools:$PATH"
fi
Install Git
sudo apt install gitGit clone the following script and execute
cd ~/
git clone https://github.com/akhilnarang/scripts
cd scripts
./setup/android_build_env.sh
Repo
Create these directories
mkdir -p ~/bin
mkdir -p ~/android/pe
Install Repo
curl https://storage.googleapis.com/git-repo-downloads/repo > ~/bin/repo
chmod a+x ~/bin/repo
Add ~/bin to Path
# set PATH so it includes user's private bin if it exists
if [ -d "$HOME/bin" ] ; then
    PATH="$HOME/bin:$PATH"
fi
Update ~/.profile
source ~/.profileConfigure Git
git config --global user.email "[email protected]"
git config --global user.name "Your Name"
Initialize the Pixel Experience repository
cd ~/android/pe
repo init -u https://github.com/PixelExperience/manifest -b eleven-plus
Download the source. This could take a long time depending on your internet connection.
repo sync -c -j$(nproc --all) --force-sync --no-clone-bundle --no-tagsDownload the device specific sources like kernel and device tree
source build/envsetup.sh
lunch aosp_sweet-userdebug
Edit kernel config
Add kernel features and modules. In a new terminal browse to the kernel source
cd kernel/xiaomi/sm6150Edit the kernel configuration
export ARCH=arm64
make sweet_user_defconfig
make menuconfig
For Kali Nethunter to optimally function we need to enable a few kernel features and add some modules. Enable them by following the guide below or download my config. Unzip the config and place it in the configuration directory of the kernel (kernel/xiaomi/sm6150/arch/arm64/configs/)
General Setup
In General Setup
- clear “Local version”
- select “System V IPC” (CONFIG_SYSVIPC=y)
Loadable Module Support
In Enable loadable module support
- Enable “loadable module support” (CONFIG_MODULES=y):
- select “Module unloading” (CONFIG_MODULE_UNLOAD=y)
- select “Module versioning support” (CONFIG_MODULE_UNLOAD=y)
- select “Forced module unloading” (CONFIG_MODULE_FORCE_UNLOAD=y)
Bluetooth
In Networking support -> Bluetooth subsystem support -> Bluetooth device drivers
- select “HCI USB driver” (CONFIG_BT_HCIBTUSB=m)
- select “Broadcom protocol support” (CONFIG_BT_HCIBTUSB_BCM=y)
- select “Realtek protocol support” (CONFIG_BT_HCIBTUSB_RTL=y)
- select “HCI UART driver” (CONFIG_BT_HCIUART=m)
- select “HCI BCM203x USB driver” (CONFIG_BT_HCIBCM203X=m)
- select “HCI BPA10x USB driver” (CONFIG_BT_HCIBPA10X=m)
- select “HCI BlueFRITZ! USB driver” CONFIG_BT_HCIBFUSB=m)
MAC80211
In Networking support -> Wireless
- select “cfg80211 wireless extensions compatibility” (CONFIG_CFG80211_WEXT=y)
- select “Generic IEEE 802.11 Networking Stack (mac80211)” (CONFIG_MAC80211=m)
- select “Enable mac80211 mesh networking (pre-802.11s) support” (CONFIG_MAC80211_MESH=y)
Ethernet
In Device Drivers -> Network Device Support -> USB Network Adapters
- select “USB RTL8150 based ethernet device support” (CONFIG_USB_RTL8150=m)
- select “Realtek RTL8152/RTL8153 Based USB Ethernet Adapters” (CONFIG_USB_RTL8152=m)
SDR
In Device Drivers -> Multimedia support
- select “Digital TV support” (CONFIG_MEDIA_DIGITAL_TV_SUPPORT=y)
- select “Software defined radio support” (CONFIG_MEDIA_SDR_SUPPORT=y)
Deselect at the bottom of the page
- Autoselect ancillary drivers (tuners, sensors, i2c, spi, frontends) (CONFIG_MEDIA_SUBDRV_AUTOSELECT=n)
In Device Drivers -> Multimedia support-> Customize TV tuners
Deselect all, except these
- select “Realtek RTL2830 DVB-T” (CONFIG_DVB_RTL2830=m)
- select “Realtek RTL2832 DVB-T” (CONFIG_DVB_RTL2832=m)
- select “Realtek RTL2832 SDR” (CONFIG_DVB_RTL2832_SDR=m)
- select “Silicon Labs Si2168” (CONFIG_DVB_SI2168=m)
- select “ZyDAS ZD1301” (CONFIG_DVB_ZD1301_DEMOD=m)
In Device Drivers -> Multimedia -> DVB/ATSC adapters -> Customize DVB Frontends
- select “AirSpy” (CONFIG_USB_AIRSPY=m)
- select “HackRF” (CONFIG_USB_HACKRF=m)
- select “Mirics MSi2500” (USB_MSI2500=m)
USB Modem
in Device Drivers -> USB support
- select USB Modem (CDC ACM) support (CONFIG_USB_ACM=y)
USB Gadget
In Device Drivers -> USB support -> USB Gadget Support
- select “Generic serial bulk in/out” (CONFIG_USB_CONFIGFS_SERIAL=y)
- select “Abstract Control Model (CDC ACM)” (CONFIG_USB_CONFIGFS_ACM=y)
- select “Object Exchange Model (CDC OBEX)” (CONFIG_USB_CONFIGFS_OBEX=y)
- select “Network Control Model (CDC NCM)” (CONFIG_USB_CONFIGFS_NCM=y)
- select “Ethernet Control Model (CDC ECM)” (CONFIG_USB_CONFIGFS_ECM=y)
- select “Ethernet Control Model (CDC ECM) subset” (CONFIG_USB_CONFIGFS_ECM_SUBSET=y)
- select “RNDIS” (CONFIG_USB_CONFIGFS_RNDIS=y)
- select “Ethernet Emulation Model (EEM)” (CONFIG_USB_CONFIGFS_EEM=y)
- select “Mass Storage” (CONFIG_USB_CONFIGFS_MASS_STORAGE=y)
Wireless LAN
In Device Drivers -> Network Device Support -> Wireless LAN
Atheros
- select “Atheros/Qualcomm devices” (CONFIG_WLAN_VENDOR_ATH=y)
- select “Atheros HTC based wireless cards support” (CONFIG_ATH9K_HTC=m)
- select “Linux Community AR9170 802.11n USB support” (CONFIG_CARL9170=m)
- select “Atheros mobile chipsets support” (CONFIG_ATH6KL=m)
- select “Atheros ath6kl USB support” (CONFIG_ATH6KL_USB=m)
MediaTek
- select “MediaTek devices” (CONFIG_WLAN_VENDOR_MEDIATEK=y)
- select “MediaTek MT7601U (USB) support” (CONFIG_MT7601U=y)
Ralink
- select “Ralink devices” (CONFIG_WLAN_VENDOR_RALINK=y)
- select “Ralink driver support” (CONFIG_RT2X00=m)
In Ralink driver support enable
- select “Ralink rt2500 (USB) support” (CONFIG_RT2500USB=m)
- select “Ralink rt2501/rt73 (USB)”*** (CONFIG_RT73USB=m)
- select “Ralink rt27xx/rt28xx/rt30xx (USB)” (CONFIG_RT2800USB=y)
- select “rt2800usb – Include support for rt33xx devices” (CONFIG_RT2800USB_RT33XX=y)
- select “rt2800usb – Include support for rt35xx devices” (CONFIG_RT2800USB_RT35XX=y)
- select “rt2800usb – Include support for rt3573 devices” (CONFIG_RT2800USB_RT3573=y)
- select “rt2800usb – Include support for rt53xx devices” (CONFIG_RT2800USB_RT53XX=y)
- select “rt2800usb – Include support for rt55xx devices” (CONFIG_RT2800USB_RT55XX=y)
- select “rt2800usb – Include support for unknown (USB)” (CONFIG_RT2800USB_UNKNOWN=y)
Realtek
- select “Realtek devices” (CONFIG_WLAN_VENDOR_REALTEK=y)
- select “Realtek 8187 and 8187B USB support” (CONFIG_RTL8187=m)
- select “Realtek rtlwifi family of devices” (CONFIG_RTL_CARDS=m)
- select “RTL8723AU/RTL8188[CR]U/RTL819[12]CU (mac80211) support” (CONFIG_RTL8192CU=m)
- select “Include support for untested Realtek 8xxx USB devices” (CONFIG_RTL8XXXU_UNTESTED=y)
Others
- select “ZyDAS devices” (CONFIG_WLAN_VENDOR_ZYDAS=y)
- select “USB ZD1201 based Wireless device support” (CONFIG_USB_ZD1201=m)
- select “ZyDAS ZD1211/ZD1211B USB-wireless support” (CONFIG_ZD1211RW=y)
- select “Wireless RNDIS USB support” (CONFIG_USB_NET_RNDIS_WLAN=m)
Save and exit out of menuconfig and copy the new configuration to the kernel config
cp .config arch/arm64/sweet_user_defconfigFor good practice do a make mrproper in the root of the kernel directory
make mrproperBuild the ROM
Turn cache on
export USE_CCACHE=1
export CCACHE_EXEC=/usr/bin/ccache
ccache -M 50G
Start the build process
mka bacon -j$(nproc --all)Install the ROM
Before flashing anything onto the phone, we first need to unlock the bootloader. Xiaomi applies a ‘delay’ period between applying for the unlock procedure and actually being able to unlock the bootloader of 168 hours. (7 days) So you will have to wait one week before unlocking.
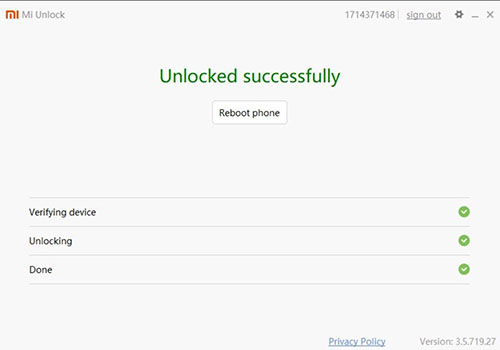
- Place a SIM card in the phone and disable WiFi
- Go to Settings → About Phone → Tap MIUI version 5 times to enable Developer Options.
- Next go Settings → Additional settings → Developer Option.
- In Developer Option → Turn on the toggle button OEM Unlocking and USB debugging options.
- Turn on your mobile data. You have to turn on mobile data from the same SIM from which you have created your Mi account.
- Tap on Mi Unlock status. And then hit the Agree button.
- After that, you have to tap on “Add Account and Device“.
- Make sure that you have a balance on your SIM. and avoid warning message on your screen.
- Then, Power off your phone.
- Once done, boot your phone into the Fastboot mode. Press Volume Down and Power Button simultaneously for a couple of seconds.
OrangeFox Recovery
Download OrangeFox or TWRP. Boot the phone into fastboot mode by holding down the volume button and simultaneously pressing the power button. Connect the phone to the computer using an usb cable and launch
fastboot flash recovery recovery.imgBoot into recovery mode by powering off the phone and hold down the volume up key together with the power button. Or use the fastboot method
fastboot reboot recoveryPixel Experience
In OrangeFox first wipe the phone clean by going to the Wipe tab and tapping on Advanced Wipe. Type “yes” to start the wiping process. After that go to Files and search for the Pixel Experience zip file we’ve previously created or downloaded and select “Swipe to install”
Magisk
Navigate to Magisk and download the latest flashable zip and copy it onto the phone
Bootup the phone and install the Magisk Manager App
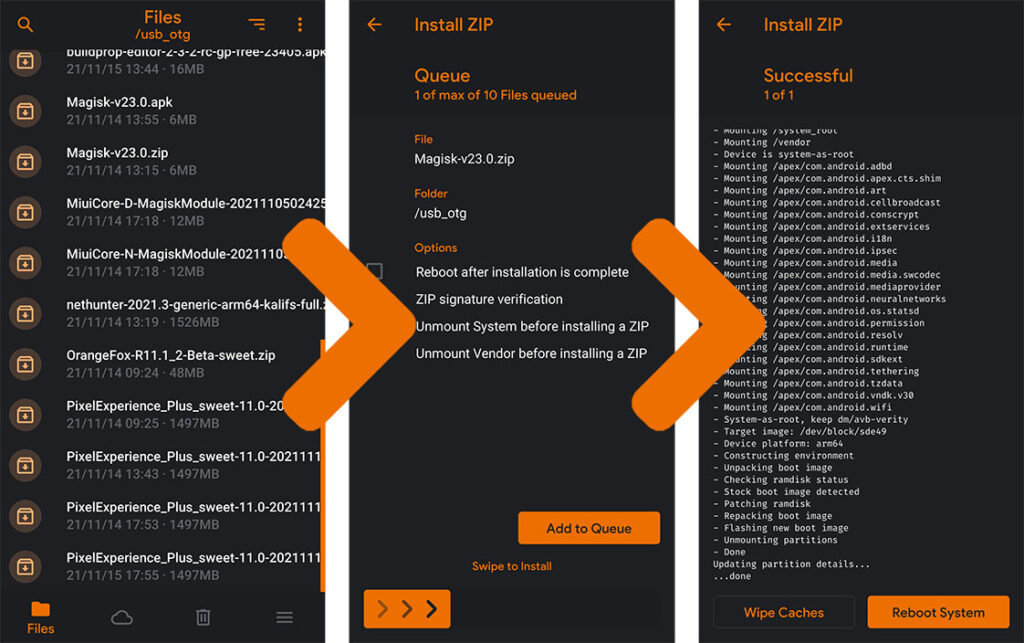
After flashing Magisk. Reboot the phone and head over to Magisk Manager
Install Wireless Firmware for Nethunter
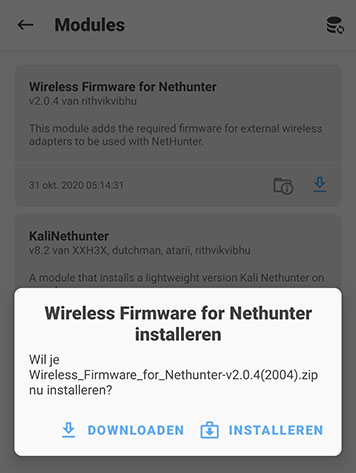
For the wireless modules to be used by Nethunter we need something called wireless firmware. This Magisk module will install the firmware for the following devices:
- Ralink – RT2501, RT2501USB, RT2561, RT2561S, RT2571W, RT2600, RT2661, RT2671, RT2760, RT2790, RT2860, RT2870, RT2890, RT3070, RT3071, RT3090, RT3290, RT5201, RT5600
- Realtek – RTL8188* (EU/FTV), RTL8192* (CU/EU/DE/SE), RTL8821/12* (AE/AU/BU), RTL8822BU
- Atheros – AR9170, AR7010
- Mediatek – MT7601u
- Broadcom – bcm43xx (not tested), BRCM4335, BRCM4339, BRCM4354
Go to Magisk and in the modules tab search for “Wireless Firmware for Nethunter” and hit install.
Kali Nethunter
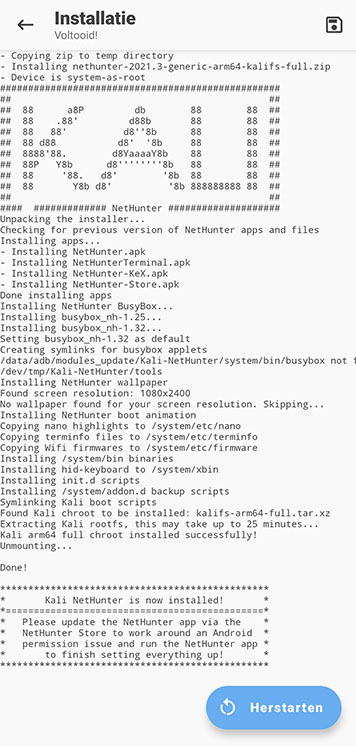
After installing the wireless firmware we can proceed to install Kali Nethunter.
Navigate to Kali and download the latest Generic ARM64 Nethunter zip file. Open Magisk Manager and select the Modules tab. From there click on install from storage and select the Kali Nethunter zip file you’ve previously downloaded.
This install could take a while since the full Kali chroot is going to be installed. After the install finishes hit Reboot.
Use the ROM
By selecting this ROM i’m guessing you know what you’re doing. But here are some pointers anyway.
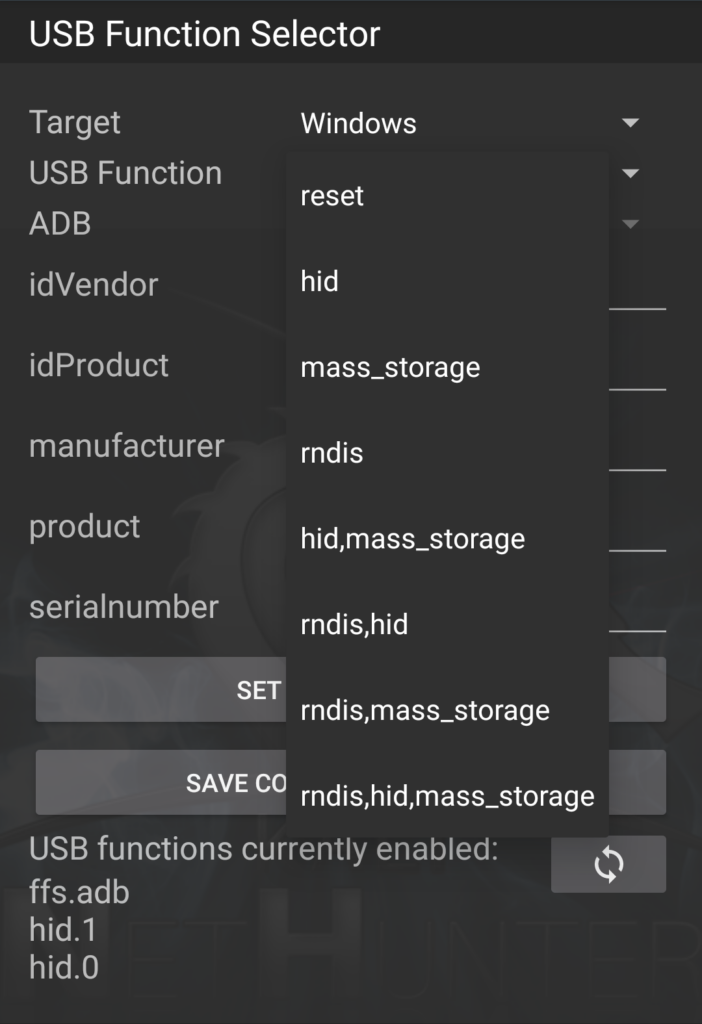
HID
HID support is enabled in the kernel, but you have so set the USB mode when connected in order to get it working. Launch the Nethunter app and head over to USB Arsenal
Here you can set the USB function. Select the Target (OS) and USB Function and hit SET USB FUNCTION. You’ve got a couple of options to set for USB Function.
- reset – reset usb
- hid – set usb to hid (Keyboard / Rubber Ducky attack etc)
- mass_storage – set usb to mass storage
- rndis – set usb to be used as a (4G/5G) tether
- hid,mass_storage
- rndis,hid
- rndis,mass_storage
- rndis,hid,mass_storage
Wifi
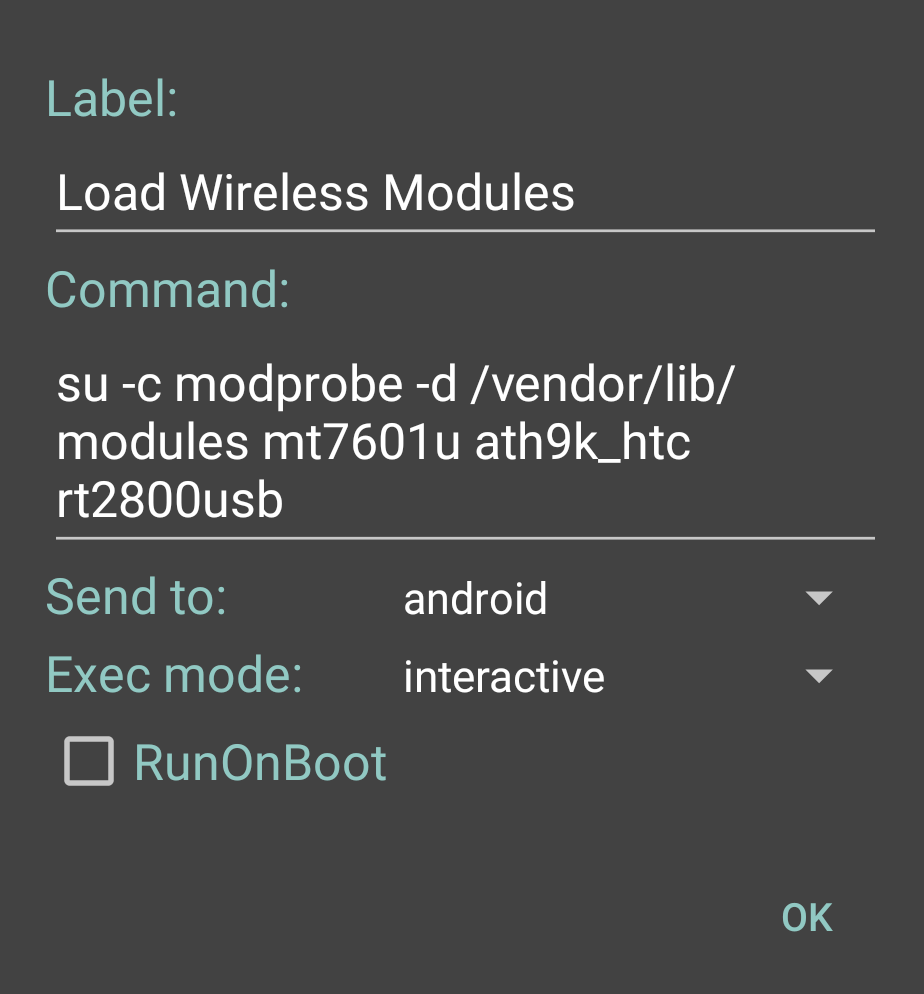
I’m using Custom Commands for loading modules i frequently use. Launch the Nethunter app and head over to Custom Commands. There we’ll create a command that will load the Wireless modules we need. (In this example: mt7601u, ath9k_htc and rt2800usb) Just create a new custom command and edit is like so
Bluetooth
Do the same for loading the Bluetooth module
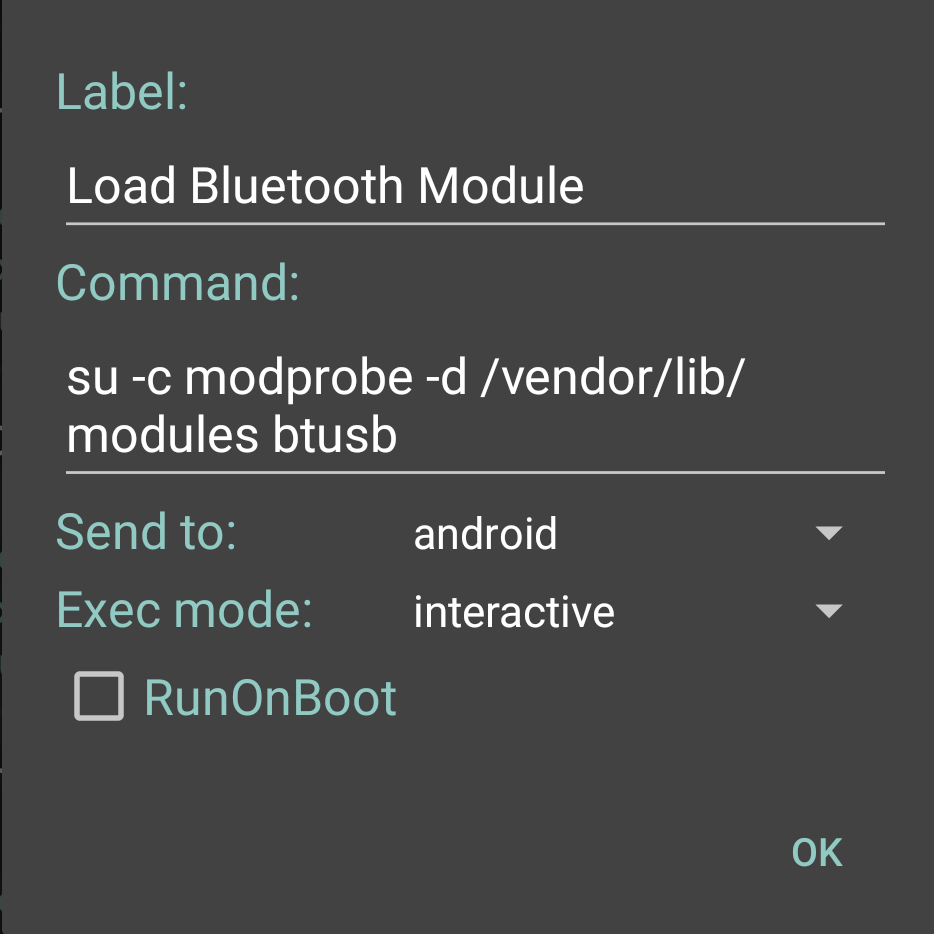
Any other modules you’d like to add can be loaded the same way if you intent to use them often. Otherwise loading a module from the Android terminal will work just as well. (su -c modprobe -d /vendor/lib/modules <package name>)
SDR
Other SDR modules you could load for example
- SDR
- airspy
- hackrf
- rtl2830
- rtl2832
- zd1301_demod
- si2168
Optional
Keychain
From AliExpress I’ve bought a USB type C OTG adapter together with a Ralink mt7601u. Bonded them together with a bit of shrink rap. And voila, a key-chain wireless adapter for Nethunter.

GPU Acceleration
So you’re using Wifite to crack WPA hashes and your phone isn’t cutting it. Then take a loot at this post if you want the power of a (Nvidia) GPU in the field
Finished
Happy hunting !
PayPal
If you like my work, please consider supporting.


Isn’t there a kernel which I can flash on any aosp ROM ,directly without building acustom ROM every time I decide to update it,
And thank you for your usefull blog.
You should be able to build a flashable zip for any AOSP ROM by extracting the Image-gz.dtb and modules. See these steps: https://wvthoog.nl/mobile-pentesting-android-11-update/#AnyKernel3
Will this unofficial pixel experience built get updates
No OTA updates for the ROM have been built in. So no. While having said that, i have seen some security updates been pushed to the device.
Building a new PixelOS ROM and planning to host my own OTA server. Stay tuned.
Because ,I’m new to this
I won’t be able to do that
So what about flashing this rom , rooting it
and make a backup of kernels by an app called flashify
Will this work
Think it’s easier to just flash the boot.img (which contains the kernel and the modules) with TWRP or Orange Fox recovery. I can extract the boot.img and make it available for download.
I read about something called arb
(anti-rollback) should I be afraid of ?
Or I can just flash what ever rom I want ?
Thank you very much for your help.
Yeah read about that as well. Didn’t have any problems unlocking my bootloader and flashing this ROM. But i immediately upgraded to PE without updating Xiaomi’s ROM
Can I flash this boot.img in orangefox just as flashing a kernel ?
I have the zip file I think I can extract it.
Yes, you have to select flash image instead of zip. Then select the boot.img and flash it to the boot partition
Thank you
I successfully installed your rom but
I noticed that screen blinks alot
Is there something like that happened with you
You installed (only) the kernel right ? (boot.img) I don’t have that issue with the full installation of the ROM. But maybe you can ‘play’ with the herz settings of the screen. I’m running at 120Hz
I installed the whole rom
Mail me using the form in the About Me page. Let me see what i can do
I mean flickering
Will system encryption affect nethunter
Don’t know actually. But Nethunter is a chroot environment, so i doubt it will be affected.
Hello , sur
Could you please advise me a wireless adapter to buy
I think to buy tp-link tl-lwn772n adapter ,
But I think that rtl8188eus driver didn’t included in this artcle ,?
The original (v1) TP-Link TL-WN722N (Atheros based) is one of the best adapters with an external antenna. If you’d want something to hang of a key-chain, go for a Mediatek MT7601u.
You are correct about the RTL8188EUS. I haven’t included it since it doesn’t offer a native kernel module.
Thank you,sir
Is there any another supported cheap adapter in this rom, because I can’t find v1 in my country ,
Just buy them of AliExpress. Search for one of these supported chipsets
-Atheros AR9170
-MediaTek MT7601U
-Ralink rt2500
-Ralink rt2501/rt73
-Ralink rt27xx/rt28xx/rt30xx
-Realtek 8187 and 8187B
-Realtek RTL8723AU/RTL8188[CR]U/RTL819[12]CU
-Realtek 8xxx
Rtl8821au does support
Hello,sir
I have a question
Do these drivers stored on the kernel of this builded rom ?
The ROM has the drivers included as modules. So yes
thank for great job
how i can include tp-link tl 722n v3 driver with monitor mode support
because its only available for me
and can enable monitor mode on built-in antinna ?
Hello,sir
Do you still usong this rom ?
Yes i am
Good tutorial, congrats.
I’ve always used a kali kernerless installation though (after installing the custom kernel I mean), your approach seem to be equally effective but I wonder if there’s any downside with installing the full generic ROM instead of a custom rom with no kernel. I’ve also normally used TWRP for this matter instead of Magisk.
But overall yeah, you nailed it.
The downside would be that installing the generic Nethunter ROM would lack kernel modifications and modules (wifi, bluetooth and sdr) that Kali suggests.
I can’t find any supported adapters in my country , all is tl wn722n v3 ,
Can you give me a suggestion ?
MediaTek MT7601U, it’s cheap and readily available
what about tl wn822n v5 ,with rtl8192eu chipset ?
Yep, that chip would work as well
pls help
when i do “mka bacon -j$(nproc –all)” a see
[ 0% 2/325] including out/soong/Android-aosp_sweet.mk …
FAILED:
In file included from build/make/core/main.mk:437:
In file included from out/soong/Android-aosp_sweet.mk:598551:
In file included from build/make/core/soong_cc_prebuilt.mk:49:
build/make/core/base_rules.mk:325: error: hardware/xiaomi/megvii: MODULE.TARGET.SHARED_LIBRARIES.libmegface already defined by external/faceunlock/prebuilt.
12:09:38 ckati failed with: exit status 1
try this:
unset NDK_ROOTit did not help me, please give me a ready boot.img?
here you go
OMG, thank you!, its works
1 more question, I noticed the names of adapters in the system/etc/firmare folder, but I did not find rtl8XXX is the rtl8811 adapter supported?
Yeah, you need the wireless modules (drivers). Let me gather and upload them
Ok:)
does that mean I can’t use the adapter now?
You can download the modules here.
You have to copy them over to the device under /vendor/lib/modules/
Then load them with su -c modprobe -d /vendor/lib/modules mt7601u for example for the MT7601u adapter
when i trying “su -c modprobe -d /vendor/lib/module rtl8xxxu” or rtl8xxxu.ko i see in nh terminal- Su invalid option d i deleted it and see Modprobe: FATAL module rtl8xxxu not found in directory vendor/lib/modules/4.14.180 when i try this comannd in adroid su terminal su -c modprobe -d /vendor/lib/module rtl8xxxu- Failed to load module rtl8xxxu1
Couple of things maybe causing that issue
– have you rooted the phone (Magisk)
– is the directory /vendor/lib/modules there ? Otherwise create it (root needed) and copy over the modules (*.ko files)
– try a more verbose output in AndroidSu using modprobe -v -d /vendor/lib/modules rtl8xxxu
Sorry there’s not “module” there “modules”
I have magisk rooted phone
When i try i see
:/ # modprobe -v -d /vendor/lib/modules/rtl8xxxu
mode is 0
verbose is 1
mod_dirs is: /vendor/lib/modules/rtl8xxxu
modules is:
module parameters is:
No modules given.
Usage:
modprobe [-alrqvsDb] [-d DIR] [MODULE]+
modprobe [-alrqvsDb] [-d DIR] MODULE [symbol=value][…]
Options:
-b: Apply blocklist to module names too
-d: Load modules from DIR, option may be used multiple times
-D: Print dependencies for modules only, do not load -h: Print this help
-l: List modules matching pattern
-r: Remove MODULE (multiple modules may be specified)
-q: Quiet
-v: Verbose
I have this directory vendor lib modules i deleted it and place new modules dir under your archive (modules.zip)
Ow i use this command
:/ # modprobe -v -d /vendor/lib/modules rtl8xxxu
mode is 0
verbose is 1
mod_dirs is: /vendor/lib/modules
modules is: rtl8xxxu
module parameters is:
Is this mean what module is successful loaded?
Mmmm old comand (without verbose ) works now, i don’t know what changes but thanks for your;)
I see what went wrong. There has to be a space between the directory and the module.
So /vendor/lib/modules SPACE rtl8xxxu
Verify that the module is loaded with lsmod|grep rtl
Yes, it loaded module
┌──(root㉿kali)-[~] └─# lsmod|grep rtl
rtl8xxxu 196608 0
mac80211 720896 1 rtl8xxxu
thanks, have good day
About system/etc/firmare there’s installing nh magisk wifi firmware *.bin files buttttt theres no RTL8XXXU how i can get or create it and i need it?
Which RTL adapter do you have ?
I have Selenga adapter with chipset RTL8811 and usb otg (type c)
Looks like the Magisk module I’ve used doesn’t offer a firmware for that card.
Best is to use an adapter listed on that page. You could probably add it yourself, but it’s too much hassle.
On the other hand, it seems that the 8811 uses the same firmware as the 8812 which is supported.
Don’t have such a card to test, so it’s just guessing at this point.
Can i use only rtl8xxxu.ko module or i need magisk to?
Not sure what you mean. You always need Magisk, and that driver supports these adapters: RTL8723AU/RTL8188[CR]U/RTL819[12]CU
But theres no drivers for it “*.ko “, you give us so many drivers but no rtl8723AU rtl8188CR (only AU) rtl819(12) (i dont understand what’s mean “12”)
Okay, dug a little bit deeper into this issue. But the RTL8811CU chipset is not the adapter you want. Best is to get a adapter that is supported by the Linux kernel, which i included in my ROM and modules.zip.
If you REALLY need to get that adapter running, you need to cross compile the module yourself. Here you can find a suitable driver for the RTL8811CU. But trust me, it’s better (8811CU is crap) and easier to find a compatible chipset/adapter.
I have installed your ROM , kernel and modules.zip. I need buy adapter which drivers (*.ko) and support of magisk module?
Yeah, that’s the best way to go. Find an adapter that matches the included modules.
The MediaTek MT7601 is an adapter that i use personally, which works great with the ROM
Also (if you could find one second hand since they don’t produce them anymore) the Atheros AR9271 is one of the best.
This one normally?
https://www.wildberries.ru/catalog/14775947/detail.aspx?targetUrl=MS&size=43517419
Yep, that one will work
Hi, does this tutorial works with pixelexperience 13+ ? (anyone tried?)
also, do you know if there is any driver compatible with wifi MT7612U ?
Thanks
Probably going to upgrade my ROM to 12/13 soon and find out. The MT7612U is a an excellent card for monitor/injection mode btw. But the module has to be built separately. (not included in the kernel atm)
Nice! please, provide any additional step if you face it (on the journey to 13) 🙂
i believe MT7612U is integraded on new kernels (4.16+ or 4.19+) in
“CONFIG_MT76_CORE”
https://cateee.net/lkddb/web-lkddb/MT76_CORE.html
https://github.com/torvalds/linux/blob/master/drivers/net/wireless/mediatek/mt76/Kconfig
Well, that makes it even easier 😉
Let me try to build it over the weekend and i’ll report back.
for some reason i can’t install your rom ( PixelExperience_Plus_sweet-11.0-20211115-1553-UNOFFICIAL.zip ) :/ I’m always getting into infinite loading (with the G logo)
That (to me) indicates some problem with wiping your phone’s partitions. There is some order in doing that, factory reset (system wipe), then dalvik and cache (if i remember correctly) After that, install the ROM first, no Magisk stuff. Reboot and install what you want
thanks for your fast reply! 😀
Still the same, i did factory reset, dalvik and cache, installed rom, turn on, and still in boot loop :/ (I’m using twrp, cause OrangeFox is deprecated to sweet version), also tried with pixelOs recovery (using adb sideload) but got the same result.
Took a bit of time (don’t know why) to boot up the first time for me as well. Anywho, building PE13 as we speak. Seems that the flash procedure has changed (OrangeFox to TWRP etc) Will get back to you when i flash my phone
I tried to make my own but I got lost on the “make menuconfig” xD since the options are different between thirteen-plus and eleven-plus 😛 and my knowledge around kernels and the needs from nethunter are not the best xD
meanwhile I’ve installed again the PixelExperiencie 13 (without a “neternel” xD). I’ll wait for your Rom to test 😀
Thanks for it!! 😀
hey, how is it going? (the PE13 version) 🙂
cheers,
It build successfully, haven’t flashed it yet. But i need to include some Nethunter kernel patches (injection mode etc), maybe include some popular wireless USB dongles (MT7612U not included since kernel is still at version 4.14) and finally add ANXCamera APK into the build.
ok, i finaly could install your rom (pe11), for some reason the beta version of OrangeFox and twrp was the problem.
with OrangeFox-R12.1_3-Unofficial-sweet worked like a charm! 😀 thanks
my MT7601 just arrived today from aliexpress 😀 (gonna test it on your PE11 rom!)
Lets see if this time i can get the ROM working in 100%, for some reason last time, when i did magisk i start to give me some errors.. (getting “system” error msg each time i turn on Bluethoot and each time I tried to access the device settings)
I finished building the PixelOS (same as Pixel Experience) ROM for Android 13. Included a lot more wireless drivers and patches this time. Only thing left is for me to test it. Should take a couple of days.
nice 🙂
If you need an extra pair of hands to test just poke me 🙂
When you have a chance, can you stop the main differences between making the PE11 and the PE13 Kali-Kernel? (at least on menuconfig part?) i’m curious about it 🙂
Well the PixelOS 13 ROM is ready for testing.
What’s included ?
Kernel: VantomKernel
Device Tree: aosp-playground
Vendor Tree: aosp-playground
MIUI Camera: aosp-playground
Besides the old modules I’ve included the MediaTek MT7612 and Realtek RTL8812/14AU modules
Google Photo backup with ‘original quality’ seems to be working as well.
Check it out, let me know what works (and doesn’t work)
Due to time restraints i was unable to include Dolby Atmos. But will add that in the next release.
Nice!!! 😀
I’ll give a try tomorrow (cause I only saw this reply now xD and its 1am here) and i’ll leave you some feedback later!
Thank you 🙂
Hey, what do you do after perform the “modprobe” ? i’m trying with a MT7601
https://aliexpress.com/item/32669016375.html
and i still can’t find my network device in the ifconfig
i think its loaded correctly.. if i do lsmod|grep mt7601u
mt7601u 110592 0
mc80211 733184 5 rt2800lib,…..,mt7601u
but when i do ifconfig, i was expecting to see a new adapter wlan1
it should be there, maybe under a different name perhaps
in a Kali terminal do this:
lsusb -tto see if the adapter is recognized and the driver is attachedand just for fun, just probe the adapter specifically (wlan1, wlan2 etc)
ifconfig wlan1if still not found, check dmesg
dmesg|grep mt76*spot
lsusb -t shows nothing
dmesg|grep mt76 in kali: usbcore: registered new interface driver mt7601u
dmesg|grep mt76 in AndroidSu terminal: Bad System call
but dont say the interface name 😡
that means it doesn’t see the adapter, it only loaded the module correctly. The problem is hardware related.
Use a different OTG adapter, maybe test the MT7601u itself in a PC.
I have the exact same adapter, tested it (just now) with a UGreen OTG cable and OTG dongle.
lsusb -t
/: Bus 02.Port 1: Dev 1, Class=root_hub, Driver=xhci-hcd/1p, 5000M
/: Bus 01.Port 1: Dev 1, Class=root_hub, Driver=xhci-hcd/1p, 480M
|__ Port 1: Dev 2, If 0, Class=Vendor Specific Class, Driver=mt7601u, 480M
dmesg|grep mt76
[ 86.163991] usbcore: registered new interface driver mt7601u
[ 144.038592] mt7601u 1-1:1.0: ASIC revision: 76010001 MAC revision: 76010500
[ 144.051381] ueventd: firmware: loading ‘mt7601u.bin’ for ‘/devices/platform/soc/a600000.ssusb/a600000.dwc3/xhci-hcd.0.auto/usb1/1-1/1-1:1.0/firmware/mt7601u.bin’
[ 144.053743] ueventd: loading /devices/platform/soc/a600000.ssusb/a600000.dwc3/xhci-hcd.0.auto/usb1/1-1/1-1:1.0/firmware/mt7601u.bin took 2ms
[ 144.053877] mt7601u 1-1:1.0: Firmware Version: 0.1.00 Build: 7640 Build time: 201302052146____
[ 144.429300] mt7601u 1-1:1.0: EEPROM ver:0d fae:00
iwconfig wlan1
wlan1 IEEE 802.11 ESSID:off/any
Mode:Managed Access Point: Not-Associated Tx-Power=0 dBm
Retry short limit:7 RTS thr:off Fragment thr:off
Encryption key:off
Power Management:on
Ok, it was an OTG adapter problem xD thanks!!
got the MT7601u running! 😀
To test the MT7612U adapter what modprobe shall i use?
modprobe -d /vendor/lib/modules mt76 ?
that would be the mt76x2e.
Report back if it works, only compiled the module. Don’t have the adapter so i could’t test it
damn, it just hit me. Wrong driver, needed the mt76x2u :/
Will need to compile that one separately and upload it. Any other driver requests while i’m at it ? 😉
atm i only have the MT7601u, the mt7612U and the RTL8811cu xD
i also tried a BT usb 5.0 but i wasn’t able to start the bluebinder and the interface, only the dbus service and the bluetooth service (but the interface was recognized)
Also Volume is not working (when i try to set Media or ClockAlarm Volume, it allways go automaticly to 0 (its probably that ” Dolby Atmos ” missing ).
Yeah, probably some Dolby Atmos remnants. Will do a new build this weekend.
Hello sir
I have a question:
Is pixel uploaded on 4th august the fix with dolby atoms ?
Thanks
Unfortunately not. I’ve build a version of the ROM with Dolby Atmos, but it had all kinds of weird quirks
Ok thank you very much
Does this rom has an acceptable bug ?
If yes then not a problem
No bugs that I’ve found so far.
Hey, I hope you are doing well, thanks for the work you have done to build the pixel os 13 for Redmi note 10 pro, really appreciate your efforts, my question is whether this rom support the focaltouch drivers fts_ts for the 8gb 256gb model, and if not how to integrate the drivers to this rom, im using a Pixel os (aryan pixel) with vantom kernel that includes the fts_ts drivers, thanks in advance.
Hi Amar, the current ROM doesn’t have these drivers integrated. For that to work you probably have to build the kernel yourself (add custom Kconfig and Makefile) or just build the modules against Basamaryans kernel. Is it this module you’re after ?
Hi, how y doing, im really into nthunter penetration i want to learn more about that, if you could just build a kernel that supports the fts_ts drivers that would be great, i will really appreciate Thanks in advance.
Hi thanks for the reply, actually idk how to build kernels, im afraid to make things worst, im just searching for someone who can build it a nethunter kernel with fts_ts drivers and external wifi support with packet injection, i really love this world of penetration and testing, but the model i have doesn’t support that.
Is the pos 13 rom erofs or non erofs ?
Kernel version 4.14, so likely non erofs
But pos from Aryans branch has 4.14 kernel and erofs compression
Just checked, it’s been built in.
CONFIG_EROFS_FS=y
I’m using kernel version 4.14.325-VantomKernel but haven’t used EroFS myself
What I mean is to use erofs recovery for flashing or no ?
Hi firstly I would like to say thank you so much for this it has saved me a tonne of time, I have your PixelOS 13 with everything installed its running the kernel you provide inside the pixelos 13 zip however USB arsenal doesn’t seem to be available, just checking has this kernal been patched to enable HID support for the HID attacks?
Thank you
Sorry disregard the last comment, I don’t know what happened but the USB arsenal just randomly became available, it’s all working well, thank you
Yes it has been patched with all the patches suggested by Kali, including HID. Glad you’ve got it working 😀
When I try to load the bt module I get:
Failed to load module /vendor/lib/modules/btusb: No such file or directory
Using the system shell (not Kali shell) run:
su -c modprobe -d /vendor/lib/modules btusb
Can you build nethunter kernel for Redmi note 10 pro max device ?
I think that these devices (10 Pro / 10 Pro Max) use the same kernel and should be compatible. Am not certain that the update script (inside the zip) which TWRP/OFOX also accepts sweetin (Note 10 Max)
This Google pixel rom support HID
And other wifi attacks ?
It sure does. All patches/modules suggested by Kali Nethunter
Pixel experience or pixelos 13 which one?
All of my PixelExperience and PixelOS ROM’s use the Nethunter Kernel, but i’d advise you to use the latest PixelOS ROM
Your pixelos last updated rom is Sep 24, 2023
That’s your latest pixelos
And where I get letest pixelos Rom?
https://www.androidfilehost.com/?fid=10620683726822081624
It’s not installing in my phone install field
Redmi note 10 pro Max
Android 13
Device code:sweet
Recovery: twrp
Yeah, it’s like i suspected. We need to edit the update file in the zip to state sweet and sweetin. It’s a bit tricky, let me first check if both devices are 100% compatible (except for the screen size of course)
How I install this rom?
It’s explained in the blogpost
https://wvthoog.nl/redmi-note-10-pro-nethunter/#Install_the_ROM
It’s not installing always field and break system
Screen shoots
https://drive.google.com/file/d/1_OpSslH1mRn4UGdJ6SJBRabFbMky2pQV/view?usp=drivesdk
Video:
https://drive.google.com/file/d/1_V4FJ0baHIYj5SUMxlbV6UqFL2y0YdpT/view?usp=drivesdk
I successfully installed pixelos 13
But monitor mode is not enabling
You need to have a compatible wifi adapter in order to enable monitor mode. One that i’ve included in the kernel config. See this section under Wireless LAN
Bro suggest me best cheapest wifi adaptor with support WiFi monitor and injection
This adaptor will support wifi monitor mode and wifi injection
https://www.flipkart.com/bunas-mediatek-chipset-mt7601-inside-usb-wifi-wireless-adapter-dongle-150mbps-data-card/p/itmb56382794c8f0
Yes that one would work but only supports 2.4ghz and has limited range (no external antenna)
Suggest any cheap adaptor for my device
And this one
https://www.amazon.in/dp/B0BMX82Y3J?ref=emc_s_m_5_mob_i_atc
Will ADnet AD-1143 SUPPORT?
I’m not certain about each of those adapters. Best is to use AliEpxress and type in the chipset. I’m using a 8821CU myself (2.4 and 5Ghz)
8812AU/8814AU have great great driver support (including packet injection) but are quite large usb adapters. MT7601u is small, but only 2.4Ghz
There is No delivery option for India on AliExpress and I’m not getting 8821CU wifi adaptor on fiilpkart and Amazon
https://www.amazon.in/AUSHA-Bluetooth-Wireless-External-Receiver/dp/B099NNWDFX
https://www.amazon.in/gp/aw/d/B0BMX82Y3J/ref=ci_mcx_psdcmw_1375427031_t1_B099NNWDFX
my last question
this one will support kali Nethunter
It has the RTL8821au chipset, not really sure if that one is supported. It should be
And this
https://www.amazon.in/gp/aw/d/B002SZEOLG/ref=ci_mcx_psdcmw_1375427031_t2_B0BMX82Y3J
according to this, it is most likely a RTL8188EUS chipset. Which would work
You did not upload kernel module
Hi bro where I get only Nethunter kernel and module for redmi note 10 pro max
The kernel can be extracted from the zip, same goes for the modules. But you need to manually copy the modules over to /vendor/lib/modules after flashing the boot.img. Or make an installable zip yourself for the kernel and modules with AnyKernel
Bro I installed your pixelos rom and connect RTL8188FTV wifi adaptor and it’s show drive not found on monitorer app
Like Sahin, you need to use a compatible adapter. Not all adapters are capable of monitor mode and/or packet injection
What should I do?
Bro this one will support monitor mode and packet injection
https://www.amazon.in/TP-LINK-T3U-Wireless-MU-MIMO-Supports/dp/B07P681N66/ref=asc_df_B0859M539M/?tag=googleshopmob-21&linkCode=df0&hvadid=397210949246&hvpos=&hvnetw=g&hvrand=1992324763747389653&hvpone=&hvptwo=&hvqmt=&hvdev=m&hvdvcmdl=&hvlocint=&hvlocphy=9184416&hvtargid=pla-910014954445&psc=1&mcid=790e5bde02dc32c2988d023721f1c0c2&ext_vrnc=hi&th=1
Hi bro i installed rucky app from Nethunter store and when I open this app it says kernel not supported please tell me solution
Hi, back in July 2023, you said you were planning to host your own OTA server. I haven’t seen any references to OTA since then so I’d like to ask if you set it up?
hehehe am here in november 2024 xD i tried to flash your pixel experience, The G ( google ) is running since 30 min, the os doesn,’t start, i used adb sideload to flash the rom from the recovery that i downloaded in the pixelos website, i used the last recovery, i did something wrong? should i flash the last pixel os again?
Hello Wim van ‘t Hoog sorry muy bad english. I’m using Google TranslatebI’m interested in this Android 11 ROM because I don’t have enough knowledge to compile a kernel. But the problem is that I can’t download anything from “androidfilehost” where you have the ROM, and I would love for you to share your ROM through a page other than “androidfilehost” so I can download this version on Android 11. Thanks. I look forward to your response.
Hello sur, i love your work. is a Android 15 or 16 version of this custom ROM will be available ?
Hi, thanks for your contribution. I was looking into it and noticed that the Xiaomi Redmi Note 10 Pro uses this processor: “Model: Qualcomm Snapdragon 732G (SM7150),” but in your tutorial, when editing the kernel configuration, it says “cd kernel/xiaomi/sm6150”… Are there two Xiaomi Redmi Note 10 Pro models? Does this work for the Xiaomi Redmi Note 10 Pro that has the Qualcomm Snapdragon 732G (SM7150) processor? Since it’s “SM7150” and you work with an “SM6150” in your tutorial, I ended up doubting its actual compatibility with the Xiaomi Redmi Note 10 Pro… Thank you in advance for your reply. Regards.