Intro
In this blog post in the Fortinet series i’m going to explain how we can configure IPTV from KPN on a FortiGate. This tutorial will guide you through the steps we need to take to get two IPTV Settopboxes configured to be able to view TV channels and also allow internet access for platforms like Netflix. So let’s get started
Table of Contents
Difficulty Levels
As I become more familiar with the Fortinet ecosystem, the complexity of these tutorials will gradually increase. To make it easier to navigate, I’ve developed a color-coded system to indicate the difficulty level of each tutorial:
- Purple Series: Easy
- Blue Series: Moderate
- Green Series: Intermediate
- Yellow Series: Advanced
- Orange Series: Highly Advanced
- Red Series: Expert

Components
I received two settopboxes from my ISP (KPN). They are the Arris VIP2952 and the connections on the back look like this
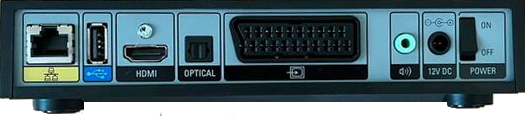
Here we can see the connections the settopbox offers. Besides power obviously we are going to connect the TV with a HDMI cable and going to connect the LAN to the FortiGate directly
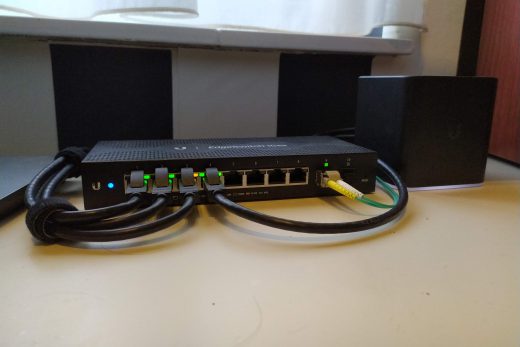
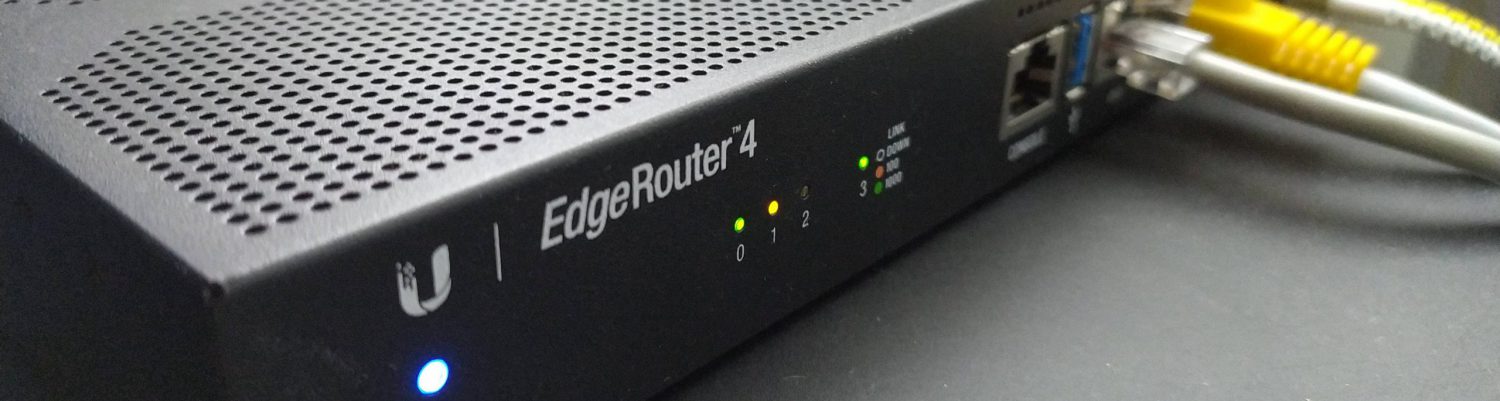
The reason i choose to connect the settopbox directly to the FortiGate is that i only have 8 ports available on my FortiSwitch. Of which i need most of them to power IP camera’s and other IoT devices, so i have no room left.
I ended up connecting ports 1 and 2 of the FortiGate to my settopboxes.
Visual topology

Configuration
Let’s start things off by isolating ports 1 and 2 from the internal switch of the FortiGate. Remember that in a previous blog post called Fortinet – Basic Configuration we configured ports 1 to 4 to be members of the internal switch and port 5 as a dedicated management port. Well, we now need to subtract ports 1 and 2 from that same switch.
VLAN Switch
We’re going to create a new VLAN switch called IPTV. Connect your PC to the management port of the FortiGate (see i told you a dedicated management port would come in handy). Launch your web browser and navigate to the URL you have set managing the FortiGate. In my case, because i’m directly connected to the management port, that would be https://192.168.200.1:8443
On the left hand side of the web interface navigate to Network and click on Interfaces. Under VLAN Switch select internal and than click Edit.
Interface members will list all interfaces that currently are members of that particular VLAN Switch. In my case these are interfaces 1 to 4. Now i need to pull interface 1 and 2 from the switch. To do so, just click on the cross icon next to the interface. That would be internal1 and internal2 in my case so that you will end up with only ports internal3 and internal4 on the internal switch.
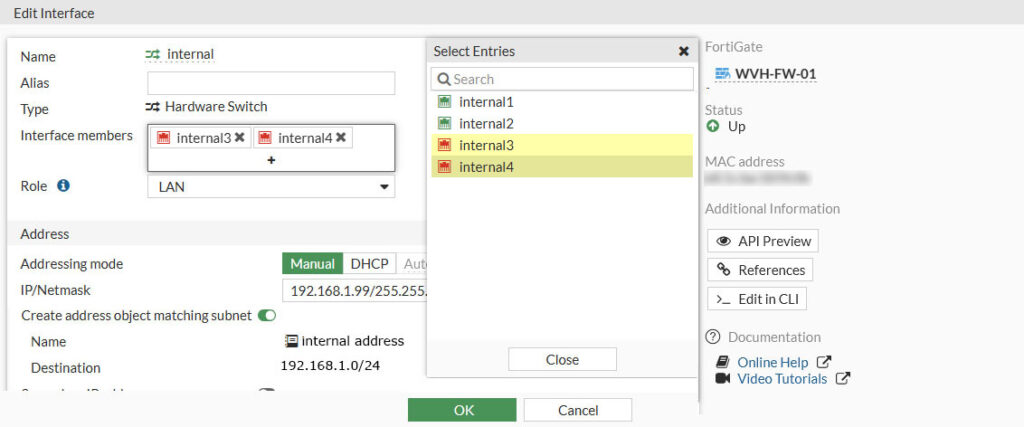
Hit OK to save
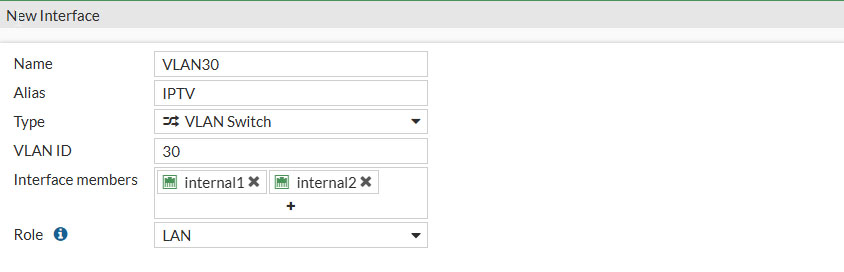
Now that we have freed up ports 1 and 2 we can create a new VLAN Switch and assign these two ports to that switch. Go to Network and then Select Interfaces. At the top of the page click on Create New and select Interface.
Use the following settings when creating the new interface. (you are free to change these settings)
- Name: Give the interface a descriptive name, this cannot be changed afterwards
- Alias: Give the interface an alias, this can be changed afterwards
- Type: VLAN Switch
- VLAN ID: 30
- Interface members: internal1 and internal2
- Role: LAN
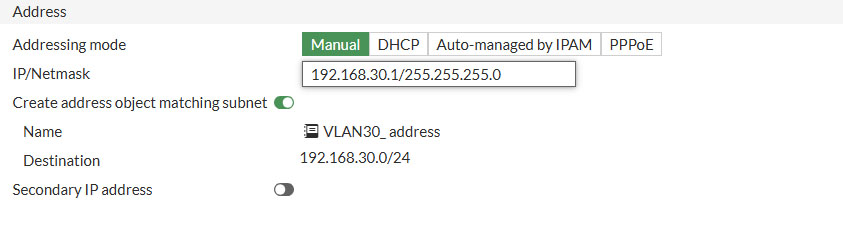
Under Address fill in the following settings (you can change these if you’d like)
- Addressing mode: Manual
- IP/Netmask: 192.168.30.1/255.255.255.0
- Create address object matching object: Enable
Under Administrative Access only select PING. We don’t need anything connected to this network be allowed to manage the FortiGate
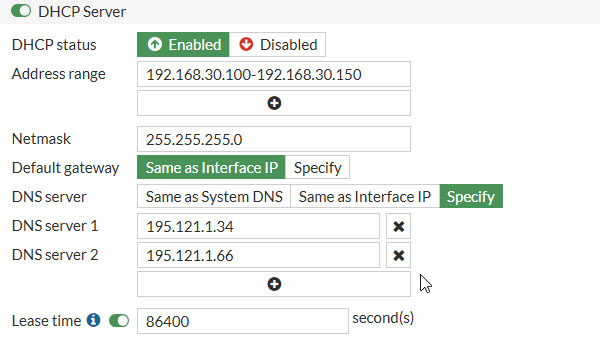
Under DHCP Server fill in the following settings (you can change these if you’d like)
- Address range: 192.168.30.100-192.168.30.150
- Netmask: 255.255.255.0
- DNS server: 195.121.134 and 195.121.1.66
- Lease time: 86400 (1 day)
Click OK to save
Now that we have our VLAN Switch setup, the settopboxes are able to receive an IP address from the FortiGate in the range of 192.168.30.x. In the next step we’re going to setup the WAN connection for IPTV traffic to flow to.
KPN IPTV
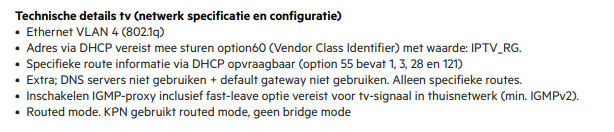
My ISP (KPN in The Netherlands) supplied a technical document to which configuration settings to ahold to when configuring an IPTV VLAN. This is what the (part of the) document states. (in Dutch)
IPTV VLAN
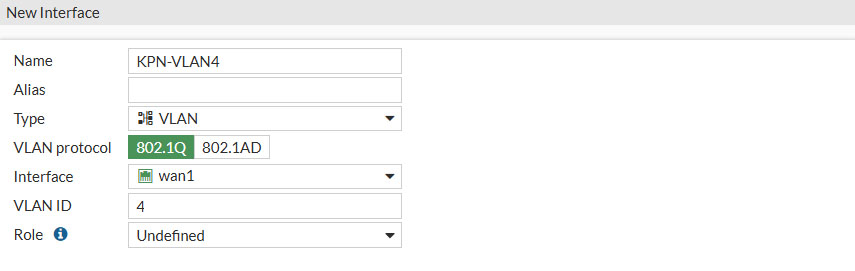
Let’s start of by creating the VLAN interface that will carry the IPTV traffic on the WAN side. Head over to Network and select Interfaces. Then at the top click on Create New and select Interface. Then configure:
- Name: KPN-VLAN4
- Give the interface a descriptive name, this cannot be changed afterwards
- Type: VLAN
- Interface: wan1
- Select the physical interface connected to your ISP
- VLAND ID: 4
- According to KPN we need to select VLAN 4
- Role: Undefined
Set the following configurations options as well
- Addressing mode: DHCP
- Retrieve default gateway from server: Disable
- Override internal DNS: Disable

For Administrative Access only select PING
Click OK to save
CLI Configuration
Unfortunately not all settings are able to being set through the web interface. For the more specialized ones we need to login into the CLI. There are two ways i find practical to login to the CLI. The first one being the build in on in the web interface. In the top right corner of the web interface there is an arrow button, click on that and the CLI will appear.

The second one is logging in with a SSH client. In Windows this could be Putty or Powershell, in Linux/Mac you could just use the build-in SSH client.
ssh username@ip-of-fortigateWhen logging into the CLI we’re going to change a few setting of our newly created KPN-VLAN4 interface. To do so, we need to select the interface first
config system interfaceAnd edit KPN-VLAN4 (or whatever name you’ve chosen for you IPTV VLAN)
edit KPN-VLAN4Just for fun you can do a show command, to display what is already configured
showThat will result in something like this
config system interface
    edit "KPN-VLAN4"
        set vdom "root"
        set mode dhcp
        set distance 10
        set allowaccess ping
        set role undefined
        set snmp-index 28
        set defaultgw disable
        set dns-server-override disable
        set interface "wan1"
        set vlanid 4
    next
end
We’re going to make some changes here. Just enter the commands below in sequence
        config client-options
            edit 1
                set code 60
                set type string
                set value "IPTV_RG"
            next
            edit 2
                set code 121
                set type string
                set value "classless-static-routes"
            next
        end
       set dhcp-classless-route-addition enable
    next
end
With that all set the WAN side of the IPTV configuration is finished. Next we’re going to setup the static route to the KPN IPTV network
Static Route
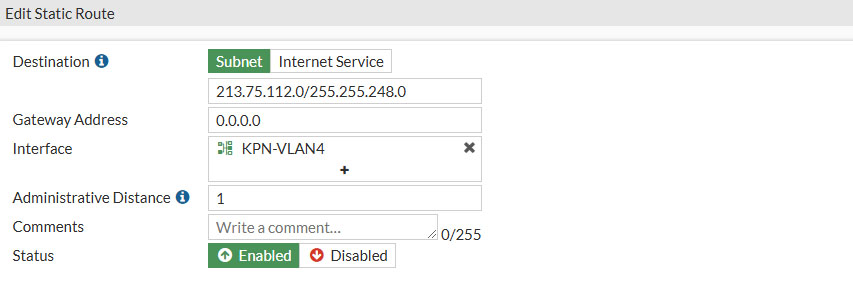
To instruct traffic traveling from the IPTV settop boxes to KPN IPTV network, we need to create a static route. Go to Network -> Static Routes and select Create New in the upper left corner.
KPN’s IPTV network has it’s own subnet and that is where we need to direct our traffic to. So select Subnet and enter in the following information
- Destination: Subnet
- 213.75.112.0/255.255.248.0
- Gateway Address: 0.0.0.0
- Interface: KPN-VLAN4
- Administrative Distance: 1
- Status: Enabled
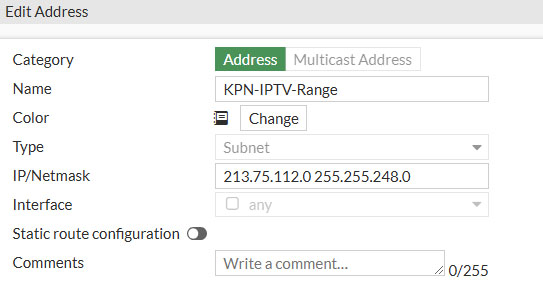
Now that we have set the appropriate static route, i’d prefer to also create a Address for that specific range so that i can reference it later when assigning a destination in a firewall policy
Address
Under Policy & Objects go to Addresses and click on Create New. Then select Address and fill in the following information.
- Name: KPN-IPTV-Range
- Type: Subnet
- IP/Netmask: 213.75.112.0 255.255.248.0
- Interface: any
Now that we set the address for the IPTV network of KPN we can reference it in a firewall policy. So let’s create one.
Policy & Objects
As mentioned i the blogpost Fortinet – Basic Configuration in a Fortigate we explicitly need to allow traffic to flow from one interface to another. So we need to allow traffic from interface IPTV VLAN30 to interface KPN-VLAN4.
Multicast Policy
We use multicast (UDP traffic) to distribute the IPTV traffic over our internal network to our settopboxes. Here we want to create two multicast policies. A downstream and a upstream policy.
Under Policy & Objects click on Multicast Policy and select Create New
We’re first going to create the upstream interface. Enter these values
- Name: IPTV Upstream
- Incoming Interface: IPTV (VLAN30)
- Outgoing Interface: KPN-VLAN4
- Source Address: all
- Destination Address: all
- Action: Accept
- Enable SNAT: Enabled
- Protocol: Any
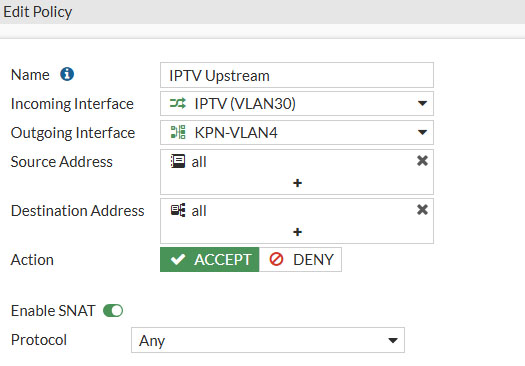
Hit OK to save
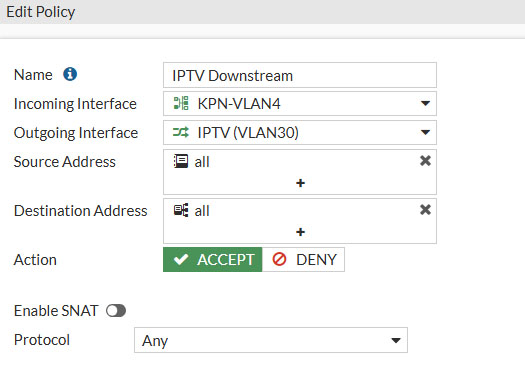
Then we do the same for the downstream policy. Again click on Create New and enter these values
- Name: IPTV Downstream
- Incoming Interface: KPN-VLAN3
- Outgoing Interface: IPTV (VLAN30)
- Source Address: all
- Destination Address: all
- Action: Accept
- Enable SNAT: Disable
- Protocol: Any
Hit OK to save
So you’d end up wit these two multicast policies

Firewall Policy
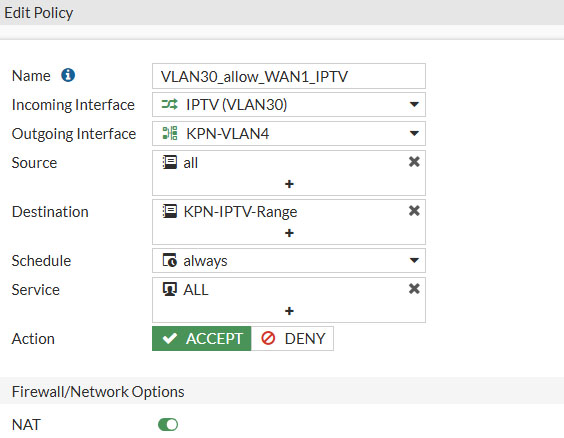
With these multicast rules set, we need to create another rule that will allow traffic from the IPTV VLAN30 interface to the IPTV network of KPN. This rule is necessary for viewing back programs
Head over to Policy & Objects -> Firewall Policy and click on Create New.
- Name: VLAN30_allow_WAN1_IPTV
- Incoming Interface: IPTV (VLAN30)
- Outgoing Interface: KPN-VLAN4
- Destination: KPN-IPTV-Range
- Schedule: always
- Service: ALL
- Action: Accept
- NAT: Enable
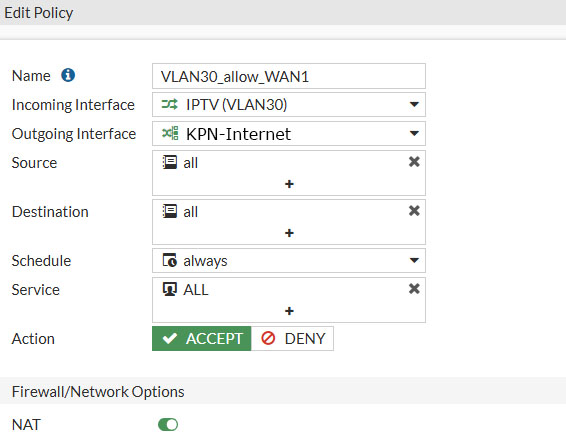
With that rule set, we need to create another rule that will allow traffic from the IPTV VLAN30 interface to the internet. This is necessary for services like Netflix, Amazon Prime, Disney to be able to work.
So again go to Policy & Objects -> Firewall Policy and hit Create New. Fill in the following information
- Name: VLAN30_allow_WAN1
- Incoming Interface: IPTV (VLAN30)
- Outgoing Interface: KPN-Internet
- Source: all
- Destination: all
- Schedule: always
- Service: ALL
- Action: Accept
- NAT: Enable
In theory we should now be able to watch TV already, but there are some minor tweaks we need to do first to assure a smooth experience.
Tweaks
Some minor but essential tweaks need to to be applied still and need to done in the CLI.
TTL-nochange
As read in some other tutorials we need to enable mutlicast no ttl change. I actually don’t know it this absolutely necessary but i cannot hurt either. So hop into the CLI again (through a SSH client or the built in Forti CLI) and enter these commands
config system settings
    set multicast-ttl-notchange enable
RTSP session helper
Another feature that i read on another blogpost is to disable the RSTP session helper. It seems to mangle the RSTP session to the IPTV network and prevents viewing recording properly.
Every Fortigate I’ve touched has RSTP session helper at position 6. To verify enter these commands
config system session-helper
	show
If position 6 (edit 6) is there, just delete it
config system session-helper
	delete 6
	end
Fast Leave
If you have more than one TV connected like i have, we need to enable Fast Leave, so that the IPTV boxes don’t interfere with one another while switching channels
To do so, enter these commands (where VLAN30 is the LAN side of my IPTV network, change for yours)
config system interface
	edit VLAN30
		set switch-controller-igmp-snooping-proxy enable
		set switch-controller-igmp-snooping-fast-leave enable
	next
end
And that’s it. IPTV from KPN on a fiber connection through a Fortigate
Conclusion
Another quite lengthy tutorial on how to setup IPTV from KPN on a Fortigate. I wanted to be thorough and cover each aspect of the configuration step including some background information why these settings need to be set.
PayPal
If you like my work, please consider supporting.