
Intro
Since a long time i desperately wanted the possibility to split up a consumer grade Nvidia graphics card to pass through to a (Proxmox) VM. Not so long ago a project on Github started under the name of vgpu_unlock (credits Dual Coder) which creates the possibility to do just that. That resulted in this lengthy tutorial because of the use of Proxmox 7 which uses the 5.11+ kernel.
You can check it out in my new blog post at https://wvthoog.nl/proxmox-7-vgpu-v3/
Table of Contents
Requirements
There are a few requirements in order to get vgpu_unlock to work. It only works on specific cards (see list below) and on kernels 5.11 and lower.
Supported GPU’s
| Nvidia card | GPU Chip | vGPU unlock profile |
| GTX 900 Series (first gen) | GM107 x4 | Tesla M10 |
| GTX 900 series (second gen) | GM204 x2 | Tesla M60 |
| GTX 1000 Series | GP102 | Tesla P40 |
| Titan V, Quadro GV100 | GV100 | Tesla V100 16GB |
| RTX 2000 Series | TU102 | Quadro RTX 6000 |
| RTX 3000 Series | GA10x | Ampere is not supported |
Older cards like the 900 and 1000 series will create a Tesla card for the VM. That means that we have to use the GRID driver in the VM in order to get this card working. Keep on reading how this can be achieved. If you own a 2000 series card however, you are in luck. Vgpu_unlock will create a Quadro card for the VM, which can use regular Nvidia drivers without any time (licensing) restriction the 900/1000 (Tesla) cards have.
Kernel version
Proxmox and Debian continuously update their packages and kernel. For vgpu_unlock to work we have to stick to kernel version 5.11. Kernel 5.13 is not going to work. To boot kernel version 5.11 we’re going to edit the Grub configuration file.
First add this line to your sources.list in order to make kernel older kernel versions available for installation.
echo 'deb http://download.proxmox.com/debian/pve bullseye pve-no-subscription' | tee -a /etc/apt/sources.listThen update your packages and upgrade if available
apt update && apt upgrade -yThis will download and install kernel version 5.13. Which is not the kernel we want. To list all the available kernels on your system execute the following command
grep menuentry /boot/grub/grub.cfgExample output
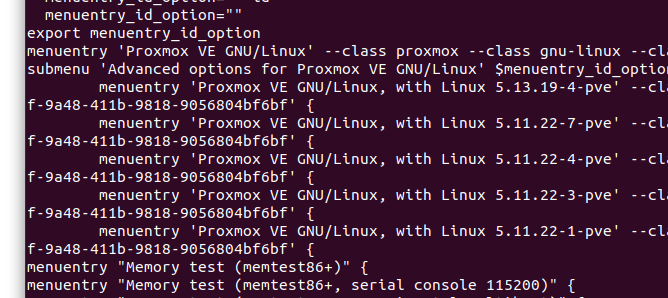
As you can see kernel version 5.11.22-7 is currently the highest available version of the 5.11 kernel and this is the version i am going to use. So now we have to edit Grub to boot this kernel by default.
nano /etc/default/grubReplace GRUB_DEFAULT with the following line. Remember to use your own kernel version, otherwise your system will not be able to boot. Also take note of the > character combining the two entries (Advanced options and Kernel version) together
GRUB_DEFAULT="Advanced options for Proxmox VE GNU/Linux>Proxmox VE GNU/Linux, with Linux 5.11.22-7-pve"Exit and save out of the file and update Grub
update-grubAnd restart the server. After the server successfully restarted check if the kernel version is correct
uname -aExample output
Linux pve 5.11.22-7-pve #1 SMP PVE 5.11.22-12 (Sun, 07 Nov 2021 21:46:36 +0100) x86_64 GNU/LinuxThis should mean you’re good to go. Proxmox will stick to the 5.11 kernel and vgpu_unlock will be able to work and remain working.
Next we can install the dependencies required.
Dependencies
Install dependencies for vgpu_unlock
apt update && apt upgrade -y
apt install -y git build-essential pve-headers-`uname -r` dkms jq unzip python3 python3-pip
Install frida
pip3 install fridaGit clone vgpu_unlock
git clone https://github.com/DualCoder/vgpu_unlock
chmod -R +x vgpu_unlock
Enable IOMMU
Configure IOMMU
nano /etc/default/grubFor Intel CPU’s edit this line
GRUB_CMDLINE_LINUX_DEFAULT="quiet intel_iommu=on iommu=pt"For AMD CPU’s edit this line
GRUB_CMDLINE_LINUX_DEFAULT="quiet amd_iommu=on iommu=pt"Save file and update grub
update-grubLoad VFIO modules at boot
nano /etc/modulesInsert these lines
vfio
vfio_iommu_type1
vfio_pci
vfio_virqfd
Create a couple of files in modprobe.d
echo "options vfio_iommu_type1 allow_unsafe_interrupts=1" > /etc/modprobe.d/iommu_unsafe_interrupts.conf
echo "options kvm ignore_msrs=1" > /etc/modprobe.d/kvm.conf
echo "blacklist nouveau" >> /etc/modprobe.d/blacklist.conf
Update initramfs
update-initramfs -uReboot Proxmox
rebootAnd verify that IOMMU is enabled
dmesg | grep -e DMAR -e IOMMUExample output
[    0.954526] pci 0000:00:00.2: AMD-Vi: IOMMU performance counters supported
[    0.958348] pci 0000:00:00.2: AMD-Vi: Found IOMMU cap 0x40
[    0.959202] perf/amd_iommu: Detected AMD IOMMU #0 (2 banks, 4 counters/bank).
Nvidia drivers
Download Nvidia’s vGPU drivers. You need to apply for a trial period to download those driver here. Copy them to the Proxmox server using SCP and unzip.
scp nvidia/NVIDIA-GRID-Linux-KVM-460.32.04-460.32.03-461.09.zip [email protected]:~
unzip NVIDIA-GRID-Linux-KVM-460.32.04-460.32.03-461.09.zip
Since i’m using Proxmox 7 based on Debian Bullseye with kernel version 5.11 i needed to patch a couple of files.
Extract the Nvidia driver
chmod +x NVIDIA-Linux-x86_64-460.32.04-vgpu-kvm.run
./NVIDIA-Linux-x86_64-460.32.04-vgpu-kvm.run -x
Download these patches and apply to the source
wget https://raw.githubusercontent.com/rupansh/vgpu_unlock_5.12/master/twelve.patch
wget https://raw.githubusercontent.com/wvthoog/nvidia_vgpu_proxmox_7/main/nv-caps.patch
wget https://raw.githubusercontent.com/wvthoog/nvidia_vgpu_proxmox_7/main/nv-frontend.patch
wget https://raw.githubusercontent.com/wvthoog/nvidia_vgpu_proxmox_7/main/nvidia-vgpu-vfio.patch

cd NVIDIA-Linux-x86_64-460.32.04-vgpu-kvm

patch -p0 < ../twelve.patch
patch -p0 < ../nv-caps.patch
patch -p0 < ../nv-frontend.patch
patch -p0 < ../nvidia-vgpu-vfio.patch
Install the driver
chmod +x nvidia-installer
./nvidia-installer --dkms
Edit the Nvidia vGPU system services files
nano /lib/systemd/system/nvidia-vgpud.service

# replace ExecStart with:
ExecStart=/root/vgpu_unlock/vgpu_unlock /usr/bin/nvidia-vgpud
nano /lib/systemd/system/nvidia-vgpu-mgr.service
# replace ExecStart with:
ExecStart=/root/vgpu_unlock/vgpu_unlock /usr/bin/nvidia-vgpu-mgrReload the services daemon
systemctl daemon-reloadEdit some Nvidia driver source files
nano /usr/src/nvidia-460.32.04/nvidia/os-interface.cUnder #include “nv-time.h” insert this line
#include "/root/vgpu_unlock/vgpu_unlock_hooks.c"Edit the next file
nano /usr/src/nvidia-460.32.04/nvidia/nvidia.KbuildAdd this line at the bottom of the file
ldflags-y += -T /root/vgpu_unlock/kern.ldRemove the original Nvidia dkms module
dkms remove -m nvidia -v 460.32.04 --allRebuild the module
dkms install -m nvidia -v 460.32.04Reboot
rebootAnd verify that vGPU is running
dmesg|grep -i vgpuYou should see something like this
[ 31.222948] vGPU unlock patch applied.Launch nvidia-smi and write down your device PCI Bus Address(es)
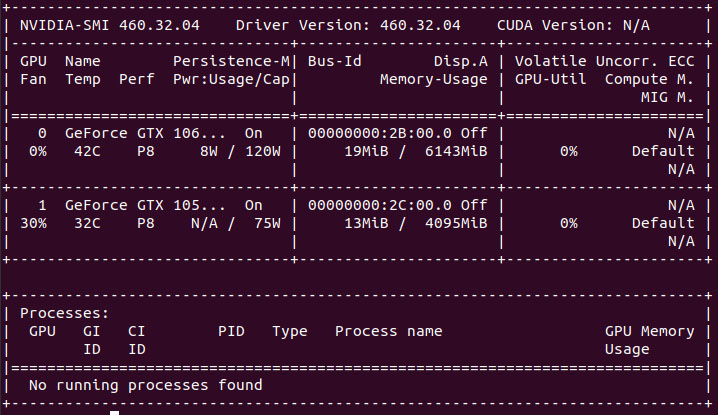
As you can see i have two GPU’s installed. The first one is a GTX 1060 with id 00000000:2B:00.0. The second one is a GTX 1050Ti with id 00000000:2C:00.0 and will be passed through directly to a Windows 10 VM since vgpu_unlock only supports one GPU. (the first one it sees)
Create the vGPU’s
Mdevctl
Install mdevctl
apt install mdevctlList the different types your GPU offers
mdevctl typesWhich gives the following (example) output among many other types
'''
   nvidia-47
    Available instances: 12
    Device API: vfio-pci
    Name: GRID P40-2Q
    Description: num_heads=4, frl_config=60, framebuffer=2048M, max_resolution=7680x4320, max_instance=12
  nvidia-48
    Available instances: 8
    Device API: vfio-pci
    Name: GRID P40-3Q
    Description: num_heads=4, frl_config=60, framebuffer=3072M, max_resolution=7680x4320, max_instance=8
  nvidia-49
    Available instances: 6
    Device API: vfio-pci
    Name: GRID P40-4Q
    Description: num_heads=4, frl_config=60, framebuffer=4096M, max_resolution=7680x4320, max_instance=6
'''
This will list all kind of different names and available instances. I’ve decided to break up my GTX 1060 into 2 vGPU’s (instances) of type Q so i went for the nvidia-48 profile. Type Q is the profile we want since it supports all the features the GPU offers like NVENC, CUDA, etc. The type you select depends on the amount of VRAM the GPU has available. My GTX 1060 has 6GB so i had to choose a profile that consumed 3GB (2 vGPU’s x 3GB = 6GB total) of memory. Also take notice of the ‘name’. This will be the card the vGPU driver creates. So in my case that would be a (Tesla) P40-3Q
Generate UUID’s
Now it’s time to generate some UUID’s for mdevctl to use in the creation of the vGPU’s. As i previously mentioned i’m going to split up the GTX 1060 into 2 vGPU’s so i needed to create 2 UUID’s.
uuid -n 2
0b5fd3fb-2389-4a22-ba70-52969a26b9d5
924cfc77-4803-4118-a5f4-bd8de589ddf6
Create vGPU profiles
At this point i recommend opening a text editor to edit the commands for creating the different vGPU’s.
Grab the PCI ID of the GPU
dmesg|grep nvidiaExample output
[    8.056238] nvidia 0000:2b:00.0: enabling device (0000 -> 0003)
[    8.056325] nvidia 0000:2b:00.0: vgaarb: changed VGA decodes: olddecodes=io+mem,decodes=none:owns=none
[    8.172280] nvidia 0000:2c:00.0: enabling device (0000 -> 0003)
[    8.172348] nvidia 0000:2c:00.0: vgaarb: changed VGA decodes: olddecodes=io+mem,decodes=none:owns=none
From nvidia-smi i could determine that 0000:2c:00.0 is my GTX 1050 Ti and 0000:2b:00.0 is the GTX 1060. Write the PCI Bus ID down of the card you intend to use.
Putting the final commands together we now have everything we need for each vGPU profile.
- UUID
- PCI Bus ID
- vGPU Profile
This results (in my case) in the following commands. Two vGPU profiles with an unique UUID on PCI parent Bus ID 0000:2c:00.0 of type nvidia-48.
mdevctl start -u 0b5fd3fb-2389-4a22-ba70-52969a26b9d5 -p 0000:2c:00.0 -t nvidia-48
mdevctl start -u 924cfc77-4803-4118-a5f4-bd8de589ddf6 -p 0000:2c:00.0 -t nvidia-48
Define the profiles so that they will be persistent after reboot
mdevctl define -a -u 0b5fd3fb-2389-4a22-ba70-52969a26b9d5
mdevctl define -a -u 924cfc77-4803-4118-a5f4-bd8de589ddf6
Verify the profiles are created correctly
mdevctl listExample output
924cfc77-4803-4118-a5f4-bd8de589ddf6 0000:2c:00.0 nvidia-48 (defined)
0b5fd3fb-2389-4a22-ba70-52969a26b9d5 0000:2b:00.0 nvidia-48 (defined)
That’s it. Now we’ve got 2 mediated devices ready to be used by a Proxmox VM
Assign vGPU to VM
Ubuntu 20.04
Thus far we’ve gotten the mdev part setup, now it’s time to create a new VM (or use an existing one) of type q35 and assign it a vGPU. Create the VM and edit the conf file.
nano /etc/pve/qemu-server/100.confPlease review the following line
args: -device 'vfio-pci,sysfsdev=/sys/bus/mdev/devices/[UUID]' -uuid 00000000-0000-0000-0000-000000000[ID-of-VM]You need to change two values. The first one is the UUID of one of the mdev devices we previously created. The second one is the ID of the VM. A complete line would look something like this
args: -device 'vfio-pci,sysfsdev=/sys/bus/mdev/devices/0b5fd3fb-2389-4a22-ba70-52969a26b9d5' -uuid 00000000-0000-0000-0000-000000000100Save and exit out of the file.
Then we can launch the VM using the web interface or command line
qm start 100You can ignore the following warning
warning: vfio 0b5fd3fb-2389-4a22-ba70-52969a26b9d5: Could not enable error recovery for the deviceLog into the VM and verify that the card is recognized.
In Ubuntu 20.04 VM this is (lspci)
00:02.0 VGA compatible controller: NVIDIA Corporation GP102GL [Tesla P40] (rev a1)It’s time to install the driver on the VM. You can find this driver in the ZIP file we downloaded at the beginning of this tutorial. I’d recommend not to deviate much from the version installed on the host machine. So i have 460.32.04 installed on the host machine (Proxmox) and going to install 460.91.03 in the VM. Download NVIDIA-GRID-Linux-KVM-460.91.03-462.96.zip from Nvidia’s website and unzip. (or from Google Cloud) Inside you will find the file NVIDIA-Linux-x86_64-460.91.03-grid.run
*** As kernel versions on the client side more frequently get above version 5.11 i’d advise to download the latest GRID driver from Google since they can build on newer kernel versions. Just select the highest available version for the installed host (Proxmox) driver. So i have the 460 driver installed on Proxmox. Using the highest available 460.x drivers from Google in my client VM’s (which is currently 460.106.00)
chmod +x NVIDIA-Linux-x86_64-460.91.03-grid.run
./NVIDIA-Linux-x86_64-460.91.03-grid.run --dkms
Once installed. Reboot the VM
rebootWhen succesful you should see that the driver is loaded in dmesg and lsmod. For a final check run nvidia-smi

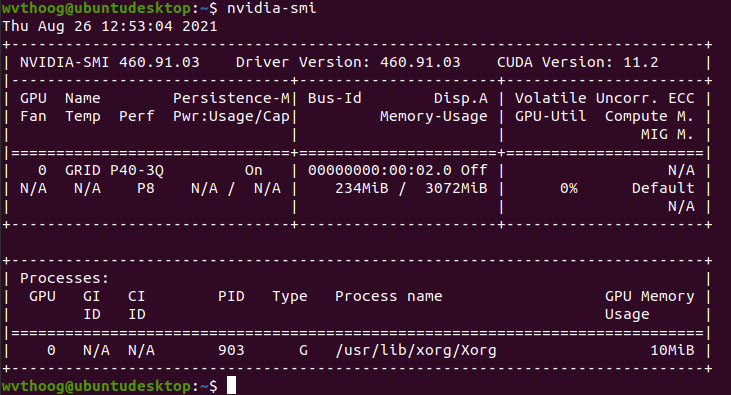
And there you have it. A P40-Q3 vGPU profile with CUDA version 11.2 on a consumer grade Nvidia GTX 1060.
Not so fast
Since we’re using the GRID driver which has been crippled by time restrictions due to licensing fees, we need to append some arguments when loading the nvidia driver to bypass these limitations. (credits neggles) What this does is set the “Unlicensed Unrestricted Time” to 1 day. After that you have to reload the nvidia driver (module) or reboot the VM.
echo 'options nvidia NVreg_RegistryDwords="UnlicensedUnrestrictedStateTimeout=0x5A0;UnlicensedRestricted1StateTimeout=0x5A0"' | sudo tee /etc/modprobe.d/nvidia.conf

sudo update-initramfs -u

sudo reboot
Windows 10
In Windows the process is more or less the same. Once again create a VM or use an existing one. This time we’re going to insert the second vGPU we’ve created. Edit the second (Windows) Proxmox VM
nano /etc/pve/qemu-server/101.confAnd insert the following line. Please keep in mind that i’m using my own UUID and VM-ID’s here
args: -device 'vfio-pci,sysfsdev=/sys/bus/mdev/devices/924cfc77-4803-4118-a5f4-bd8de589ddf6' -uuid 00000000-0000-0000-0000-000000000101Save and exit out of the file.
Launch the VM using the web interface or command line
qm start 101When the Windows VM boots up we open the NVIDIA-GRID-Linux-KVM-460.91.03-462.96.zip file once more but this time extract the 462.96_grid_win10_server2016_server2019_64bit_international.exe Windows driver. And run the file.
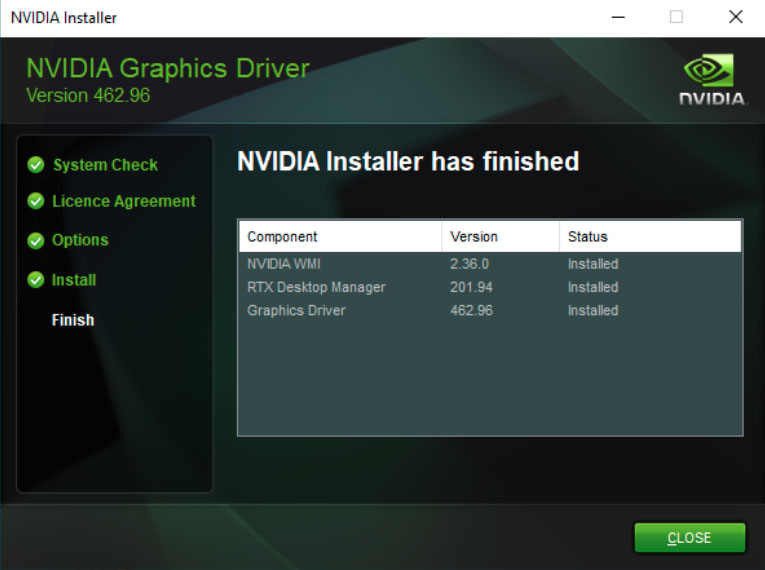
Reboot and consult Device Manager if there are any problems
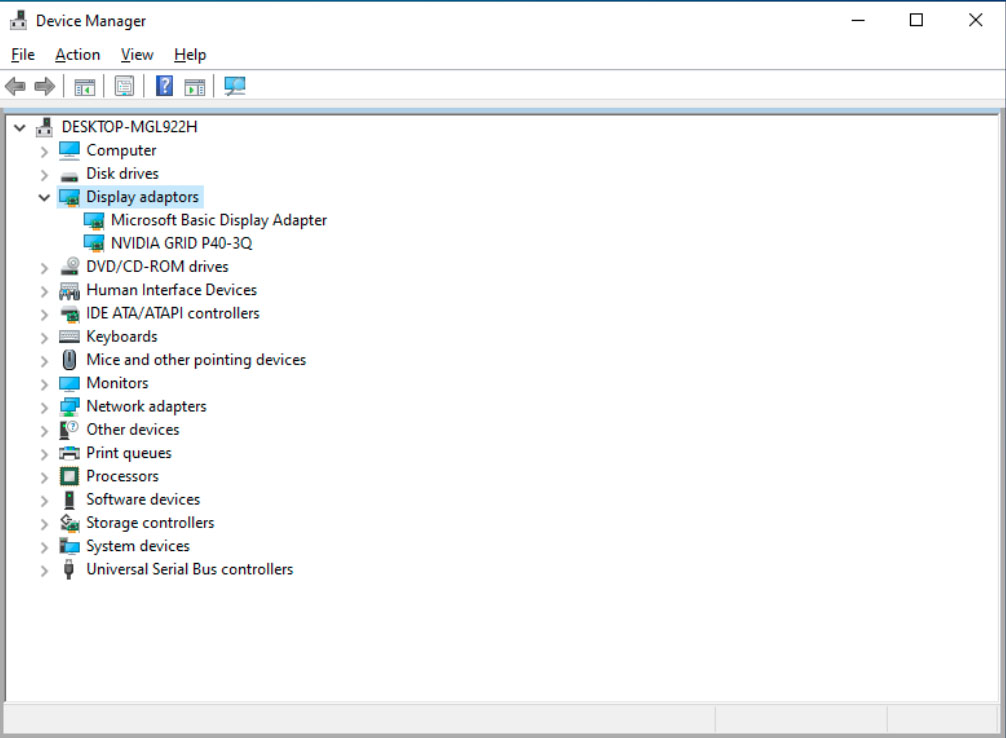
Which there aren’t any. After that you could use Remote Desktop Connection (with RemoteFX) or even better use Looking Glass or Parsec to fully utilize the newly created vGPU.
Hold your horses
Again since we’re using the GRID driver we need to install vGPU_LicenseBypass to bypass time limitations of the driver. What this script does is set the unlicensed allowed time to 1 day and get rid of license notification messages. Just double click the bat file and allow Administrator access. (credits Krutav Shah)
Conclusion
Hopefully you will find this tutorial informative. It cost me a bit of time to get to this point where it functions the way i think it should in Proxmox. An alternative method would we to rewrite the the Mdev PCI ID in the Proxmox config and load the Nvidia Quadro driver in the VM. But i didn’t have any success going that route.
PayPal
If you like my work, please consider donating


Hi There,
This is an awesome guide, thank you. I used a combination of this and a popular Craft Computing YouTube video.
Perhaps for the audience, I got it running with the exact same driver as detailed here, as well as the qemu.conf arg commands (Craft’s more verbose ones didn’t work for me, didn’t bother examining in detail)
Proxmox 7 (5.11.22-4-pve) with a Quadro P1000, profile nvidia-47 (GRID P40-2Q)
Craft ‘rewrote’ the PCI ID of his card in MDEV, which offered him the possibility to use the (default) Quadro driver. Vgpu_unlock (the way i figured) does not need to do that, just split up your card as desired and use the Grid driver to get it working in the VM
Will definitely try this again. I watched video from https://www.youtube.com/watch?v=cPrOoeMxzu0&t=1080s and used https://github.com/rupansh/vgpu_unlock_5.12 to make my proxmox 7 rtx 2080 ti working as vgpu, but at the end, it does not show ‘vGPU unlock patch …’.
Was wondering if this is not working with kernel 5.11. But your blog seems to prove me wrong.
Small note about the “vGPU unlock patch applied” dmesg message
You need to edit vgpu_unlock_hooks.c and search for these lines
/* Debug logs can be enabled here. To enable it, change 0 to 1. */#if 1
#define LOG(...) printk(__VA_ARGS__)
#else
#define LOG(...)
#endif
See that i changed the 0 to a 1 to enable debug logs
I also wonder if there is a problem with driver 470. Does this setup work fine with 1 gpu only? Is there any way to easily uninstall driver 470 to install 460. I tried dkms remove but does not allow me to install 460.
I only boot the new proxmox in it to restart everything.
Yeah, the 470 driver does not play nice with Proxmox as of the time I’ve tested it. The 460.32.04 driver works best, seen this been the recommended driver on several websites. Unfortunately vpgu_unlock only supports one GPU. I’ve got two installed myself, but can only use one.
About deinstalling, if you installed the dkms driver than it should be as simple as “dkms remove” to uninstall the driver. Check which driver you have installed with “dkms status”
There is a proxmox subscription problem. I also added ‘deb http://download.proxmox.com/debian/pve bullseye pve-no-subscription’ to ‘/etc/apt/sources.list.d/pve-enterprise.list’ to avoid ‘Failed to fetch https://enterprise.proxmox.com/debian/pve/dists/bullseye/InRelease 401 Unauthorized [IP: 51.91.38.34 443]’.
You have to comment that line out, since (i assume) you don’t have a Proxmox subscription. This is normal behavior.
Hmmm… Does not work, same problem, nvidia-smi shows sth, mdevctl stypes output profiles, but dmesg does not show any vgpu unlock patch applied.
I wonder if you only have one gpu on the motherboard, if you have multple boot os (I have a dualboot windows and ubuntu, to get into proxmox I need to go to bios). Do have any warning when opening proxmox like nvidia-gpu i2c?
7.065853] nvidia 0000:09:00.0: Driver cannot be asked to release device
Do this
apt remove --purge '^nvidia-.*'then reboot and install nvidia vpgu dkms driver
If you look into vgpu_unlock_hooks.c, there is no rtx 8000 (which is using the same chip of rtx 2080 ti). I wonder if this is the main problem.
Since rtx 6000 is more compatible to rtx 2080.
Sent me a private message (contact form) and grant me access to your Proxmox server via SSH. Hard to believe that one of the most popular Nvidia GPU’s (2080 Ti) isn’t supported.
And purge does not show anything to remove.
I ignore the vgpu unlock message, force the script to print it with ‘printk’. Then boot windows, at the end, nvidia-smi shows increased usage. But the device manager cannot show the right gpu, hence cannot install driver.
Anyway, gtx 1070 works.
Please add this to the guide.
I lost about an hour just now, combing through everything, thinking setting the debug flag would help me debug the problem.
NOT, that without the debug flag, I would never see the message.
The guide says look for this message, but unless you set the debug flag you dont see it.
Thank you, thank you, thank you for all that you do!!!
Looking forward to the new guide!!!
Hello and thanks for the great tutorial. This works perfectly! Is there also the possibility to patch the latest VGPU driver (vGPU 13) NVIDIA-GRID-Linux-KVM-470.63-470.63.01-471.68 so that it works with the latest kernel version?
As of the time of this writing this wasn’t possible. (tried it with the 470.63.01 driver)
Hi.
Having a problem with compiling module after patches applied. Here is what make.log shows:
LD [M] /var/lib/dkms/nvidia/460.32.04/build/nvidia-vgpu-vfio.o
MODPOST /var/lib/dkms/nvidia/460.32.04/build/Module.symvers
ERROR: modpost: GPL-incompatible module nvidia-vgpu-vfio.ko uses GPL-only symbol ‘eventfd_signal’
ERROR: modpost: GPL-incompatible module nvidia-vgpu-vfio.ko uses GPL-only symbol ‘eventfd_ctx_fdget’
ERROR: modpost: GPL-incompatible module nvidia-vgpu-vfio.ko uses GPL-only symbol ‘eventfd_ctx_put’
make[2]: *** [scripts/Makefile.modpost:124: /var/lib/dkms/nvidia/460.32.04/build/Module.symvers] Error 1
make[2]: *** Deleting file ‘/var/lib/dkms/nvidia/460.32.04/build/Module.symvers’
make[1]: *** [Makefile:1753: modules] Error 2
make[1]: Leaving directory ‘/usr/src/linux-headers-5.11.22-5-pve’
make: *** [Makefile:80: modules] Error 2
PVE 7.0-13
kernel 5.11.22-5-pve
Any ideas?
Then one of the patches didn’t get applied. One of them is to replace the MIT license with GPL, which causes this error.
Apply this patch again:
patch -p0 < ../nvidia-vpgu-vfio.patch
Yeap… there is a typo in the article “patch -p0 < ../nvidia-v_pg_u-vfio.patch"
I had to install pve-header as nvidia installer required. I had to type:
apt install pve-headers-`uname -r`
THANK YOU
3 HOURS LATER I FINALLY SOLVED IT
Anyone upgraded to Proxmox 7.1 does it break it?
Yes… broke it….no patch for 5.13
Anyone have any luck getting vgpu_unlock to work with Win11? I assume it will need the 470+ version and no one has figured that one out yet to my knowledge
@Hacked2123 no worries here mind you I did combination from this guide and craft computing using a 2060rtx splitting into 3 parts for 2x win11 and 1x server 2019 running Emby for transcoding.
If you install Proxmox 7.0 an/or using kernel < 5.13 just type this command: apt-mark hold proxmox-ve now you can update your system and dont have to worry your system wil break
ANy way. Great tutorial but ofc i have some issues. i followed it to the letter and all is working till i create a VM.
I am new too proxmox so maybe i create it wrong. my steps:
Mem 4g
BIOS OVMF (EUFI)
Machine pc-q35-6.1
scsci controller VirtO ScSCI
HDD is IDE
and the args in the conf file are correct.
when i boot into windows it sees 2 video cards. nvida detects that is a vgpu.
after reboot VM wont start anymore
ah sorry also choose in vm display: VirtIO-GPU
all other wont give me that second video card in the vm
Nevermind. I guess i needed to reboot promox a few times? then it suddenly works with Windows11
asnd in proxmox i need to set the graphic to default
getting an erro when i start a second vm at the same time: failed to open /dev/vfio/62: Device or resource busy
Yeah, i had that same problem. It has something to do with the selected driver you’ve installed in Proxmox. Use driver version 460.32.04
I have tried to install with pve-manager / 7.1-7 / df5740ad (running kernel: 5.11.22-7-pve). When executing “dkms install -m nvidia -v 460.32.04″ the following appears:
‘make’ -j6 NV_EXCLUDE_BUILD_MODULES = ” KERNEL_UNAME = 5.11.22-7-pve IGNORE_CC_MISMATCH = ” modules ……
the installation ends: “DKMS: install completed.” But when executing dmesg | grep -i vgpu I have no result.
Any recommendation please
In the file vgpu_unlock_hooks.c on line 567 change the 0 into a 1 for debugging to be enabled
/* Debug logs can be enabled here. To enable it, change 0 to 1. */#if 1
#define LOG(...) printk(__VA_ARGS__)
Maybe good to remove the apt update because that put me too 5.13, took a while to realizethebreak, and had to rollback 🙂 Now will try again, tnx
Hmmm, not upgrading the packages can be an issue. Will append this article soon on how to exclude kernel upgrades.
You can also instruct grub to boot the ‘older’ kernel like so. First find out which kernels are available in grub
grep 'menuentry' /boot/grub/grub.cfgThen edit grub.cfg
nano /boot/grub/grub.cfgReplace the GRUB_DEFAULT line with something (example) like this
GRUB_DEFAULT="Proxmox VE GNU/Linux, with Linux 5.11.22-4-pve"And update grub
update-grubapt-mark hold proxmox-ve ?
That’s the Proxmox Environment. You need to hold back the kernel.
This package:
pve-kernel-version-pveDoes anyone have any issue for timeout waiting on systemd?
Hi,
Yes, on windows 10 with TPM 2.0.
Seems to be fine if I remove TPM.
I’ve been getting the waiting on systemd error when trying to launch one of my vm’s. What is this TPM 2.0 you’re referring to? Maybe that’s my issue as well.
I used unlock on rtx3070 , dmesg | grep -i vgpu no vGPU unlock patch applied, nvidia-smi no information appeared
Then the (dkms) driver isn’t properly installed or loaded. What does lsmod|grep -i nvidia report ?
Im running into the same issue, I ran the above command and it produced
lsmod|grep -i nvidia
nvidia_vgpu_vfio 57344 0
nvidia 34074624 10 nvidia_vgpu_vfio
mdev 28672 2 vfio_mdev,nvidia_vgpu_vfio
vfio 36864 4 vfio_mdev,nvidia_vgpu_vfio,vfio_iommu_type1,vfio_pci
Using Proxmox 7.0-2
Confirmed im on correct kernal.
using NVIDIA-GRID-Linux-KVM-460.32.04-460.32.03-461.33
Which kernel are you guys running ?
uname -aHey Wim, thanks for the quick reply
5.11.22-4
Same kernel i am running. How about
dmesg| grep -i nvidiaLet me do a fresh install, I just tried going down to proxmox 6 but im still having issue.
Let me do a clean install and i can record each step and output in the process. Thank you for your time in helping us all by the way
Hi Win
Proxmox-ve_7.0-2
Kernal = 5.11.22-4-pve
dmesg| grep -i nvidia pre install
[ 8.141905] nouveau 0000:42:00.0: NVIDIA GP106 (136000a1)
[ 8.320227] input: HDA NVidia HDMI/DP,pcm=3 as /devices/pci0000:40/0000:40:02.0/0000:42:00.1/sound/card0/input5
[ 8.320374] input: HDA NVidia HDMI/DP,pcm=7 as /devices/pci0000:40/0000:40:02.0/0000:42:00.1/sound/card0/input6
[ 8.320470] input: HDA NVidia HDMI/DP,pcm=8 as /devices/pci0000:40/0000:40:02.0/0000:42:00.1/sound/card0/input7
[ 8.320558] input: HDA NVidia HDMI/DP,pcm=9 as /devices/pci0000:40/0000:40:02.0/0000:42:00.1/sound/card0/input8
[ 8.320646] input: HDA NVidia HDMI/DP,pcm=10 as /devices/pci0000:40/0000:40:02.0/0000:42:00.1/sound/card0/input9
[ 8.320734] input: HDA NVidia HDMI/DP,pcm=11 as /devices/pci0000:40/0000:40:02.0/0000:42:00.1/sound/card0/input10
[ 8.320875] input: HDA NVidia HDMI/DP,pcm=12 as /devices/pci0000:40/0000:40:02.0/0000:42:00.1/sound/card0/input11
[ 10.023455] audit: type=1400 audit(1642261351.310:4): apparmor=”STATUS” operation=”profile_load” profile=”unconfined” name=”nvidia_modprobe” pid=916 comm=”apparmor_parser”
[ 10.026399] audit: type=1400 audit(1642261351.310:5): apparmor=”STATUS” operation=”profile_load” profile=”unconfined” name=”nvidia_modprobe//kmod” pid=916 comm=”apparmor_parser”
running update-initramfs -u
root@****:~# update-initramfs -u
update-initramfs: Generating /boot/initrd.img-5.11.22-4-pve
Running hook script ‘zz-proxmox-boot’..
Re-executing ‘/etc/kernel/postinst.d/zz-proxmox-boot’ in new private mount namespace..
No /etc/kernel/proxmox-boot-uuids found, skipping ESP sync.
running dmesg | grep -e DMAR -e IOMMU
Does not return anything that indicates PCI
root@****:~# dmesg | grep -e DMAR -e IOMMU
[ 0.022952] ACPI: DMAR 0x00000000BD3346F4 000190 (v01 DELL PE_SC3 00000001 DELL 00000001)
[ 0.023000] ACPI: Reserving DMAR table memory at [mem 0xbd3346f4-0xbd334883]
[ 0.322157] DMAR: IOMMU enabled
[ 0.750099] DMAR: Host address width 46
[ 0.750100] DMAR: DRHD base: 0x000000d2100000 flags: 0x0
[ 0.750105] DMAR: dmar0: reg_base_addr d2100000 ver 1:0 cap d2078c106f0466 ecap f020de
[ 0.750108] DMAR: DRHD base: 0x000000dc900000 flags: 0x1
[ 0.750111] DMAR: dmar1: reg_base_addr dc900000 ver 1:0 cap d2078c106f0466 ecap f020de
[ 0.750113] DMAR: RMRR base: 0x000000bf458000 end: 0x000000bf46ffff
[ 0.750114] DMAR: RMRR base: 0x000000bf450000 end: 0x000000bf450fff
[ 0.750115] DMAR: RMRR base: 0x000000bf452000 end: 0x000000bf452fff
[ 0.750116] DMAR: ATSR flags: 0x0
[ 0.750118] DMAR-IR: IOAPIC id 2 under DRHD base 0xd2100000 IOMMU 0
[ 0.750120] DMAR-IR: IOAPIC id 0 under DRHD base 0xdc900000 IOMMU 1
[ 0.750122] DMAR-IR: IOAPIC id 1 under DRHD base 0xdc900000 IOMMU 1
[ 0.750123] DMAR-IR: HPET id 0 under DRHD base 0xdc900000
[ 0.750124] DMAR-IR: x2apic is disabled because BIOS sets x2apic opt out bit.
[ 0.750125] DMAR-IR: Use ‘intremap=no_x2apic_optout’ to override the BIOS setting.
[ 0.750631] DMAR-IR: Enabled IRQ remapping in xapic mode
[ 1.929184] DMAR: dmar0: Using Queued invalidation
[ 1.929198] DMAR: dmar1: Using Queued invalidation
[ 1.934281] DMAR: Intel(R) Virtualization Technology for Directed I/O
./nvidia-installer –dkms
ERROR: Failed to run `/usr/sbin/dkms build -m nvidia -v 460.32.04 -k 5.11.22-4-pve`: Error! Your
kernel headers for kernel 5.11.22-4-pve cannot be found.
Please install the linux-headers-5.11.22-4-pve package,
or use the –kernelsourcedir option to tell DKMS where it’s located
apt install pve-headers-`uname -r`
resolves the Failed to run `/usr/sbin/dkms build -m nvidia -v 460.32.04 -k 5.11.22-4-pve`: Error
root@****:~# dmesg|grep -i vgpu
root@****:~# dmesg| grep -i nvidia
[ 8.315746] nvidia-nvlink: Nvlink Core is being initialized, major device number 511
[ 8.317749] nvidia 0000:42:00.0: enabling device (0000 -> 0003)
[ 8.318357] nvidia 0000:42:00.0: vgaarb: changed VGA decodes: olddecodes=io+mem,decodes=none:owns=none
[ 8.434753] NVRM: loading NVIDIA UNIX x86_64 Kernel Module 460.32.04 Wed Jan 6 05:54:18 UTC 2021
[ 8.508077] input: HDA NVidia HDMI/DP,pcm=3 as /devices/pci0000:40/0000:40:02.0/0000:42:00.1/sound/card0/input5
[ 8.508193] input: HDA NVidia HDMI/DP,pcm=7 as /devices/pci0000:40/0000:40:02.0/0000:42:00.1/sound/card0/input6
[ 8.508292] input: HDA NVidia HDMI/DP,pcm=8 as /devices/pci0000:40/0000:40:02.0/0000:42:00.1/sound/card0/input7
[ 8.508387] input: HDA NVidia HDMI/DP,pcm=9 as /devices/pci0000:40/0000:40:02.0/0000:42:00.1/sound/card0/input8
[ 8.508476] input: HDA NVidia HDMI/DP,pcm=10 as /devices/pci0000:40/0000:40:02.0/0000:42:00.1/sound/card0/input9
[ 8.508569] input: HDA NVidia HDMI/DP,pcm=11 as /devices/pci0000:40/0000:40:02.0/0000:42:00.1/sound/card0/input10
[ 8.508662] input: HDA NVidia HDMI/DP,pcm=12 as /devices/pci0000:40/0000:40:02.0/0000:42:00.1/sound/card0/input11
[ 9.270132] audit: type=1400 audit(1642264206.562:7): apparmor=”STATUS” operation=”profile_load” profile=”unconfined” name=”nvidia_modprobe” pid=906 comm=”apparmor_parser”
[ 9.270142] audit: type=1400 audit(1642264206.562:8): apparmor=”STATUS” operation=”profile_load” profile=”unconfined” name=”nvidia_modprobe//kmod” pid=906 comm=”apparmor_parser”
[ 12.444291] nvidia 0000:42:00.0: Driver cannot be asked to release device
[ 12.444507] nvidia 0000:42:00.0: MDEV: Registered
First off, you need to enable virtualization support in your bios. To enable IOMMU
Secondly, it seems that you’re experiencing dkms build problems for the nvidia driver since it can’t find the pve-headers.
What does dpkg -l|grep pve-headers report ?
Hey, sorry for the late reply
root@****:~# dpkg -l|grep pve-headers
ii pve-headers 7.1-1 all Default Proxmox VE Kernel Headers
ii pve-headers-5.11.22-4-pve 5.11.22-9 amd64 The Proxmox PVE Kernel Headers
ii pve-headers-5.13 7.1-5 all Latest Proxmox VE Kernel Headers
ii pve-headers-5.13.19-2-pve 5.13.19-4 amd64 The Proxmox PVE Kernel Headers
Hmm i thought i had enabled Virtualization on the bios side, let me double check .
PVE 5.11+ kernel seems to break the possibility to split up the GPU. So stick to 5.11. (since you apparently have kernel 5.13 installed as well) Edit that via grub, to boot the 5.11 kernel.
NVRM: GPU at 0000:08:00.0 has software scheduler DISABLED with policy BEST_EFFORT.
please tell me.
root@pve:~/NVIDIA-Linux-x86_64-460.32.04-vgpu-kvm# patch -p0 < ../nvidia-io.patch
-bash: ../nvidia-vpgu-vfio.patch: No such file or directory
put the nvidia-vpgu-vfio.patch file one directory lower than the NVIDIA-Linux-x86_64-460.32.04-vgpu-kvm directory
I’m getting the following error:
root@smaug:/etc/pve/qemu-server# qm start 909
mdev instance ‘00000000-0000-0000-0000-000000000909’ already existed, using it.
kvm: -device vfio-pci,sysfsdev=/sys/bus/pci/devices/0000:01:00.0/00000000-0000-0000-0000-000000000909,id=hostpci0,bus=pci.0,addr=0x10: vfio 00000000-0000-0000-0000-000000000909: error getting device from group 11: Input/output error
Verify all devices in group 11 are bound to vfio- or pci-stub and not already in use
start failed: QEMU exited with code 1
I have this for the args:
root@smaug:/etc/pve/qemu-server# cat 909.conf
args: -device ‘vfio-pci,sysfsdev=/sys/bus/mdev/devices/3dc0f7f3-74ec-4a7f-913e-b302725d4eb2’ -uuid 3dc0f7f3-74ec-4a7f-913e-b302725d4eb
I also did the -uuid as all the zeroes and 909 at the end, the error remains the same.
Thoughts?
Had that same problem with ‘other’ Nvidia drivers. Please stick to the 460.32.04 driver on the host (Proxmox) machine
lol, I’m dumb. Ampere isn’t working or may not work since it uses sr-iov, correct? I’ll have to find my 1060.
Only these cards are supported
Nvidia vGPU cards GPU Chip vGPU unlock supported:
Tesla M10 GM107 x4 Most Maxwell 1.0 cards
Tesla M60 GM204 x2 Most Maxwell 2.0 cards
Tesla P40 GP102 Most Pascal cards
Tesla V100 16GB GV100 Titan V, Quadro GV100
Quadro RTX 6000 TU102 Most Turing cards
RTX A6000 GA102 Ampere is not supported
Hello, you have made a very detailed guide, Thanks a lot for the same.
I have pve-manager/7.1-10/6ddebafe (running kernel: 5.13.19-4-pve) with the nivida driver 510.47.03-511.65 which I got from the nvidia site.
I have a Tesla T4 16GB Card which is Grid capable and this is on an HP DL385 AMD EPYC Server.
Will this combination work or do I need to get to kernel 5.11 and ver 460.32.04 (if yes from where do i get this version of the driver)
** Update – i got kernel 5.11 installed .
now i get the below errors (also unable to patch the file)
ERROR: Failed to run `/usr/sbin/dkms build -m nvidia -v 460.32.04 -k 5.11.22-7-pve`:
Kernel preparation unnecessary for this kernel. Skipping…
Building module:
cleaning build area…
‘make’ -j32 NV_EXCLUDE_BUILD_MODULES=” KERNEL_UNAME=5.11.22-7-pve IGNORE_CC_MISMATCH=” modules……(bad exit status: 2)
Error! Bad return status for module build on kernel: 5.11.22-7-pve (x86_64)
Consult /var/lib/dkms/nvidia/460.32.04/build/make.log for more information.
If i understand correctly, you won’t even need the vgpu_unlock tool. You can just use this GPU as is with the grid driver
Which video card should I buy for Promox 7.1.10? It needs to run on more than 1 virtual server.
I would go for a GTX 2000 series (2060/2070/2080 etc)
Thanks for the great tutorial. I stranded with the kernel. It is a fresh install Proxmox 7, and when I command to see what older kernels are installed I only get 5.13.19-2-pve. How can I install older kernels
First you have to install a 5.11 kernel.
apt search pve-kernel-5.11then install the highest available one. Currently pve-kernel-5.11.7-1-pve
From there edit Grub to boot the 5.11 kernel like i described in the tutorial and you’re good to go
Thanks for the quick reply
When I do this, I get
root@pve:~# apt search pve-kernel-5.11
Sorting… Done
Full Text Search… Done
root@pve:~#
root@pve:~# apt search pve-kernel
Sorting… Done
Full Text Search… Done
pve-firmware/now 3.3-3 all [installed,local]
Binary firmware code for the pve-kernel
pve-kernel-5.13/now 7.1-5 all [installed,local]
Latest Proxmox VE Kernel Image
pve-kernel-5.13.19-2-pve/now 5.13.19-4 amd64 [installed,local]
The Proxmox PVE Kernel Image
pve-kernel-helper/now 7.1-6 all [installed,local]
Function for various kernel maintenance tasks.
root@pve:~#
So I when I install it gives me a error
Sorry real newbie
Really no 5.11 kernels at all ? Interesting. What repositories have you got ?
cat /etc/apt/sources.listFresh new install
root@pve:~# cat /etc/apt/sources.list
deb http://ftp.nl.debian.org/debian bullseye main contrib
deb http://ftp.nl.debian.org/debian bullseye-updates main contrib
# security updates
deb http://security.debian.org bullseye-security main contrib
root@pve:~#
add this line
deb http://download.proxmox.com/debian/pve bullseye pve-no-subscriptionand do an
apt update& check againapt search pve-kernel-5.11Yes, thanks it worked
Great ! Updating the tutorial as well
Sorry run into two problems
root@pve:~/NVIDIA-Linux-x86_64-460.91.03-vgpu-kvm# patch -p0 < ../nvidia-vpgu-vfio.patch
-bash: ../nvidia-vpgu-vfio.patch: No such file or directory
and
root@pve:~/NVIDIA-Linux-x86_64-460.91.03-vgpu-kvm# patch -p0 < ../nv-caps.patch
patching file kernel/nvidia/nv-caps.c
Hunk #3 FAILED at 589.
1 out of 3 hunks FAILED — saving rejects to file kernel/nvidia/nv-caps.c.rej
any idea how to get this to work?
I must say I can't get to the Nvidia trial request because the website os offline. So I downloaded NVIDIA-Linux-x86_64-460.91.03-vgpu-kvm. Can this be the problem, how can I get the right Nvidia drivers?
place the patches one directory lower than NVIDIA-Linux-x86_64-460.91.03-vgpu-kvm. And try again.
KVM version 460.91.03 might be too new. Try searching for 460.32.04. That one definitely works
the patches are in the root, like the tutorial. one folder back from the drivers.
I have to wait for Nvidia to be back online 🙂 and will download the right driver, this one was floating around on the internet
Dank je voor je tijd
The last one, still does not work
root@pve:~/NVIDIA-Linux-x86_64-460.32.04-vgpu-kvm# patch -p0 < ../nvidia-vpgu-vfio.patch
-bash: ../nvidia-vpgu-vfio.patch: No such file or directory
root@pve:~/NVIDIA-Linux-x86_64-460.32.04-vgpu-kvm#
Started over 3 times. I'm so sorry. And without this the rest is also not working (I tried)
Strange. It can’t find the file. But an easy fix would be to edit the kernel/nvidia-vgpu-vfio/nvidia-vgpu-vfio.c file and change MODULE_LICENSE(“MIT”); to MODULE_LICENSE(“GPL”);
thanks,
But I give up, last try when I install the driver. I got this error
NVIDIA Accelerated Graphics Driver for Linux-x86_64 (460.32.04)
ERROR: Failed to run `/usr/sbin/dkms build -m nvidia -v 460.32.04 -k 5.11.7-1-pve`:
Kernel preparation unnecessary for this kernel. Skipping…
Building module:
cleaning build area…
‘make’ -j32 NV_EXCLUDE_BUILD_MODULES=” KERNEL_UNAME=5.11.7-1-pve IGNORE_CC_MISMATCH=” modules….(bad exit status: 2)
Error! Bad return status for module build on kernel: 5.11.7-1-pve (x86_64)
Consult /var/lib/dkms/nvidia/460.32.04/build/make.log for more information.
OK
This is more diffucult then I thought
Hi
I use dmesg|grep -i vgpu command it doesn’t show something like [ 31.222948] vGPU unlock patch applied after I finish all process
MY display:
dmesg|grep -i vgpu
[ 12.185400] CPU: 9 PID: 1035 Comm: nvidia-vgpud Tainted: P O 5.11.22-7-pve #1
[ 12.219231] Modules linked in: ebtable_filter ebtables ip_set ip6table_raw iptable_raw ip6table_filter ip6_tables iptable_filter bpfilter nf_tables bonding tls softdog nfnetlink_log nfnetlink intel_rapl_msr intel_rapl_common edac_mce_amd nvidia_vgpu_vfio(O) snd_hda_codec_realtek snd_hda_codec_generic ledtrig_audio snd_hda_codec_hdmi snd_hda_intel snd_intel_dspcfg soundwire_intel soundwire_generic_allocation soundwire_cadence iwlmvm snd_hda_codec snd_hda_core mac80211 kvm_amd snd_hwdep libarc4 soundwire_bus kvm snd_soc_core btusb snd_compress crct10dif_pclmul btrtl ac97_bus btbcm ghash_clmulni_intel nvidia(O) iwlwifi snd_pcm_dmaengine btintel aesni_intel snd_pcm bluetooth crypto_simd snd_timer cryptd ecdh_generic snd glue_helper cfg80211 ecc rapl soundcore vfio_mdev mdev ccp wmi_bmof pcspkr efi_pstore zfs(PO) zunicode(PO) zzstd(O) zlua(O) zavl(PO) icp(PO) mac_hid zcommon(PO) znvpair(PO) spl(O) vhost_net vhost vhost_iotlb tap ib_iser rdma_cm iw_cm ib_cm ib_core iscsi_tcp libiscsi_tcp
Thanks
You’d have to edit the vgpu_unlock_hooks.c (search for debug) to see that in dmesg. Alternatively you could use journalctl -u nvidia-vgpud.service to see is vgpu_unlock is loaded.
Just a quick side note. This tutorial is somewhat outdated. I’m working on a new version of how to get vgpu_unlock working on newer kernels. Should not be that long to put to put online
Hi Sir:
Thanks for your reply.
No information appears when I use the command nvidia-smi , There should be a problem here.
Thanks
About the status of my system:
proxmox-ve: 7.0-2 (running kernel: 5.11.22-7-pve)
root@pve:~# lsmod | grep -i nvidia
nvidia_vgpu_vfio 57344 0
nvidia 34074624 8 nvidia_vgpu_vfio
mdev 28672 2 vfio_mdev,nvidia_vgpu_vfio
vfio 36864 4 vfio_mdev,nvidia_vgpu_vfio,vfio_iommu_type1,vfio_pci
root@pve:~# dmesg | grep -i nvidia
[ 3.525632] nvidia-nvlink: Nvlink Core is being initialized, major device number 236
[ 3.527000] nvidia 0000:01:00.0: vgaarb: changed VGA decodes: olddecodes=io+mem,decodes=none:owns=io+mem
[ 3.563376] input: HDA NVidia HDMI/DP,pcm=3 as /devices/pci0000:00/0000:00:01.0/0000:01:00.1/sound/card1/input9
[ 3.563398] input: HDA NVidia HDMI/DP,pcm=7 as /devices/pci0000:00/0000:00:01.0/0000:01:00.1/sound/card1/input10
[ 3.563418] input: HDA NVidia HDMI/DP,pcm=8 as /devices/pci0000:00/0000:00:01.0/0000:01:00.1/sound/card1/input11
[ 3.563435] input: HDA NVidia HDMI/DP,pcm=9 as /devices/pci0000:00/0000:00:01.0/0000:01:00.1/sound/card1/input12
[ 3.563453] input: HDA NVidia HDMI/DP,pcm=10 as /devices/pci0000:00/0000:00:01.0/0000:01:00.1/sound/card1/input13
[ 3.563469] input: HDA NVidia HDMI/DP,pcm=11 as /devices/pci0000:00/0000:00:01.0/0000:01:00.1/sound/card1/input14
[ 3.563487] input: HDA NVidia HDMI/DP,pcm=12 as /devices/pci0000:00/0000:00:01.0/0000:01:00.1/sound/card1/input15
[ 3.569937] NVRM: loading NVIDIA UNIX x86_64 Kernel Module 460.32.04 Wed Jan 6 05:54:18 UTC 2021
[ 3.973571] audit: type=1400 audit(1646206289.451:7): apparmor=”STATUS” operation=”profile_load” profile=”unconfined” name=”nvidia_modprobe” pid=671 comm=”apparmor_parser”
[ 3.973573] audit: type=1400 audit(1646206289.451:8): apparmor=”STATUS” operation=”profile_load” profile=”unconfined” name=”nvidia_modprobe//kmod” pid=671 comm=”apparmor_parser”
[ 8.852113] CPU: 7 PID: 799 Comm: nvidia-vgpud Tainted: P O 5.11.22-7-pve #1
[ 8.852183] RIP: 0010:_nv035994rm+0x20/0xd0 [nvidia]
[ 8.852910] ? _nv021564rm+0x338/0x450 [nvidia]
[ 8.853206] ? _nv002560rm+0x9/0x20 [nvidia]
[ 8.853417] ? _nv003504rm+0x1b/0x80 [nvidia]
[ 8.853636] ? _nv022246rm+0x13d/0x9f0 [nvidia]
[ 8.853806] ? _nv000699rm+0x910/0x2100 [nvidia]
[ 8.854043] ? rm_init_adapter+0xc5/0xe0 [nvidia]
[ 8.854230] ? nv_open_device+0x122/0x8d0 [nvidia]
[ 8.854368] ? nvidia_open+0x2b7/0x560 [nvidia]
[ 8.854504] ? nvidia_frontend_open+0x58/0xa0 [nvidia]
[ 8.865509] Modules linked in: ebtable_filter ebtables ip_set ip6table_raw iptable_raw ip6table_filter ip6_tables iptable_filter bpfilter nf_tables bonding tls softdog nfnetlink_log nfnetlink intel_rapl_msr intel_rapl_common x86_pkg_temp_thermal intel_powerclamp coretemp nvidia_vgpu_vfio(O) snd_hda_codec_realtek snd_hda_codec_generic snd_sof_pci snd_sof_intel_hda_common snd_hda_codec_hdmi snd_sof_intel_hda snd_sof_intel_byt snd_sof_intel_ipc snd_sof snd_sof_xtensa_dsp snd_soc_hdac_hda snd_hda_ext_core snd_soc_acpi_intel_match snd_soc_acpi ledtrig_audio snd_hda_intel snd_intel_dspcfg kvm_intel soundwire_intel soundwire_generic_allocation soundwire_cadence snd_hda_codec snd_hda_core kvm snd_hwdep soundwire_bus mei_hdcp nvidia(O) snd_soc_core crct10dif_pclmul ghash_clmulni_intel snd_compress aesni_intel ac97_bus snd_pcm_dmaengine zfs(PO) crypto_simd snd_pcm cryptd glue_helper snd_timer joydev input_leds vfio_mdev snd intel_cstate mdev mei_me soundcore ee1004 mei zunicode(PO) zzstd(O)
[ 8.992648] RIP: 0010:_nv035994rm+0x20/0xd0 [nvidia]
root@pve:~# dpkg -l | grep pve-headers
ii pve-headers-5.11.22-7-pve 5.11.22-12 amd64 The Proxmox PVE Kernel Headers
Thanks
root@pve:~# journalctl -u nvidia-vgpud.service
— Journal begins at Wed 2022-03-02 14:43:07 CST, ends at Wed 2022-03-02 16:11:16 CST. —
Mar 02 15:19:02 pve systemd[1]: Starting NVIDIA vGPU Daemon…
Mar 02 15:19:02 pve systemd[1]: Started NVIDIA vGPU Daemon.
Mar 02 15:19:02 pve bash[765]: vgpu_unlock loaded.
Mar 02 15:19:02 pve nvidia-vgpud[765]: vgpu_unlock loaded.
Mar 02 15:19:03 pve nvidia-vgpud[811]: vgpu_unlock loaded.
Mar 02 15:19:03 pve nvidia-vgpud[811]: Verbose syslog connection opened
Mar 02 15:19:03 pve nvidia-vgpud[811]: Started (811)
Mar 02 15:19:03 pve nvidia-vgpud[811]: Global settings:
Mar 02 15:19:03 pve nvidia-vgpud[811]: Size: 16
Version 1
Mar 02 15:19:03 pve nvidia-vgpud[811]: Homogeneous vGPUs: 1
Mar 02 15:19:03 pve nvidia-vgpud[811]: vGPU types: 494
Mar 02 15:19:03 pve nvidia-vgpud[811]:
Mar 02 15:19:05 pve nvidia-vgpud[811]: pciId of gpu [0]: 0:1:0:0
Mar 02 15:30:00 pve nvidia-vgpud[811]: Received signal 15
Mar 02 15:30:00 pve nvidia-vgpud[811]: PID file unlocked.
Mar 02 15:30:00 pve systemd[1]: Stopping NVIDIA vGPU Daemon…
Mar 02 15:30:00 pve nvidia-vgpud[811]: PID file closed.
Mar 02 15:30:00 pve nvidia-vgpud[811]: Shutdown (811)
Mar 02 15:30:00 pve systemd[1]: nvidia-vgpud.service: Killing process 815 (nvidia-vgpud) with signal SIGKILL.
— Boot 2da7943677cb48c99c9b9b6be36322ec —
Mar 02 15:31:29 pve systemd[1]: Starting NVIDIA vGPU Daemon…
Mar 02 15:31:29 pve systemd[1]: Started NVIDIA vGPU Daemon.
Mar 02 15:31:29 pve bash[760]: vgpu_unlock loaded.
Mar 02 15:31:29 pve nvidia-vgpud[760]: vgpu_unlock loaded.
Mar 02 15:31:29 pve nvidia-vgpud[799]: vgpu_unlock loaded.
Mar 02 15:31:29 pve nvidia-vgpud[799]: Verbose syslog connection opened
Mar 02 15:31:29 pve nvidia-vgpud[799]: Started (799)
Mar 02 15:31:29 pve nvidia-vgpud[799]: Global settings:
Mar 02 15:31:29 pve nvidia-vgpud[799]: Size: 16
Version 1
Mar 02 15:31:29 pve nvidia-vgpud[799]: Homogeneous vGPUs: 1
Mar 02 15:31:29 pve nvidia-vgpud[799]: vGPU types: 494
Mar 02 15:31:29 pve nvidia-vgpud[799]:
Mar 02 15:31:32 pve nvidia-vgpud[799]: pciId of gpu [0]: 0:1:0:0
— Boot 9d8df87b5976408e9bb8e5dce2102dca —
Mar 02 16:06:08 pve systemd[1]: Starting NVIDIA vGPU Daemon…
Mar 02 16:06:08 pve systemd[1]: Started NVIDIA vGPU Daemon.
Mar 02 16:06:08 pve bash[766]: vgpu_unlock loaded.
Mar 02 16:06:08 pve nvidia-vgpud[766]: vgpu_unlock loaded.
Mar 02 16:06:08 pve nvidia-vgpud[813]: vgpu_unlock loaded.
Mar 02 16:06:08 pve nvidia-vgpud[813]: Verbose syslog connection opened
Mar 02 16:06:08 pve nvidia-vgpud[813]: Started (813)
Mar 02 16:06:08 pve nvidia-vgpud[813]: Global settings:
Mar 02 16:06:08 pve nvidia-vgpud[813]: Size: 16
Version 1
Mar 02 16:06:08 pve nvidia-vgpud[813]: Homogeneous vGPUs: 1
Mar 02 16:06:08 pve nvidia-vgpud[813]: vGPU types: 494
Mar 02 16:06:08 pve nvidia-vgpud[813]:
Mar 02 16:06:11 pve nvidia-vgpud[813]: pciId of gpu [0]: 0:1:0:0
Mar 02 16:07:44 pve nvidia-vgpud[813]: Received signal 15
Mar 02 16:07:44 pve nvidia-vgpud[813]: PID file unlocked.
Mar 02 16:07:44 pve systemd[1]: Stopping NVIDIA vGPU Daemon…
Mar 02 16:07:44 pve nvidia-vgpud[813]: PID file closed.
Mar 02 16:07:44 pve nvidia-vgpud[813]: Shutdown (813)
Mar 02 16:07:44 pve systemd[1]: nvidia-vgpud.service: Killing process 831 (nvidia-vgpud) with signal SIGKILL.
— Boot 7fed82b5e57c479f9db23859fd4ae3c7 —
Mar 02 16:10:33 pve systemd[1]: Starting NVIDIA vGPU Daemon…
Mar 02 16:10:33 pve systemd[1]: Started NVIDIA vGPU Daemon.
Mar 02 16:10:33 pve bash[764]: vgpu_unlock loaded.
Mar 02 16:10:33 pve nvidia-vgpud[764]: vgpu_unlock loaded.
Mar 02 16:10:33 pve nvidia-vgpud[804]: vgpu_unlock loaded.
Mar 02 16:10:33 pve nvidia-vgpud[804]: Verbose syslog connection opened
Mar 02 16:10:33 pve nvidia-vgpud[804]: Started (804)
Mar 02 16:10:33 pve nvidia-vgpud[804]: Global settings:
Mar 02 16:10:33 pve nvidia-vgpud[804]: Size: 16
Version 1
Mar 02 16:10:33 pve nvidia-vgpud[804]: Homogeneous vGPUs: 1
Mar 02 16:10:33 pve nvidia-vgpud[804]: vGPU types: 494
Mar 02 16:10:33 pve nvidia-vgpud[804]:
Mar 02 16:10:36 pve nvidia-vgpud[804]: pciId of gpu [0]: 0:1:0:0
stuck on “Driver cannot be asked to release device”
I do get “vGPU unlock patch applied.”
Am I good, or do I have a problem
geforce 960
root@wraithe:~# dmesg | grep -i vgpu
[ 13.305861] vGPU unlock patch applied.
root@wraithe:~# dmesg | grep -i nvidia
[ 10.218829] nvidia-nvlink: Nvlink Core is being initialized, major device number 234
[ 10.219116] nvidia 0000:0b:00.0: vgaarb: changed VGA decodes: olddecodes=io+mem,decodes=none:owns=none
[ 10.233884] input: HDA NVidia HDMI/DP,pcm=3 as /devices/pci0000:00/0000:00:03.1/0000:0b:00.1/sound/card0/input17
[ 10.233909] input: HDA NVidia HDMI/DP,pcm=7 as /devices/pci0000:00/0000:00:03.1/0000:0b:00.1/sound/card0/input18
[ 10.233939] input: HDA NVidia HDMI/DP,pcm=8 as /devices/pci0000:00/0000:00:03.1/0000:0b:00.1/sound/card0/input19
[ 10.233965] input: HDA NVidia HDMI/DP,pcm=9 as /devices/pci0000:00/0000:00:03.1/0000:0b:00.1/sound/card0/input20
[ 10.233992] input: HDA NVidia HDMI/DP,pcm=10 as /devices/pci0000:00/0000:00:03.1/0000:0b:00.1/sound/card0/input21
[ 10.234010] input: HDA NVidia HDMI/DP,pcm=11 as /devices/pci0000:00/0000:00:03.1/0000:0b:00.1/sound/card0/input22
[ 10.234030] input: HDA NVidia HDMI/DP,pcm=12 as /devices/pci0000:00/0000:00:03.1/0000:0b:00.1/sound/card0/input23
[ 10.334876] NVRM: loading NVIDIA UNIX x86_64 Kernel Module 460.32.04 Wed Jan 6 05:54:18 UTC 2021
[ 12.698092] audit: type=1400 audit(1647198733.743:4): apparmor=”STATUS” operation=”profile_load” profile=”unconfined” name=”nvidia_modprobe” pid=927 comm=”apparmor_parser”
[ 12.698093] audit: type=1400 audit(1647198733.743:5): apparmor=”STATUS” operation=”profile_load” profile=”unconfined” name=”nvidia_modprobe//kmod” pid=927 comm=”apparmor_parser”
[ 13.523539] nvidia 0000:0b:00.0: Driver cannot be asked to release device
[ 13.523566] nvidia 0000:0b:00.0: MDEV: Registered
root@wraithe:~#