Intro
In previous posts using Android with Termux or Nethunter I’ve explained how to build an Android mobile pentesting ROM using AOSP – Pixel Experience. This works great but is limited by the compute power of the ARM chip of the phone itself. That means that when you’re on the go you can only use short word lists (like wordlist-probable.txt) or return home to actually try to crack the captured handshakes using Hashcat. It would be more convenient if there was a way to have the cracking power of a Nvidia GPU in the field. So i came up with this solution. Modify Wifite so that it offers a TCP connection to a Hashcat server which uses GPU acceleration for cracking captured 4-way WPA handshakes.
I’m aware that there are other solutions available to achieve the same result, like WebHashcat. The benefit of doing it my way is that it’s integrated into Wifite without exiting and uploading the hash separately.
Table of Contents
Pre-requirements
Server side
As a dedicated fan of Proxmox my Hashcat server is running in a Kali VM. Even better, this VM is using a Nvidia GTX 1060 split up into two vGPU’s running at an average of 220 k/s with Hashcat mode 22000. Just make sure that you have a Nvidia GPU installed correctly either in a VM or bare metal.
So given that you already have the CUDA toolkit installed, the first step is to clone PyHashcat and download Hashcat v6.1.1 (has to be v6.1.1 otherwise PyHashcat won’t build) and build both of them.
Build PyHashcat
git clone https://github.com/f0cker/pyhashcat.git
cd pyhashcat/pyhashcat
wget https://github.com/hashcat/hashcat/archive/refs/tags/v6.1.1.zip
unzip v6.1.1.zip && mv hashcat-6.1.1 hashcat
cd hashcat
sudo make install_library
sudo make install
cd ..
sudo apt install libminizip-dev
python3 setup.py build_ext -R /usr/local/lib
sudo python3 setup.py install
When successful you should now have Hashcat and the PyHashcat library installed system wide on your server.
Verify by launching Python and importing the PyHashcat module
python3
import pyhashcat
help(pyhashcat)
If no (import) errors arise we can move on to cloning my modified Wifite fork.
Clone Wifite
git clone https://github.com/wvthoog/wifite2Run Hashcat server
In the directory wifite2 you will find the file Server.py. This file will start the Hashcat cracking server.
cd wifite2
python3 Server.py -h
Here we can see the arguments that need to be passed in order to startup the Hashcat backend server
usage: Server.py [-h] --ip IP --port PORT --password PASSWORD --wordlist WORDLIST

optional arguments:
  -h, --help           show this help message and exit
  --ip IP              IP address of the server
  --port PORT          Listening port of the server
  --password PASSWORD  Set the password for the server
  --wordlist WORDLIST  Wordlist to use for cracking
Although this is pretty self explanatory, just a quick run down
| Command | Function |
| –ip | This will set the LAN IP address of your server which is connected to the internet |
| –port | This will set the port the server will be listening on |
| –password | This will set the password the server will accept from the Wifite client |
| –wordlist | This will set the wordlist used for cracking the hash. |
To start up the server you’d run a command similar to this for example
python3 Server.py --ip 192.168.2.118 --port 4000 --password testing123 --wordlist rockyou.txtWhat this will do is start listening for incoming TCP connections on IP 192.168.2.118 and port 4000 with password testing123 and wordlist rockyou.txt. Make sure you open this port on your router, otherwise the server can’t be reached from the internet.
              :=++****++-:
          -*%@@@@%%##%%@@@@%*-
       :*@@@#=:.        .:=#@@@*:
     .#@@%-                  -%@@#.
    =@@%-       -*#=     =**.  -@@@=
   =@@#      :*@@#:   .*@@#.    +@@@=
  :@@#     -%@@#:   .*@@%-    :%@@@@@:
  #@@:   -%@@%-    +@@@=     *@@@=:@@#
  @@@  :%@@@+    -%@@%.    -@@@@:  @@@
  @@% +@@@@-   -#@@@%    :#@@@#.   %@@
  #@@#@@@@#::+%@@@@@- .=%@@@@-    .@@#
  :@@@@@@@@@@@%@@@@@@@@@@@@+      #@@:
   +@@@@@@@%= .@@@@@@@@@@+       *@@+
    +@@@%=:    :%@@@@%+:       :%@@+
     :%@@#-       .          -#@@%:    Wifte & Hascat over TCP
       -#@@@*=.          .=*@@@#-      a Hashcat backend server for Wifite
         .=#@@@@@%#**#%@@@@@#=.        created by wvthoog
             :-+**####**+-:            https://wvthoog.nl

 [+] Server is starting
 [+] Server is listening on IP: 192.168.2.118 and port: 4000
Wordlists
You can use any wordlist you’d like. In the example above I’ve used the rockyou wordlist which is not the best out there since the words are not all valid WPA candidates. (8 characters or more) To use your own wordlist, just download it in the root of the wifite2 directory and pass your wordlist to the –wordlist argument when launching the server.
Download the rockyou wordlist
cd wifite2
wget https://github.com/brannondorsey/naive-hashcat/releases/download/data/rockyou.txt
WAN IP
Later on (on the Android side) we need the WAN (external) IP address of the Hashcat server. Head over to this site and write down your IPv4 address. Again make sure you’ve opened the port on your router !
This concludes the server side installation. The server is ready for incoming hashes to arrive and pass them to the PyHashcat library which in turn calls Hashcat. Status updates are displayed in the shell as well as sent back over TCP to the Wifite client.
Cracking process
The cracking process on the server will look something similar to this

Android (Nethunter) side
Log into your Nethunter phone and open up a shell with superuser privileges. Either on the phone itself or by connecting to it with SSH. Once logged in we again clone the Wifite repository
Clone Wifite
git clone https://github.com/wvthoog/wifite2Install dependencies
On the side of the phone it is important that we have a few dependencies installed in order for Wifite to work correctly.
apt install aircrack-ng tshark hcxtools hcxdumptool reaver bully cowpatty macchanger -yAlthough it currently only works on 4-way WPA handshakes (PMKID capture does not work that well on Wifite) it is good practice to install all of these dependencies (and others i might have forgotten) even though we technically only need aircrack-ng and tshark.
Run Wifite with TCP Hashcat
Navigate to the Wifite directory and launch Wifite using the following command
# python3 Wifite.py --wpa --tcp-hashcat --hostname 192.168.2.118 --port 4000 --password testing123 --no-wps --no-pmkidBreaking this line up
| Command | Function |
| python3 Wifite.py | launch Wifite (with superuser privleges) |
| –wpa | target WPA enabled networks |
| –tcp-hashcat | use Hashcat over TCP for captured hash cracking |
| –hostname | the hostname of the Hashcat server. This can be an IP address or a DNS hostname |
| –port | the port used by the Hashcat server |
| –password | the password just by the Hashcat server |
| –no-wps | don’t use WPS attacks against the target |
| –no-pmkid | don’t use PMKID attacks against the target |
The hostname is the IPv4 address we’ve requested previously on the server side. Make sure you enter your own ip address or hostname !
After launching, Wifite will act in the normal way and let’s you select a wireless interface for monitoring. After you’ve selected your target and captured the handshake the modified code is activated. First it will convert the cap file to a hccapx file and sent it over to the Hashcat server. The server will accept the hash file and starts cracking it with the wordlist you specified on the server side.
Cracking process
During the cracking process the Wifite client is updated about the cracking status. The cracking process will look something like this

Intentionally copied the Aircrack process Wifite uses. So the status messages look more or less the same. When it reaches the end of the cracking process it displays all the relevant information about the target as well as the recovered hash.
Custom command
Launching Wifite on a Nethunter phone using the above command is kind of a pain. Since it’s so long a better way would be to create a Custom Command in your Nethunter phone like so.
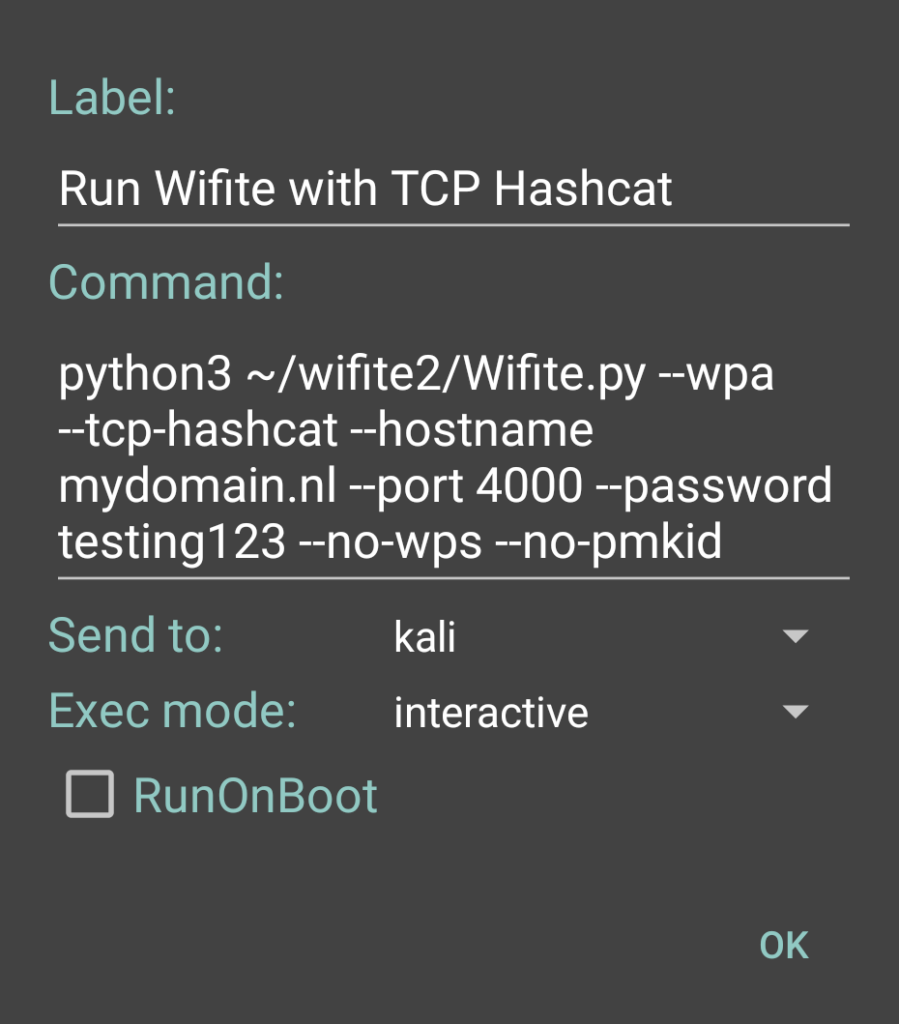
Just to make sure, you need to change the hostname to your own WAN IPv4 address and use your own port and password.
Improvements
Things i’d like to approve upon
- Don’t crack handshakes for every target, but stash them to crack them all together at the end
- Using Hashcat masks
- Using Hashcat hybrid mode (mask/wordlist)
- Use PMKID attacks
- Specify the server wordlist through Wifite
Conclusion
So, what do you guys think ? I realize that there is a lot of room for improvement. Heck maybe even be integrated in mainline Wifite itself. I’m open to suggestions and feature requests. Please leave your reaction down in the comment section below.
PayPal
If you like my work, please consider supporting.