Intro
In de midst of the Raspberry Pi shortage i came across this project. Someone figured out that a 4G WiFi router could be repurposed as a Single Board Computer (SBC) running Linux or OpenWRT. What piqued my interest was its decent compute power and features like a built-in 4G modem and GPS—something lacking in a comparable Raspberry Pi Zero W2. The goal? Transform this stick into a remote pentesting device accessible over 4G.
Table of Contents
OpenStick
The OpenStick project was initiated by Handome Yingyang, who created a custom bootloader to enable running Linux instead of the default Android firmware. Zoltán Mizse of Extrowork subsequently penned an excellent article, detailing the recommended stick and providing instructions on how to get it operational.
Not all 4G sticks are compatible; we specifically need a stick running the Qualcomm MSM8916 chipset. Acquiring such a stick can be challenging, as there are limited compatible models, including:
- UFI001B
- UFI001C
- UF896
- UZ801
- SP970
Your best chance of obtaining such a stick at an affordable price is through platforms like AliExpress or Amazon, with prices typically ranging from 12 to 15 dollars. I’ve personally acquired several sticks from different vendors and attempted to inquire about the version being sold, but most sellers were unaware. Consequently, acquiring the desired version can be hit or miss. Look for the keyword “MSM8916” in the product description. Typically, these sticks are black and a clue on the back of the stick is the presence of “SSID 4G-UFI-XX”
I have one UF896 stick and one UZ801 v3.0 stick. Most sticks sold currently are most likely to be the UZ801 v3.0 or v3.2. The v3.0 version is compatible and also the most stable stick i own.
In this tutorial, I’ll focus on the UZ801 v3.0 variant, which I found to be the most stable. If you have a different variant, you’ll need a distinct bootloader, boot image, and kernel. You can either search for these online or build your own.
Now that we have our stick, the first step is to flash the bootloader, boot image, and root filesystem to enable Linux. Our initial task is to enable ADB.
ADB
To activate ADB, insert the stick and allow it to fully boot up. Then establish a WiFi connection with the stick using the credentials specified on its back. After successfully logging in, launch a webbrowser and navigate to the stick’s management page at http://192.168.100.1. Log in with the username/password combination “admin.”
Once logged in, visit http://192.168.100.1/usbdebug.html to enable ADB. Reboot the stick (by reinserting the stick into the PC) and verify that ADB is active post-reboot.
adb devices
List of devices attached
0123456789ABCDEF	device
To gain root access execute
adb shell
setprop service.adb.root 1; busybox killall adbd
After obtaining root access, it’s essential to create a comprehensive backup of the factory firmware. This backup serves as a safety net in case of any issues down the line. If you encounter problems later, you can restore any or all partitions using this backup. Unfortunately, I neglected to perform this step with my initial stick, and as a result, I messed up the modem partition, leading to a non-functional 4G connection due to the loss of IMEI information.
EDL
Initiate a reboot into EDL mode, which grants direct read and write access to the eMMC storage of the stick. This step is crucial for creating a comprehensive backup of the eMMC storage, providing a safety net for potential issues in the future.
adb reboot edlNext, retrieve the EDL tool from Bjoern Kerler’s GitHub page and follow the provided instructions to install the necessary dependencies. Once installed, proceed to generate various backups.
Initially, create a full single image backup of the eMMC storage. This results in a large file encompassing all partitions. To restore, the entire file needs to be written back to the stick.
edl rf uz801-stock.binSubsequently, perform a full backup of each individual partition. This process produces a separate file for each partition, facilitating selective recovery if needed. For instance, use modem.bin for the modem partition.
edl rl uz801_stock --genxmlUpon completion, securely store all backup files. With the original firmware safeguarded, the software flashing process can commence. Simply unplug and reconnect the device to restore ADB access.
Fastboot
Disconnect and reconnect the stick once again to return to ADB mode. After the stick has fully booted up, execute the following command to access the bootloader. Fastboot will be employed to flash the new OpenStick firmware onto the device.
adb reboot bootloaderVerify if Fastboot recognizes the device by executing:
fastboot devicesA successful recognition should yield a value, confirming that the stick is now in Fastboot mode and prepared to receive the new firmware.
Flash
The original firmware by Handsome Yingyang ran Debian Bullseye. I’ve upgraded mine to Debian Bookworm, incorporating several modifications for enhanced versatility. The choice is yours regarding which version to install; the following commands are tailored to my version. If you prefer Handsome Yingyang’s version, download it from his repository here.
Begin by downloading my OpenStick release:
wget https://download.wvthoog.nl/projects/security/openstick/openstick-uz801-v3.0.zipNow, unzip the file and flash the new firmware onto the stick:
cd OpenStick/flash/
./flash.sh
Assuming everything proceeded as intended without any errors, the stick should have automatically rebooted. After the reboot, the new software (in this instance, Debian Bookworm) should be up and running, allowing us to log in to the stick.
Login
The stick is currently operating on a basic version of Debian Bookworm, allowing us to install various applications within the constraints of the 3.2GB available storage. Notably, the stick’s kernel is compiled with USB Gadget support, and both the libusbgx library and the gadget tool are installed.
SSH
For SSH access, my Debian version on the stick will automatically create an RNDIS USB gadget device with an IP address of 192.168.200.1 upon boot. We can establish a SSH connection to the stick as follows:
ssh [email protected]Please note that the default password for the user is: 1
WiFi
In addition to the RNDIS network connection, a WiFi hotspot is generated during the initial bootup. Connect to the WiFi hotspot using the following credentials:
- SSID: 4G-UFI-XX
- PSK: 1234567890
To establish an SSH connection over WiFi, use the following command:
ssh [email protected]Please note that the default password for the user is: 1
Connect to Internet
Now that we’re logged in we want to connect to internet for updating and installing software. The stick has te ability to connect to the internet through WiFi or 4G. Since setting up WiFi is easier we’ll start with that one.
WiFi
As Debian employs NetworkManager, we can leverage nmcli (or nmtui if you prefer) to set up and activate our WiFi connection. Replace SSID and PASSWORD with the appropriate values for connecting to your wireless network.
To begin, delete the hotspot connection:
nmcli connection delete hotspotNext, connect to an access point:
sudo nmcli dev wifi connect "SSID" password "PASSWORD"Check if wlan0 is successfully connected and has an assigned IP address:
ip show a wlan0If the connection is successful, establish an SSH connection to that IP address using the earlier credentials:
ssh user@<ip-address>4G/LTE
One remarkable feature of this stick is its built-in 4G modem, enabling remote access from virtually anywhere in the world.
To configure the connection, we’ll use nmcli and work with a pre-created NetworkManager profile named “lte.”
Begin by editing the SIM card PIN setting. If you don’t have a PIN set, you can skip this step:
sudo nmcli connection modify lte gsm.pin <your_pin>Next, set the APN for your cellular network provider. Many providers use “internet” as the APN, but it’s essential to verify this information on your provider’s website:
sudo nmcli connection modify lte gsm.apn <your_apn>Activate the 4G connection:
sudo nmcli connection up lteCheck if the stick has successfully connected to the 4G network:
sudo mmcli -m 0Verify if an IP address has been assigned:
ip a show wwan0If the connection is established and an IP address is assigned, you’ve successfully connected the stick to a 4G network. Conduct a speed test to evaluate the connection speed:
sudo apt install speedtest-cli
speedtest-cli
Here’s an example of the result I obtained:
$ speedtest-cli
Retrieving speedtest.net configuration...
Testing from KPN (89.200.46.120)...
Retrieving speedtest.net server list...
Selecting best server based on ping...
Hosted by Redhosting (Almere) [29.20 km]: 58.1 ms
Testing download speed................................................................
Download: 36.46 Mbit/s
Testing upload speed..................................................................
Upload: 39.21 Mbit/s
Basic Usage
Now, let’s dive into the interesting part of this tutorial – altering USB function behavior using the USB Gadget library and three distinct command-line tools.
Here’s a summary of some commonly used USB Gadget functions:
- RNDIS
- Remote Network Driver Interface Specification (RNDIS)
- Creates a Virtual Ethernet link on top of USB CDC (ECM)
- HID
- Human Interface Device (HID)
- Creates a keyboard, mouse or gamecontroller
- MSD
- Mass Storage Device (MSD)
- Create a USB mass storage device
- FFS
- Creates a USB FunctionFS device
- MIDI
- Creates a USB MIDI audio device
- PRINTER
- Creates a USB printer
- UVC
- USB Video Class (UVC)
- Creates a USB webcam device
- UAC
- USB Audio Class (UAC)
- Creates a USB audio device
- ECM
- Ethernet Control Module (ECM)
- Creates a USB Ethernet device
- ACM
- Abstract Control Model (ACM)
- Create a USB Serial device
As mentioned earlier, my build incorporates three command-line tools for USB Gadget manipulation. The first is the official tool from the creators of the libusbgx library, called GT (gadget tool). I prefer using this tool as it allows loading a gadget from a scheme (file) and supports enabling gadgets through a systemd service.
The second tool is GC (gadget controller), developed by Handsome Yingyang. Gadgets can be easily added using the GC command. For instance, adding an RNDIS gadget:
sudo gc -a rndis
sudo gc -e
Available options in GC include:
Usage : gc [options....]
-h          Show this help.
-l          Show active gadget functions.
-c          Clean all active gadget.
-e          Enable all active gadget.
-d          Disable all active gadget.
-a <function> [configs ...]   Add a gadget function.
-r <name>      Remove a gadget function by name in list (-l).
The traditional method of adding USB gadgets is to use examples provided by libusbgx. For example, adding an RDNIS gadget:
sudo gadget-rndis-os-descOther available commands include:
gadget-acm-ecm         gadget-ffs             gadget-import          gadget-ms              gadget-rndis-os-desc   gadget-uvc
gadget-export          gadget-hid             gadget-midi            gadget-printer         gadget-uac2            gadget-vid-pid-remove
For the remainder of this tutorial, the focus will be on GT (Gadget Tool).
GT utilizes scheme files containing device settings for the USB Gadget you want to create. These scheme files are stored in the directory /usr/local/etc/gt/templates and can be loaded either through the gt@ systemd service or by directly issuing the command gt load.
RNDIS
By default, the USB function of the stick is set to RNDIS, turning the USB into an Ethernet device. It is currently configured as a standard 4G dongle, providing an IP address to the connected computer and acting as a router to the 4G network (internet).
To enable RNDIS, execute the following command:
sudo gt load --path /usr/local/etc/gt/templates rndis-os-desc.schemeTo remove it
sudo gt rm -rf rndis-os-descHID
The HID functionality presents an intriguing usage scenario where the USB function can be set to HID, allowing the injection of keystrokes into the connected computer, similar to a Rubber Ducky. For now, let’s enable the USB HID gadget with the following command:
sudo gt load --path /usr/local/etc/gt/templates hid.schemeMass Storage
The stick can also function as a mass storage device for writing data. To achieve this, create a file on the stick capable of holding the data. For instance, I’ve chosen a 50MB file size using DD:
cd ~/
dd if=/dev/zero of=mass.img count=50 bs=1MB
Next, create a FAT partition on the file using fdisk. Follow these options:
$ sudo fdisk mass.imgChoose the fdisk options as follows:
Welcome to fdisk (util-linux 2.38.1).
Changes will remain in memory only, until you decide to write them.
Be careful before using the write command.

Device does not contain a recognized partition table.
Created a new DOS (MBR) disklabel with disk identifier 0x7151c4a3.

Command (m for help): o
Created a new DOS (MBR) disklabel with disk identifier 0xa758800f.

Command (m for help): n
Partition type
   p   primary (0 primary, 0 extended, 4 free)
   e   extended (container for logical partitions)
Select (default p):

Using default response p.
Partition number (1-4, default 1):
First sector (2048-102399, default 2048):
Last sector, +/-sectors or +/-size{K,M,G,T,P} (2048-102399, default 102399):

Created a new partition 1 of type 'Linux' and of size 49 MiB.

Command (m for help): t
Selected partition 1
Hex code or alias (type L to list all): c
Changed type of partition 'Linux' to 'W95 FAT32 (LBA)'.

Command (m for help): w
The partition table has been altered.
Syncing disks.
Create the FAT32 filesystem:
sudo mkfs.vfat mass.imgThen, create the mass storage device:
sudo gt load --path /usr/local/etc/gt/templates mass.schemeI’ve included a few other schemes i found online. These include
acm-ecm.scheme cdc-ecm.scheme ffs.scheme mass.scheme midi.scheme uac1.scheme uvc.scheme acm.scheme bmc.scheme ecm.scheme hid.scheme midi2.scheme rndis-os-desc.scheme uac2.schemeIt’s also possible to create your own GT schemes. Visit Collabora.com for part 1 and part 2 of their excellent tutorials on how to write your own GT schemes.
Advanced Usage
Now that we’ve covered the basics, let’s explore some more advanced examples, such as loading gadgets at startup using Systemd, creating your own USB gadgets using GT and some common traffic sniffing techniques using USB a ethernet gadget.
Systemd
GT offers the ability to load USB Gadgets at startup using their provided systemd service file called gt@. This file is located in /etc/systemd/system and can be used to enable USB gadgets at startup. By default i’ve enabled the rndis-os-desc scheme to be loaded on startup this way. It relies on the GT config file (located in /usr/local/etc/gt/gt.conf) to tell it where it can find the scheme files. When that is set, you can simply create or export a gadget in the templates directory and load it on startup by issueing
sudo systemctl gt@<usb gadget>Please note that the USB gadgets are loaded without the .scheme extension. So hid.scheme would be loaded as gt@hid
Create your own gadget
Previously i’ve showed how to load USB gadgets using GT scheme files. These files are merely just a collection of command which can just as easily be entered in sequence using the GT tool. This way you have total control on which gadget you create and when you’re finished export it to a scheme files for easy loading in the future.
Using GT let’s create a USB gadget called g1 and assign it an ECM function and config.
gt create g1
gt func create g1 ecm usb0
gt config create g1 c 1
gt config add g1 c 1 ecm usb0
We can also assign gadget attributes like vendor and product id
gt set g1 idVendor=0x1d6b idProduct=0x0104Than we can enable the gadget by issueing
gt enable g1That should have enabled the ECM gadget and make it show up on the host PC as an ethernet device. If you’d like to save your custom configuration just simply export it like so
gt save g1 ecm.schemeTor
To enhance anonymity, we’ll install Tor, allowing us to SSH into the system over Tor without revealing our actual IP address. If the stick is connected to the internet via WiFi or 4G, it automatically connects to the Tor network. To display your onion link, execute the following:
sudo cat /var/lib/tor/ssh/hostnameCopy the onion URL and log in from another PC. For instance, if the hostname is: 903jfbuvf5uxa27o3efkf6hpyugbrr5efvayycslris822lueejlkg81a, you can log in over Tor on a PC by issuing:
torify ssh user@903jfbuvf5uxa27o3efkf6hpyugbrr5efvayycslris822lueejlkg81a.onionExamples
When logged in remotely, either via Tor or SSH directly we are presented with a regular Linux terminal and we can enable any of the USB gadgets we desire. To start off i’ll enable a USB ECM ethernet device. This will show up on the host PC as a regular ethernet adapter from which we can redirect some traffic to. So let’s remove the RNDIS gadget that is created on startup and add a ECM gadget.
sudo systemctl stop gt@rndis-os-desc
sudo gt load --path /usr/local/etc/gt/templates ecm.scheme
MITM
This will activate the ECM gadget and an IP address will be assigned to the host through dnsmasq. Then we want to redirect that traffic through our stick so that we can analyse the IP traffic. For that we need to do ARP spoofing and we need a tool called Bettercap for that.
Bettercap
I’ve compiled and installed the latest version of Bettercap on my version of OpenStick. Before using it, we need to update the caplets (predefined attacks) and the user interface:
sudo bettercap -eval "caplets.update; ui.update; q"Launch Bettercap. This command will start Bettercap on interface usb0 and will also launch a web GUI on port 443. Either connect to it directly using the WAN or WiFi connection or use Tor if you want to be more anonymous
sudo bettercap -iface usb0 -caplet https-uiStart the network sniffer
net.sniff onFeel free to explore advanced features and configurations within Bettercap for a variety of network-related tasks.
TCPDump
If the stick is put into RNDIS gadget mode all traffic is routed through the stick by default. This is the whole idea behind RNDIS meaning that it will act as a router to the internet in this mode. When this mode is enabled the host PC will recognize it as a RNDIS adapter and will add it to the routing table with a lower metric than all the other router. Resulting in the default route going through the stick
In this configuration we don’t need to use ARP spoofing but we can simply listen on a specific interface (usb0 in out case) and see the traffic being sent and received. First disable the ECM gadget and enable the RNDIS gadget
sudo systemctl stop gt@ecm
sudo systemctl start gt@rndis-os-desc
Then launch tcpdump on usb0
sudo tcpdump -i usb0 -w - | socat - TCP-LISTEN:8000,reuseaddrTshark
Or if you prefer to use Tshark to capture traffic. Launch Tshark on usb0 like so
sudo tshark -i usb0 -w - | socat - TCP-LISTEN:8000,reuseaddrWhen either you launched Tcpdump or Tshark we can then launch Wireshark on the receiving end to inspect the network traffic that is routed through the stick. Launch Wireshark like so
socat TCP:<ip-address>:8000 - | wireshark -k -i -All of the prior command require a direct IP connection to the stick itself, either through WiFi or the 4G connection. In most cases you aren’t in range of the WiFi connection of the stick and most cellular providers use NAT inside their 4G network. So there is no way to connect to the stick directly. We then have two option, the first one would be a reverse SSH connection to a host which is accessible from the internet. Or, like i’ve explained earlier, incorporate the anonymity of the Tor network.
torify socat TCP:903jfbuvf5uxa27o3efkf6hpyugbrr5efvayycslris822lueejlkg81a.onion:80 - | wireshark -k -i -Rubber Ducky
Another great use case for the stick is the ability to insert keystrokes as if it we’re remotely controlled keyboard over the internet. This involves using the USB HID gadget. When the HID gadget is enabled (can support keyboard, mouse and joystick) a device is create called hidg0 in the directory /dev. Using that device we can use a script called DroidDucky to run pre defined Rubber Ducky payloads. These payload range from simple Notepad examples to full on Reverse Shell enablers. Choose one that suits your need and place it in the payloads directory.
For example purposes i’ve included a classic Rick Roll example. What this does is open up the Windows run prompt, enters a website url and goes full screen.
cd ~/ducky
sudo ./droidducky.sh payloads/rickroll.txt
Creating your own payload is also possible. Refer to the Hak5 website to see a list of available commands
Or refer to this payload repository to download a Rubber Ducky payload
Troubleshooting
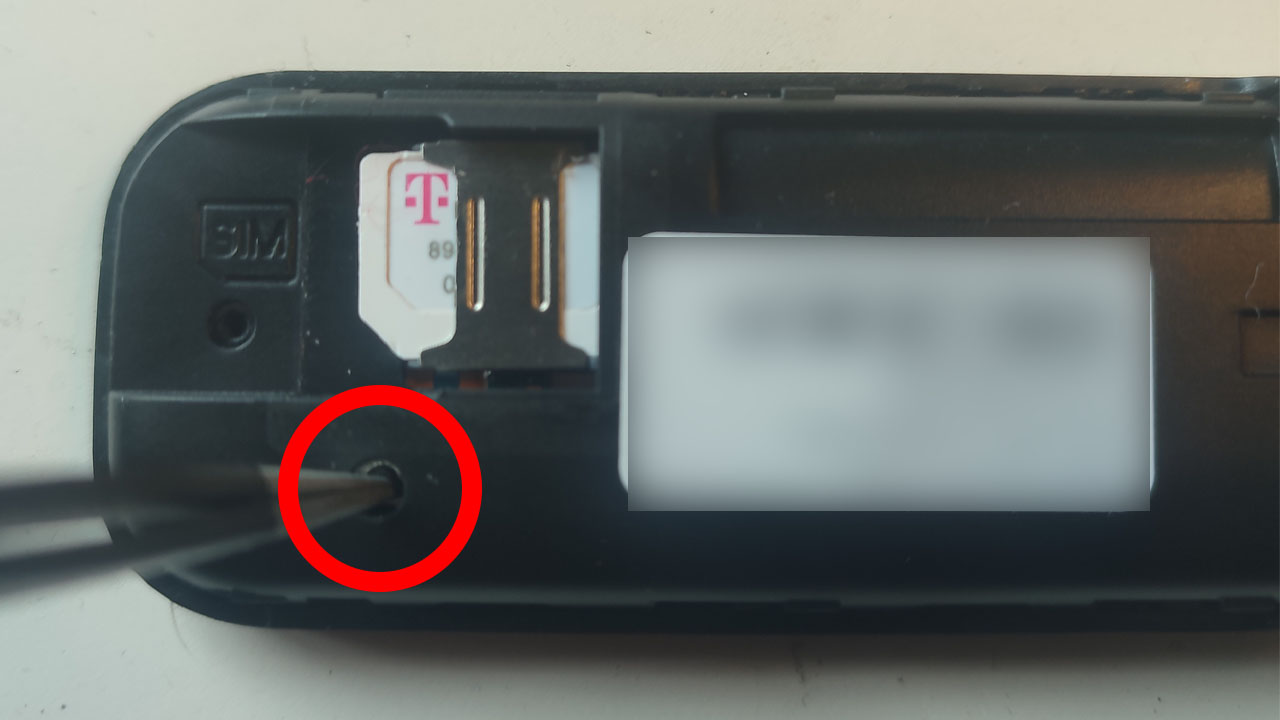
When you’ve encountered a problem either by locking yourself out of the stick or by reflashing some or all of the partitions we need to go back into EDL mode and flash the partitions we want. The current bootloader supports entering Fastboot mode by pressing the reset button on the stick. While plugging in the stick hold this button for 5 seconds
If you’ve entered Fastboot mode succesfully then you can easily enter EDL mode by issuing the following command
fastboot oem reboot-edlAfter that the stick reboots to EDL mode and we can start the recovery process from there
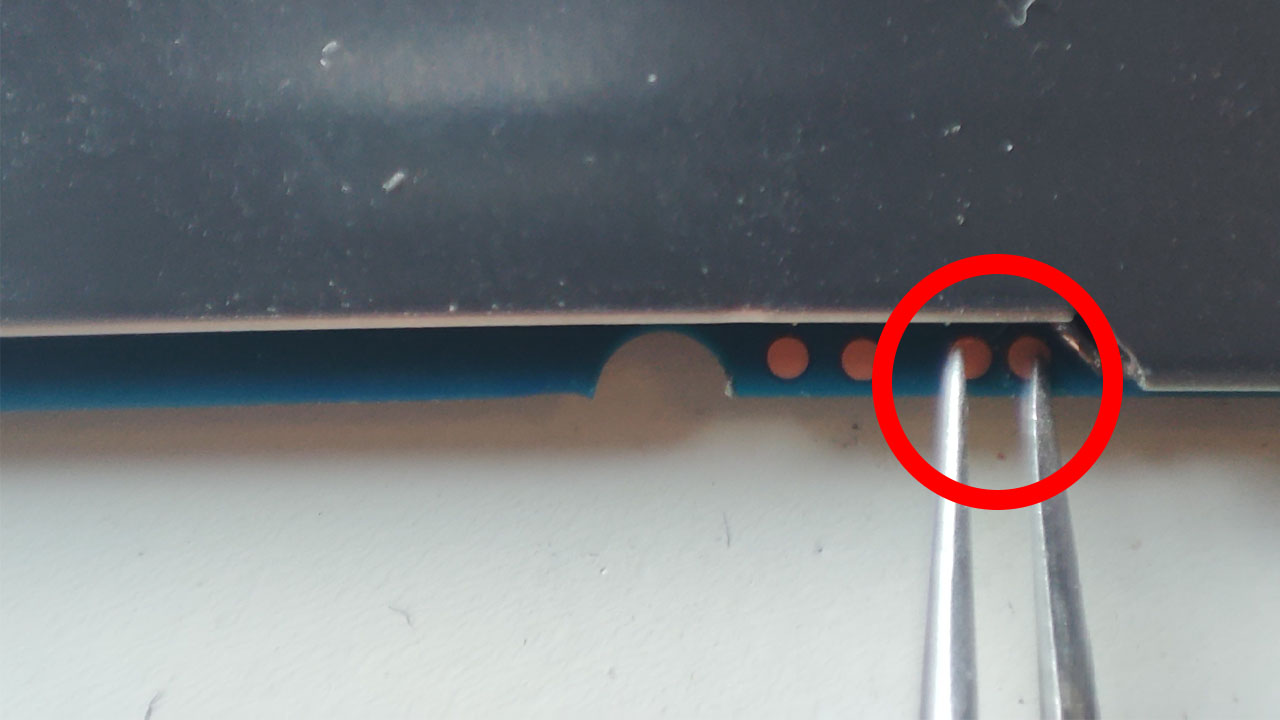
But what if that didn’t work, and the bootloader is non responsive. That we need to open up the stick and find these two headers on the PCB.
Short these two headers while plugging in the stick to a PC. EDL mode is forced and the stick can be recovered using the EDL image you created previously.
Resources
A few good resources I’ve found and based my build of OpenStick on, are:
- https://www.kancloud.cn/handsomehacker/openstick/2636505
- https://github.com/OpenStick
- https://github.com/msm8916-mainline


Hello Wim, This is very interesting. Do you have the same Debian Bookworm stock but for an UF896?. I have bought two sticks and both came as is. Thanks
It’s me again – I forgot to say – That I pushed your UZ801 Bookworm roots.img anyhow. It works nicely, but not the lte modem the stick cannot find it unfortunately. I don’t have an ADB access anymore from my PC. Is there a way to re-enable it, even if to do that I need to get rid of the RNDIS mode?. And would it be possible to know how you upgraded to Bookworm and if the recent patches related to have been used. Actually, It seems that kernel has merged the msm8916-modem-qdsp6 driver into the mainline. https://lore.kernel.org/linux-arm-msm/[email protected]/ .Thanks
Yeah, when using the UZ801 image you would have to replace the firmware in
/lib/firmware(specific for UF896) to get the modem working again. Let me check if i still have have a working UF896 Bookworm image stored somewhere.I removed ADB mode, but you could re-enable it by adding Mobian to Apt sources
deb http://repo.mobian.org/ bookworm main non-freeAnd then execute this or add it to systemd (/etc/systemd/system) to load automatically at boot
gc -a ffsmkdir -p /dev/usb-ffs/adb
mount -t functionfs adb /dev/usb-ffs/adb
adbd -D &
gc -e
To get rid of RNDIS mode, just do
gc -cor do
sudo systemctl disable gt@rndis-os-descif you want to disable rndis at boot. But be careful, because it’s currently the only way (besides the wifi hotspot) to get a connection through ssh
I’ve used the mainstream kernel for this build and it was build on 22 November 2023. So that driver would have been included.
I’ve been trying to get adb working without success. When executing the third command I get an error:
mount -t functionfs adb /dev/usb-ffs/adb
mount: /dev/usb-ffs/adb: special device adb does not exist.
dmesg(1) may have more information after failed mount system call.
and it fails again on the last command:
gc -e
failed to enable gadget!
Is there a particular reason why you decided to remove adb mode? I wonder if I should leave it as it is.
Hello,
Thank you for the beautiful guide.
I tried to install Rasp ap post step but it keep failing, my purpose to use rasp ap to configure VPN through browser.
Request you to help here.
Thank you in advance.
Haven’t used RaspAP myself, but it looks like it could work. What is the problem you encounter when installing ?
UI comes blank, also it changes the IP and locks me out.
I even tried manual install but still same issue.
I even tried to avoid configurations steps and start directly from (as advised by the developer of rasp ap) but still same issue
https://docs.raspap.com/manual/#install-packages
If we have rasp ap working on it, then it’ll be replacement to the openwrt and will be helpful to the community.
for most of the users, openwrt is easy way to configure VPNs on the router, making it perfect inexpensive travel router.
Alright, did some little digging around RaspAP. I think the easiest way to go about this is by disabling a few options I’ve configured by default that could cause an issue when creating an AP and/or assigning IP addresses. First disable the hotspot
nmcli connection delete hotspot
Then connect to your wireless network
nmcli dev wifi connect your-ssid password “your-password”
Comment out the dnsmasq options I’ve set in /etc/dnsmasq.conf (at the very bottom)
Then reboot and connect to the stick through wifi (lookup it’s new IP address in the DHCP table of your router)
Run the RaspAP installer again
Hey! First of all, thank you for your work. Unfortunately, I have several other versions of this stick (and none of them is UZ801), and I’m trying to install OpenStick on them. When I use your image, device drops into fastboot mode right after the installation (I think it might have less disk space than needed and rootfs is not written properly). If I use the basic Openstick image from Github, I have no problem with the installation but modem is in the failed state. The question is, how do I debug these issues, and add support for another version?
I think i’d might extend this tutorial a bit on howto create a chroot environment. From there you can create your own custom version like i did. But for hardware support i should work as the kernel is the same. Most likely the device tree is the problem here and the mappings on the sticks are different.
Same for me stuck in fastboot !
Any idea how to proper flash ?
Oh, and I forgot to add: replacing bins in /lib/firmware has no effect, and installing just the boot.img from uz801 puts the device in a boot loop.
Hey Wim, this is an awesome guide on an unknown device, easy to follow and understand!. I have the dongle UZ801 V2.1 working. However, It would be great if how you could do a guide on how to make the custom Debian Bookworm image for the dongle.
Man, I love all the security tutorials, please keep the good work going!
Already on the todo list. Shouldn’t be that hard to write up, but i have to find the time and also finish my new Proxmox script first.
This is a very helpful guide that fills in some of the spots missed by others out there. Thanks. I succeeded in getting all the way to a booting Debian system, but the modem has issues with something in the config I think. I’m getting this spamming the system journal about 20 times a second:
“`
[modem0] couldn’t enable interface: ‘Couldn’t set operating mode: QMI protocol error (52): ‘DeviceNotReady”
Nov 10 04:05:26 openstick ModemManager[253]: [modem0] state changed (enabling -> disabled)
Nov 10 04:05:26 openstick NetworkManager[249]: [1699585526.9441] device (wwan0qmi0): state change: prepare -> disconnected (reason ‘user-requested’, sys-iface-state: ‘managed’)
Nov 10 04:05:26 openstick NetworkManager[249]: [1699585526.9489] manager: NetworkManager state is now CONNECTED_LOCAL
Nov 10 04:05:26 openstick NetworkManager[249]: [1699585526.9536] policy: auto-activating connection ‘lte’ (a52290d2-a5a8-4903-b44d-158f960f3825)
Nov 10 04:05:26 openstick NetworkManager[249]: [1699585526.9582] device (wwan0qmi0): Activation: starting connection ‘lte’ (a52290d2-a5a8-4903-b44d-158f960f3825)
Nov 10 04:05:26 openstick NetworkManager[249]: [1699585526.9590] device (wwan0qmi0): state change: disconnected -> prepare (reason ‘none’, sys-iface-state: ‘managed’)
Nov 10 04:05:26 openstick NetworkManager[249]: [1699585526.9620] manager: NetworkManager state is now CONNECTING
Nov 10 04:05:26 openstick NetworkManager[249]: [1699585526.9639] device (wwan0qmi0): state change: prepare -> need-auth (reason ‘none’, sys-iface-state: ‘managed’)
Nov 10 04:05:26 openstick ModemManager[253]: [modem0] simple connect started…
Nov 10 04:05:26 openstick ModemManager[253]: [modem0] simple connect state (3/10): enable
Nov 10 04:05:26 openstick ModemManager[253]: [modem0] state changed (disabled -> enabling)
Nov 10 04:05:26 openstick NetworkManager[249]: [1699585526.9731] device (wwan0qmi0): state change: need-auth -> prepare (reason ‘none’, sys-iface-state: ‘managed’)
“`
I feel like it’s probably something simple, but I’m just diving into the ModemManager space and am still working off internet guides.
Which stick do you have ?
It would seem that I have a V1 board, vs a V3.0 or V3.2. That may be my problem. Can you point me in the direction I should be googling to solve this?
UZ801 V1
This looks like the same vague 4G issues i’ve had with the UF896 version of the stick. For some reason it kept disconnecting. Thinking it has something to do with the 4G firmware (in /lib/firmware) but wasn’t able to resolve that on my UF896 as well. The UZ801 v3.0 just worked, as in a very stable 4G connection
I was mistaken, I actually have UZ801 V3.0 boards. I’m in Africa, maybe I need a different mcfg_sw.mbn file?
Seeing a similar issue here with UZ801 v3.2. The modem times out when registering with the network and repeats over and over again. I replaced the firmware files with a v3.2 dump but it didn’t make any difference. I also tried to manually specify a longer timeout, but then the error changes to ‘network timeout’. Sadly looks like something has changed on this version of the board!
Finally got it to work. Needed to replace /lib/firmware files with the ones in the modem.bin partition. Next question is about routing. How would I route traffic from all clients connected to wifi or RNDIS to the network connection provided by wwan0?
Seems like that is working by default, and I can alter the ip routing table as needed. However, I am running into the problem of wireless clients not being able to see each other on the network. Everyone has internet and can ping the openstick device, but it’s like client isolation is turned on somehow. Any ideas?
Hi, maybe you can help me a little, can’t install wireguard, since it’s not in kernel( what should i do to get it?
Just stumbled upon your page after someone (Morty perhaps?) asked for help on getting Wireguard to run on your firmware image. I have experimented with these sticks and have a couple of UZ801 v3.0s, one running Debian bullseye, other with stock software to use as source for firmwares, configs, etc.
Some technical info about how you put your firmware image together would be helpful.
I see the kernel is based on 6.7 msm8916 mainline. Can you share the kernel source/config/dts you used ? Last time I’ve tried a 6.7-rc kernel from msm8916 mainline tree on my UZ801 v3.0, it resulted in a bootloop.
Also, in your blogpost, you forgot to mention the possibility of connecting external devices to the stick via OTG mode (that is, acting as a USB host instead of a gadget). I have tried this mode using an USB A Y-cable (using the power-only plug for power) with a USB gender-changer and it does work fine. I have a card reader connected with a 32GB card inserted for extra storage.
Already started working on a blogpost on how to setup your own build environment, but due to other activities (Proxmox vGPU script mainly and regular work) didn’t find the time to finish that. But will do soon.
Host mode is a great idea, but i haven’t had any practical use for it so i didn’t include it the blogpost. Maybe you could contact me and i’ll include that as well. Wireguard should be quite easy to set up, don’t know if i would include it in this post though, wrote a complete other article about how to set that up on any device. (linux included)
Hi Wim, I am really keen to get USB host mode up and running for my project. I’ve made a Y + power cable but I can’t seem to set the mode to enable OTG. Is there any way you could update your image with CONFIG_USB_OTG_FSM set so that the USB mode can be altered? Or please share your build process, it would be amazing to be able to start with you image configuration and build new kernels for this thing.
Hi. I was also struggling with making the OTG role switching work, but I finally found the problem. CONFIG_USB_OTG_FSM is not actually needed for the usb role switching. If you take a look at Handsomeyinyang’s kernel config, it isn’t set there either. The official openstick debian version has the /sys/kernel/debug/usb/ci_hdrc.0/role setting, so why doesn’t this version have it?
The answer is, that role setting actually existed in two places up until recently, and the redundant setting was patched out.
Take a look at this:
https://patches.linaro.org/project/linux-usb/patch/[email protected]/
So you CAN find the role setting in wvthoog’s version, and you can switch the usb role:
/sys/devices/platform/soc@0/xxxxxxxx.usb/ci_hdrc.0/role
Maaate! That’s awesome, thank you so much for telling us how to do it 🙂
I’ve spent a lot of time on this problem over the past few weeks (and learned a lot in the process) but this is a great easy way to make it happen.
I asked because [#] ip link add wg0-client type wireguard
Error: Unknown device type.
Unable to access interface: Protocol not supported
There is no such kernel module for Wireguard in your Debian image.
Really ? Since it’s just a normal Bookworm installation i would expected it to just work and that sudo apt install wireguard would install the kmod as well.
Unfortunately it doesn’t install that easily, I’ve gone to zerotier for now, it installed there easily and without problems. So for now I’ll wait for a guide on custom Debian Bookworm image for the dongle. Thanks again for your guide. By the way, if you need it, I made the shell for the convenience of remote work with this device, I did it for the sake of turning it into something similar to lte proxy, only via VPN. I don’t know who needs it except me, but if someone needs it, please write here, I’ll upload somewhere.
Hi. Thanks for the comprehensive instructions. I was trying to download the openstick software ( wget https://download.wvthoog.nl/openstick-uz801-v3.0.zip ), but it is not found.
Resolving download.wvthoog.nl (download.wvthoog.nl)… 62.131.110.203
Connecting to download.wvthoog.nl (download.wvthoog.nl)|62.131.110.203|:80… failed: No route to host.
I tried from 2 different sources.
Is it possible you could make it available again?
That is an error on my side. Changed my network config and need to add port forwarding. Will do that tonight
Hi again. The behaviour has changed so I assume you have been working on your network configuration. If this is not the case I do apologize for jumping the gun here.
wget will now find a route and try the operation up to 20 trimes before giving up. It says the connection timed out.
–2024-07-05 08:21:02– (try:19) https://download.wvthoog.nl/openstick-uz801-v3.0.zip
Connecting to download.wvthoog.nl (download.wvthoog.nl)|62.131.110.203|:443… failed: Connection timed out.
Retrying.
–2024-07-05 08:23:21– (try:20) https://download.wvthoog.nl/openstick-uz801-v3.0.zip
Connecting to download.wvthoog.nl (download.wvthoog.nl)|62.131.110.203|:443… failed: Connection timed out.
Giving up.
Hi Wim.
The behaviour for the download link has changed, but I am still unable to obtain the file. The operation times out. Would you be able to look into that once you find the time?
wget https://download.wvthoog.nl/openstick-uz801-v3.0.zip
–2024-07-08 07:56:10– https://download.wvthoog.nl/openstick-uz801-v3.0.zip
Resolving download.wvthoog.nl (download.wvthoog.nl)… 62.131.110.203
Connecting to download.wvthoog.nl (download.wvthoog.nl)|62.131.110.203|:443… failed: Connection timed out.
Retrying.
–2024-07-08 07:58:22– (try: 2) https://download.wvthoog.nl/openstick-uz801-v3.0.zip
Connecting to download.wvthoog.nl (download.wvthoog.nl)|62.131.110.203|:443…
Trying to download the OpenStick zip file you link to, and is not working. Is there another source?
Do you have other source for the zip file? as I still cannot access it.
I’ve temperately created this link until i fix my network and reverse proxy
Thank you
The new link has stopped working as well. Could you share the openstick-v3 file via dropbox, box, google share, or onedrive?
The original link is back up
Thank you, will install later today.
BTW, I am interested in getting GPS working but hardware info on the MSM8916 is very hard to find. That said did find a schematic for a Samsung SM-G357FZ which uses this chip on the FCC site (https://fccid.io/A3LSMG357FZ/Schematics/Schematics-2357112.pdf) and it appears all that is needed is an antenna, a GPS amplifier and a good bit of luck that the pin on the MSM8916 has been taken out to a pad somewhere. But I suspect adding a GPS module to the UART may be the easy option 🙂
Hey Wim, first of all awesome article!
Sadly the download link seems to be down again, could you be so kind to upload the firmware on a temporary drive?
In debian/openwrt, Is there a way to change the imei ?
I’ve tried to do that on my first stick (overwritten my IMEI by accident) using some Qualcomm tools, but wasn’t successful
yep, imei changing working fine with at+wrimei=111122223333555at+wrimei2=111122223333555
Thank you your image works great!
Did you build your own kernel?
I wanted to enable host mode on the USB port but I believe it needs CONFIG_USB_OTG_FSM set in the kernel (not set in your kernel).
Once built with the above flag a /sys/kernel/debug/usb/ci_hdrc.0/role virtual file should exist.
Then to enable host mode:
echo host > /sys/kernel/debug/usb/ci_hdrc.0/role
and to disable:
echo gadget > /sys/kernel/debug/usb/ci_hdrc.0/role
I decided connecting a GPS module via the USB port would be the easiest option as the UART on the Openstick is only 1.3V compatible and all the GPS modules I have are a minimum of 3.3V. Thankfully some of the GPS modules have a USB port in addition to UART outputs. So if I can get host mode working this should be a breeze 🙂
Guess I will need to setup a cross compile environment for ARM.
Well I can build and flash a new kernel (V6.10.0) but I have been unable to expose the virtual /sys/kernel/debug/usb/ci_hdrc.0/role file even with the CONFIG_USB_OTG_FSM flag set.
The device tree I am using looks like it has USB role support and the kernel options seem OK but I must be missing something. I have spent way more time than I should have on this one feature so I have decided to give up trying to enable USB host mode and just connect a GPS to the stick via WiFi using an ESP8266.
Hey arsome work! Is there a posible to use the Bluetooth on the soc? With Bluetoothctl the Stick does not discover anything.
Been a while when i’ve worked on this stick, but if i remember correctly the SoC is either Wifi or Bluetooth.
Did you know how i can test this? Where are your Informations from? is there an datasheet or so?
Hi, your link to the zip file is down.
Do you have a link to the kernel source that you’ve used for this image?
Original link in blog post is back up as of 9 Aug.
how do i disable the led lights?
Do:
echo -n 0 > /sys/class/leds/red\:power/brightness
echo -n 0 > /sys/class/leds/blue\:wan/brightness
echo -n 0 > /sys/class/leds/green\:wlan/brightness
Thank you for the tutorial, I have a 4G-UFI-xx key that I modified with your firmware. I can access it via ssh but I can’t get the modem to work.
nmcli device gives wwan0qmi0 gsm connecting (need authentication) modem
then disconnected.
mmcli -m 0 gives
state disabled (in status)
What is the problem ?
I have the same problem. What part of the world are you in? Can you verify what is printed on the board and what does Firmware Revision (in mmcli -m 0) say? Mine says UZ801_V01R01B08 but the board is printed UZ801_V03.
Thank-you for this anser, I am in France and the firmware revision: UZ801_V01R01B08 and my board is printed FY_UZ801_V3.2
I got one step further. Key was copying the files from the modem partition to the /lib/firmware folder. I assumed they were the same as the image provided above, since file sizes were the same, but not true. now my firmware revision says UZ801_V3.0_21_V01R01B10
Thanks for the blog, but image download doesn´t work again, any alternatives?
https://drive.google.com/file/d/1mmRcLlExH5Yd8gsq7p6L6FvghhBvX3A3 is the same file that he is/was hosting. I’ve used it for multiple flashes.
I affraid this one doesn’t work either
Can openstick-uz801-v3.0.zip be used on uz801 v3.2?
thanks for the writeup! can you reveal which loader you used to dump the original firmware with the edl tool? its not working for me with the default loader selected, neither with the default msm8916 loaders…
I notice using your image that available RAM shows as 390MB. Where did the rest of the 512MB go?
System need Ram.
On the other hand, I’m stuck at “Key was copying the files from the modem partition to the /lib/firmware folder.”
How to extract all files from modem partition?
My UZ801 is FY_UZ801_V3.2 on board, as Baville user said.
This WAS the android data info:
Model number
UZ801
Processor info
Qualcomm Technologies, Inc MSM8916
Android version
4.4.4
Baseband version
N958St_Z85_CN_JSXPH1IDN1H213
Kernel version
3.10.28
user17@cf4c1a952808 #1
Fri Apr 26 17:53:41 CST 2024
Build number
V2.3.11
—-
Now I’ve flashed this debian.
Could you please help me?
Did you follow the instructions and dump all the partitions before flashing the debian image? If so, one of those partitions is modem.bin. You need to mount that image and then copy the files over to /lib/firmware on the stick. go here for some more detail (my notes for flashing) blog.ltzs.us
Oh, Andrew:
I ran a lot with the dongle, tried openstick, openwrt, everything. I’m on android again, trying to debug everything, comparing my stock firmware with other people’s -different- stock firmware, trying to make the dongle secure (I got it rooted from the factory, seems reckless to me) …..
I finally found your website and your GitHub. I might contact you later, while I’ll continue to focus on doing a full debug this already-rooted-stock firm.
I thank you too for all the experience you have on this dongle that you also share with others.
Thanks.
Alexandr.
P.S. THANKS for uploading this openStick firm to your Google Drive.
Andrew I was trying to review your notes on flashing but the blog.Itzs.us is giving me 404 errors.
It seems based on your posts here you have solved the same problems I am having.
Hello I have tried this and it works all the way until “sudo mmcli -m 0” I get timeout after 90 seconds.
I have tried other SIM providers and confirmed the SIMS are active and I have the correct APN. I cannot seem to get the device to gain access to LTE network with any SIM. Is there any suggestions?
Debian installed fine and I can manipulate all other functions
Hello,
can you please restore wget link or any other hosting link to download the firmware openstick-uz801-v3.0.zip?
Many thanks
Hello,
can you please restore wget link or any other hosting link to download the firlmware openstick-uz801-v3.0.zip?
Many thanks
Hello, dear! The link really doesn’t work. Please duplicate it to another resource! Thanks!
Hi, could you please restore link for openstick-uz801-v3.0.zip?
Just restored the link
Thanks! The link is working!
Many Thanks!
Thanks. Working fine.
Hello, I tried to download wget https://download.wvthoog.nl/openstick-uz801-v3.0.zip – but it does not seem to work. Can you help?
Hi, I just wanted to try your version. But the Link is dead. Could you please restore the link or upload it to GitHub or so? Thanks for your awesome work 🙂
Yeah, i’m going to upload it to another site. My Nextcloud server (which hosts this file) has some serious stability issues. For now the link is up again, will update the new link to another site (Github probably soon)
<3
Thanks
Thanks for that Wim! Wondered if you ever managed to finish the post on how to build the image? It would be great to be able to customize it a bit (and be able to change the kernel config).
Secondly, does anyone know by any chance what the 4 pads on the other side of the board from RX/TX/ECL are? I would love to have i2c, either as a proper i2c (that would be fantastic) or potentially through i2c-gpio (I could potentially use the LED gpio…). Trying to figure out how many GPIO are potentially available.
I see:
– 3 GPIO for the LEDs
– Maybe some GPIO on the test pads on the opposite side of RX/TX/ECL?
– Maybe some GPIO or bus on the pads of the 3 unsoldered 8 pin component at the back. Two side-by-side ~close to the usb connector, one small one big and another one under the sim tray
I stopped writing up the blog post at about 50% finished because of other ongoing projects. If this still is something people are interested in i’d might finish it
Definitely still interested on my end…
I´ve been waiting for it too!
Yes I’m also very interested in this topic. The device has a lot of potential.
I’m also very interested, especially enabling wireguard would make sense for me.
@Wim: Could it help to setup an online donation for you, to rise up the priority -:) ?
Robert
There is a PayPal donate button at the bottom of the page 😉 I think opening this project up again, and write up the tutorial should take me about 2 days.
Hi, in German: “Wer lesen kann, ist klar im Vorteil” like: “Who is able to read, has clear advantages”… 🙁
I will make a donation for this tutorial when it’s published.
Definitely interested. Thanks for sharing the knowledge.
I’ve got everything working, LTE connects well ( firmware revision: UZ801_V3.0_21_V01R01B10 transferred from the stock F/W) and also the WiFi and I’m super happy to have such a powerful system in such a small and cheap form factor.
The only problem now is that even with active cooling and a very strong USB power supply and with minimum CPU load, the system freezes without warning after about 2 hours of use. After a power cycle, everything seems normal again.
Does anyone have any ideas on how I could track down what the issue is, and how it could be fixed?
I think I’ve figured it out. There was a comment about cores being disabled in the stock firmware in this git repo: https://github.com/AlienWolfX/UZ801-USB_MODEM and I wonder if the voltage regulators for the SoC are a bit underpowered and can’t drive 4 cores. I’ve disabled 3 of the 4 cores with “echo 0 | sudo tee /sys/devices/system/cpu/cpu3/online” and now it hasn’t crashed after almost 4 hours. I’m going to leave it going overnight and then try enabling a second core.
It’s perfectly stable running on a single core, but as soon as I enabled a second one it was back to crashing. So there is some issue with multi processor support, but it’s great that I can rely on it now with all the features it otherwise has. Thank you for the information in this post so far, it’s been extremely helpful.
Very odd. I also have multiple UZ801 sticks with the same debian image flashed. I’ve been running Tailscale 24/7 on one of them for a month now, and it has not crashed once.
I also loaded the CPU very heavily with ffmpeg when I first got it out of curiosity, and it definitely started throttling, making the shell unresponsive, but it didn’t crash the kernel or anything like that.
Did you find anything in /var/log/syslog ? It could be faulty hardware, or maybe there are multiple revisions of the UZ801 board, and the voltage regulators have different specs?
Hi Mike,
How good is your USB 5v power and cable.
Some cheap cables drop the voltage with even small loads.
Do you happen to have a discord?
I do, but haven’t done much with it yet
Discord
Can we upgrade the kernel to 6.17? I tried my best to compile the kernel myself, but I broke like 4 sticks trying to solder the Serial console.. so i can never really figure out the errors if any.. and none of my builds booted so far
Can stick be used as an usb host or does it have pins that can be used for serial io?
Then I could use it for a datalogger.
The latest release https://github.com/LongQT-sea/OpenStick-Builder/releases includes a systemd service called msm8916-usb-gadget. You can switch to USB host mode by disabling this service.
Do you know if it is possible to expose the modem as a serial device on USB possibly by using GT?
I want to send SMS using AT commands.
If it is possible then I will educate myself further from this and other posts to try and do it.
I have UZ801-V3.2.
Check out LongQT-sea’s github. He has reworked the image and might have some insight into this. https://github.com/LongQT-sea/OpenStick-Builder/releases/tag/v1.0
Thanks Andrew. I will have a look.
The latest release https://github.com/LongQT-sea/OpenStick-Builder/releases includes the /etc/msm8916-usb-gadget.conf file.
You can edit this file and then restart the msm8916-usb-gadget service to enable two ACM serial ports.
After that, use socat to create a bidirectional bridge between the modem AT port (/dev/wwan0at0) and the USB serial gadget port (/dev/ttyGS1).
Problem with qBittorrent: after installation, the system starts freezing after some time, and one CPU core gets loaded to 100%. The issue persists even after completely removing qBittorrent, which suggests there might be problems with dependencies or components that remain in the system.
Has anyone encountered a similar situation?
UZ801 v3.0:
1. Somehow got stuck and bricked, lsusb gave no device anymore. Solved by pushing reset button 5 seconds while inserting stick.
2. No connection using 4g modem, solved by restoring original modem.bin files (as written bij Paul).
I love this project, it makes old devices live even longer. Thank you so much for sharing!
For years I have such a 4G-LTE-Wifi-Modem which stopped working eventually but I kept it. Maybe it’s pretty old because the circuit board has “FY_UZ801_V1.1” written on it.
Do you perhaps have such a device and a backup of the memory so that I can breathe new life into mine? (I can boot it into EDL and [this tool](https://github.com/bkerler/edl)) communicates just fine with it.
Thanks in advance!
kind regards
Chris
Hi Chris,
I have a 4GB dump of the whole NAND, you can have it if you need it. Please reply to this message if you still need that image.
Hi! Can you share it please? Also with instructions to restore the image. Thanks!
Here you go. I’ve included the partition table (gpt)
The full dump, as well as the individual partition dumps
This is a fantastic article, thank you. I am all the way up and running with LTE modem working on V3.2, good connection to the internet and can also send and receive SMS. I have mmcli and qmicli both working but would really love a DIAG port for the modem, do you know if this is possible from a Debian installation? (Frustratingly it works straight away over usb/ADB when in stock android ROM before flashing.)
Looking around in /dev, it has rpmesg_ctrl2, wwan0at0,wwan0at1,wwan0qmi0 but nothing that can take a DIAG connection. My mind always thinks usb-composition at this point but the qmicli method–gas-dms-get-usb-composition fails with QMI protocol error (31): ‘InvalidServiceType’
ModemManager reports:
device and plugin as qcom-soc, drivers as: rpmsg_ctrl, com-q6v5-mss, bam-dmux
Any ideas would be great, this is a level beyond my usual linux experience. Thanks.
Hi Tom, if you figure it out please let me know.
I’m working on turning the device into a Rayhunter-type thing.
Actually, I am now done porting the real Rayhunter to it 🙂
https://github.com/efforg/rayhunter
Hi, Great project! I just installed this and all is working perfectly. The one thing that could be improved is the iwd support instead of wpa_supplicant. Unfortunately, kernel need to be rebuild with proper modules/options as otherwise it will not start at all…. eg:
CONFIG_CRYPTO_USER_API_HASH=m
CONFIG_CRYPTO_USER_API_SKCIPHER=m
CONFIG_CRYPTO_HMAC=y
CONFIG_CRYPTO_MD5=m
CONFIG_CRYPTO_CBC=y
CONFIG_CRYPTO_ECB=y
CONFIG_CRYPTO_DES=m
CONFIG_KEY_DH_OPERATIONS=m
Hi and thanks for writing this down… I have been playing with PostmarketOS on my Nexus 5 but not super-happy about it and I thought I will give this USB Stick a go. I got “a version” on Ali, with the MSM8916 chipset (checked by opening the casing) and initially I had issues getting it into EDL at all (it did only boot to fastboot but EDL couldn’t find it, no matter what I’ve tried)
Then I just thought, yolo. I have tried your modified `flash.sh` and it did flash everything but in the end it does not seem to boot. I can still see it in fastboot, and `fastboot oem reboot-edl` now actually works, so I can backup things (which I already overwrote lol)
I think the HW version is just different or something, and that is why it won’t boot at all. I can see UF 02 V05 on the PCB but can’t find anything like that in Handsome Yingyang’s repo, so I guess I am out of luck.
Mental note: I was able to restore the dongle using the dump from https://github.com/OpenStick/OpenStick/issues/59. I have used the `debian` dump which had bullseye installed.
what wifi?
I need WPA3 , no WEP!
Hi — I have the same problem with the dongle staying in fastboot after installation. I managed to boot the OS with the command “fastboot continue”. Ethernet and Wi‑Fi seem to work correctly. Any suggestions to fix the problem?
Hello. I purchased the USB 4G LTE modem (3in1), and was not able to get it connect to US carriers on Band 5. I tried to reflash the dongle with “openstick-uz801-v3.0”. The flashing went perfectly fine, but now the stick will not boot at all, just signal bars LED keeps blinking. I backed up the stock firmware, but I don’t know how to flash it back, since I can’t connect using ADB. The stick has board “FY_UX801_3.2”. Is it possible to get it working? Thanks.
In my previous post I made a mistake. The correct name of the board is ““FY_UZ801_V3.2”.
I take back, that stick is not working. I was able to ssh to it and try to set up LTE parameters. The SIM is detected, but it will not activate. it shows:
lock: sim-pin2
| unlock retries: sim-pin (3), sim-puk (10), sim-pin2 (3), sim-puk2 (10)
| state: disabled
| power state: off
I don’t know what sim-pin2 is and where to get it from. I use Simbase SIM card, that is supposed to be unbranded to any carrier, and is controlled by user panel in Simbase account. Simbase requires “Roaming” to be enabled, but I don’t see such option on the stick’s menu.
did you backup individual partitions or whole image? which of these commands did you use to backup?
edl rf uz801-stock.bin
edl rl uz801_stock –genxml
Thank you very much for your great work. I am very dumb in linux and I will be glad if you can help me. Devices connected to the wifi hotspot can’t communicate with each other. The connected devices get internet through the hotspot. But there is wlan0 -wlan0 communication.
Hi thanks for the articles,
I have ran debian successfully on fy_uz801_v1.1 but it couldnt detect sdcard. I did some research and saw that “mmc@7864900” in device tree source(dts) need to be okay. However, I spent a while trying to edit dts and rebuild the boot.img, and in the end I couldn’t. Could you pls give some assistances?
Thanks